报错总结
下面报错还没有好的解决方法,
django.db.migrations.exceptions.InconsistentMigrationHistory: Migration admin.0001_initial is applied before its dependency account.0001_initial on database 'default'.
如果makemigration 遇见这样报错,用户自定义模型造成的,
1.备份数据库
2.删除数据库,
3.创建数据库
4.在migrations
5.恢复备份
总结:如果提前恢复备份还是会报错
找到解决办法
1.备份数据库
2.删除数据库,
3.创建数据库
4.在migrate
5.把sql备份表的migration删除了
DROPTABLEIFEXISTS`django_migrations`;
/*!40000ALTERTABLE`django_migrations`DISABLEKEYS*/;
6.导入sql表,再migrate就不会报错了,发现原因数据库原因
source C:\Users\yys53\OneDrive\sql\33333.sql
Can't execute the given command because you have active locked tables or an active transaction
意思是当一个连接在一个表上显示持有锁,那么这个连接不能做 DELAYED, CREATE TABLE, CREATE TABLE ... LIKE, and DDL ,包括存储过程,视图(触发器除外)。使用下面命令解决
unlock tables;
找到原因:因为远程备份mysqldump自己电脑导致
(1452, 'Cannot add or update a child row: a foreign key constraint fails (`mxproject`.`django_admin_log`, CONSTRAINT `django_admin_log_user_id_c564eba6_fk_auth_user_id` FOREIGN KEY (`user_id`) REFERENCES `auth_user` (`id`))')
在settings.pymysql设置值添加
DATABASES = {
    'default': {

        'OPTIONS': {
                    # 取消外键的检查(admin后台添加或删除数据会报错)
                    "init_command": "SET foreign_key_checks = 0;",
                    }
    }
}
Exception ignored in: <function UiAutomatr.__del__ at 0x0D533C48>
Traceback (most recent call last):
  File "C:/Users/yys53/OneDrive/python/bestscript/UIAutomator.py", line 47, in __del__
  File "C:/Users/yys53/OneDrive/python/bestscript/UIAutomator.py", line 191, in console_input
  File "C:\Users\yys53\OneDrive\python\install\lib\os.py", line 985, in popen
ImportError: sys.meta_path is None, Python is likely shutting down
解决了,但是不确定真正原因,猜测可能不能太多函数写入(if __name__ == '__main__':)下面,添加一个类就好了
5.安装opencv-python报错ModuleNotFoundError: No module named ‘skbuild‘
sudo apt install cmake
pip3 install scikit-build
6.安装opencv-pythonRunning setup.py bdist_wheel for opencv-python ...
要升级pip不然等半小时安装
sudo pip3 install --upgrade pip
去/blog/vim __init__.py 改称对应版本,1.4.0
import pymysql

pymysql.install_as_MySQLdb()

pymysql.version_info = (1, 4, 0, "final", 0)
~
8. python opencv ImportError: libGL.so.1: cannot open shared object file: No such file or directory
在centos安装好opencv后,报错:ImportError: libGL.so.1: cannot open shared object file: No such file or directory,
解法:
yum install mesa-libGL.x86_64
9.CentOS下yum命令报错File contains no section headers. file: file:///etc/yum.repos.d/ 出现:file://mnt 的问题
在使用yum命令执行安装指令时,报错File contains no section headers. file: file:///etc/yum.repos.d/
以及出现 file:///mnt
原因是配置中没有配置yum源
yum 的一切配置信息都储存在yum.repos.d 的目录下
操作:
cd /etc/yum.repos.d
rm -rf ./* #删除所有文件
ls #查看是否有文件,要确保没有其他文件
vim CentOS7.repos
[CentOS7]
name = CentOS-service
baseurl = file:///mnt
enabled = 1
gpgcheck = 0					#结束,按下ESC,输入:wq,回车
yum clean all
能查看到许多的文件包,说明没问题
yum list
10.centos7 报错except KeyboardInterrupt, e:
vim /usr/bin/yum
之前为了方便将python默认的解释器设为了python3.7,导致按python3.7解析2.7的语法出错了,修改第一行为python2.7
#!/usr/bin/python2.7
11.pyttsx3 TypeError: item 1 in _argtypes_ passes a union by value, which is un
安装python2.71版
pip install pyttsx3==2.71
12.django的migrate报错1050, Table django_content_type already exists
Django的默认数据库表中有两张特别重要的表,一个是django_migration,另一个就是django_content_type。前者记录了django工程中每一个已注册app下的migrations目录下执行python manage.py makemigration生成的initial文件和app的关系,用于django来根据对应的initial文件生成sql语句操作数据库表;而后者则是一个记录已经initial过的app的相关信息。
我本次出现这种错误的原因在于,我修改了已经创建的数据库表的名字,然后忘了删除已经存在的intial文件,导致每次migrate的时候都提示no migration apply,然后我就去库里把django_migrations清空了,然后由于django_content_type已经保存了执行过initital的记录,结果验证出错了,因为是现在django_migrations是空的。
解决办法也很简单:
不需要删除文件
1.
python manage.py makemigrations
2.执行python manage.py migrate --fake; # 这个会重新构建django_migrations表中的数据
python manage.py migrate --fake
3.去django_migrations表中删除没有生效的那么app对应的记录,
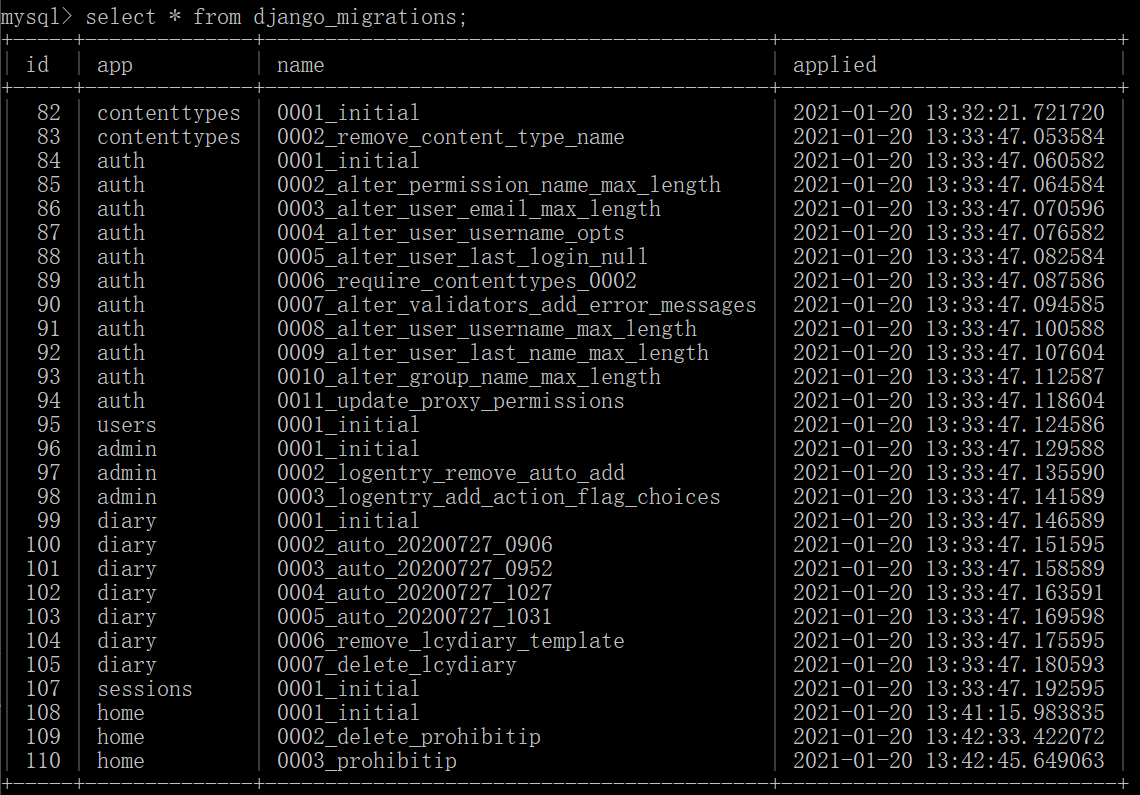
delete from django_migrations where id = 110;
注意:如上所示不能删除108那条(这条是model.py所有的表,如果只有一张表可以删除的,若多张表,会报错其他表已存在),删除110那条,
如果没有110,删除models.py的ProhibitIP的表,然后执行1和2不,再在models.py下添加prohibitip表,执行1和2步,会出现110那条,然后删除那条,执行migrate(只有删除类似110条的才可以用低5步)
4.
python manage.py migrate
13.centos的 adb 卡住 NoneType object has no attribute dump_hierarchy
ps -ef | grep adb
# 杀掉adb的程序
kill -9 3430865
14.centos python opencv报错libGL.so.1: cannot open shared object file: No such file or directory
Traceback (most recent call last):
File "UIAutomator.py", line 10, in <module>
import cv2 as cv
File "/usr/local/lib64/python3.6/site-packages/cv2/__init__.py", line 5, in <module>
from .cv2 import *
ImportError: libGL.so.1: cannot open shared object file: No such file or directory
yum install mesa-libGL.x86_64
乌班图
sudo apt install libgl1-mesa-glx
15.opencv在WindowsServer 报错from .cv2 import * ImportError: DLL load failed: 找不到指定的模块
1. 先安装vc集合
2.将dll 下面的dll 文件拷贝到下面目录,windows server 系统缺少动态库
复制到windows\system32 和 sysWoW64 各一份
注意:不能覆盖dll跳过即可,不会影响
评论列表 (0 条评论)