nodejs jest 使用 jest-allure 测试报告和allure-jest测试报告
以下是 allure-jest 和 jest-allure 的区别对比表格:
| 特性/库 | allure-jest | jest-allure |
|---|---|---|
| 维护状态 | 官方维护,Allure 团队支持 | 社区维护,可能更新不频繁 |
| 核心功能 | Jest 的 Allure 集成,允许你在 Jest 测试中使用 Allure 功能,生成 Allure 报告 | 同上,也是 Jest 的 Allure 集成 |
| 易用性/API | 使用 allure 对象直接调用 Allure API(例如 allure.label, allure.step) |
提供 allure 对象或类似的 API,但具体 API 可能会有所不同 |
| 配置 | 通过 jest.config.js 或命令行参数进行配置,通常需要 setupFilesAfterEnv |
类似的配置方式,但也可能需要额外的 reporter 配置 |
| 依赖 | 依赖 allure-commandline 来生成报告 |
同样依赖 allure-commandline 或类似的工具 |
| 生态系统/支持 | 与 Allure 生态系统更好地集成,更容易获得官方支持 | 可能不如 allure-jest 与 Allure 生态系统集成紧密 |
| TypeScript 支持 | 更好的 TypeScript 支持 (通常) | TypeScript 支持可能不如 allure-jest |
| 更新频率 | 更新更频繁,能更快地适应 Jest 和 Allure 的新版本 | 更新频率可能较低 |
| 示例代码 | javascript import { allure } from 'allure-jest'; describe('Test', () => { it('should pass', () => { allure.step('Step 1'); }); }); |
javascript const allure = require('jest-allure'); describe('Test', () => { it('should pass', () => { allure.createStep('Step 1', () => {})(); }); }); |
详细解释:
-
维护状态:
allure-jest是由 Allure 框架的官方团队维护的,这意味着它更有可能得到及时的更新、修复和支持。jest-allure是一个社区维护的项目,虽然可用,但可能没有官方团队的支持那么可靠。 -
易用性和 API: 两者都提供了类似的 API,允许你在 Jest 测试中添加 Allure 注释(例如,步骤、附件、标签)。
allure-jest的 API 通常更简洁和易于使用,更贴近 Allure 官方的风格。 -
生态系统:
allure-jest与 Allure 生态系统(例如,Allure Jenkins 插件、Allure Teamcity 插件)的集成通常更好。 这意味着你可以更轻松地将allure-jest与你的 CI/CD 流程集成。 -
TypeScript: 由于
allure-jest是由 Allure 团队维护的,它通常具有更好的 TypeScript 支持。 这对于使用 TypeScript 的项目来说是一个重要的优势。
选择哪个?
一般来说,推荐使用 allure-jest。 它是由官方团队维护的,具有更好的易用性、生态系统集成和 TypeScript 支持。 除非你有特定的原因需要使用 jest-allure,否则 allure-jest 是更好的选择。
迁移:
如果你目前正在使用 jest-allure,并且想要迁移到 allure-jest,你需要:
- 卸载
jest-allure:npm uninstall jest-allure或yarn remove jest-allure - 安装
allure-jest:npm install allure-jest --save-dev或yarn add allure-jest -D - 更新你的测试代码以使用
allure-jest的 API。 这通常涉及更改require('jest-allure')为import { allure } from 'allure-jest',并更新 Allure API 的调用方式。 - 更新你的 Jest 配置以使用
allure-jest。 这通常涉及将allure-jest添加到setupFilesAfterEnv数组中。
希望这个对比表格对你有帮助!
当然,我可以为你列出一些常用的Jest参数,以及它们的简要说明。这里是一个参数列表:
| 参数 | 说明 |
|---|---|
--watch |
运行监视模式,监听文件变化自动重新运行测试。 |
--coverage |
生成代码覆盖率报告。 |
--verbose |
显示详细的测试输出信息。 |
--bail |
第一个测试失败时停止后续测试。 |
--testPathPattern |
指定正则表达式匹配要运行的测试文件。 |
--testNamePattern |
指定正则表达式匹配要运行的测试用例。 |
--updateSnapshot |
更新快照测试的快照数据。 |
--runInBand |
以串行方式运行测试用例。 |
--onlyChanged |
只运行发生变化的测试文件。 |
--config |
指定自定义的Jest配置文件。 |
--setupFiles |
指定运行所有测试文件之前要运行的脚本文件。 |
--collectCoverageFrom |
指定计入代码覆盖率报告的文件。 |
--maxWorkers |
设置最大并行运行的测试进程数量。 |
--detectOpenHandles |
检测未关闭的资源句柄。 |
--globals |
设置全局变量供测试使用。 |
--notify |
在测试完成时显示桌面通知。 |
请注意,这只是一些常用的参数,Jest还有其他许多参数可供使用。你可以在Jest的官方文档中找到完整的参数列表和详细说明。
要在 Node.js 中使用 Jest 并生成 Allure 报告,你需要进行以下步骤:
-
安装依赖:
首先,你需要安装 Jest 和 Allure 相关的依赖。在项目目录下运行以下命令:npm install --save-dev jest-allurenpm install jest-jasmine2 --save-dev -
配置 Jest:
在你的项目中,创建一个 Jest 配置文件,例如jest.config.js。在配置文件中添加以下内容:/** @type {import('jest').Config} */ const config = { testMatch: ["**/__tests__/**/*.js?(x)", "**/?(*.)+(spec|test).js?(x)"], testEnvironment: 'node', reporters: [ 'default', "jest-allure" ], setupFilesAfterEnv: ["jest-allure/dist/setup"], testRunner: "jest-jasmine2", maxWorkers: 1, }; export default config;
}
这将告诉 Jest 使用 Allure 格式来处理测试结果。
3. 配置 Allure Reporter:
在你的项目中,创建一个 Jest 配置文件,例如 `jest.setup.js` (实测这个不是必须的)。在配置文件中添加以下内容:
// jest.setup.js

  const { AllureReporter } = require('@wdio/allure-reporter');
  const { registerAllureReporter } = require('jest-allure');

  registerAllureReporter();

  const allure = new AllureReporter();

  allure.writeEnvironmentInfo({
      name: 'Environment Name',
      url: 'Environment URL',
  });
这将注册 Allure Reporter 并配置一些环境信息。
const { Severity } = require("jest-allure/dist/Reporter");
const fs = require("fs"); // 引入Node.js的文件系统模块


describe("Fancy test", () => {

        it("Test your amazing feature", async () => {
            reporter
                .description("Feature should work cool")
                .severity(Severity.Critical)
                .story("BOND-007");

            reporter.startStep("Check it's fancy");
            // expect that it's fancy
            reporter.endStep();

            reporter.startStep("Check it's cool");
            // expect that it's cool
            reporter.endStep();


            reporter.addAttachment("Screenshot",
            fs.readFileSync("screenshot.png"), // 读取附件文件内容
            "image/png") // 指定文件类型);
        });

    }
);
-
运行 Jest 测试:
现在,你可以运行 Jest 测试,它将生成 Allure 报告。在终端中执行以下命令:npx jest -
生成 Allure 报告:
运行完 Jest 测试后,你可以使用 Allure Commandline 工具来生成 Allure 报告。--clean每次情况report,在终端中执行以下命令:npx allure generate --clean或者
allure generate allure-results --clean -o allure-report -
这将会生成 Allure 报告所需的文件。
-
查看 Allure 报告:
生成报告后,你可以使用 Allure Commandline 来启动一个本地服务器并查看报告。在终端中执行以下命令:npx allure serve或者
allure open allure-report然后在浏览器中访问生成的报告页面。
以上步骤将帮助你配置 Jest 和 Allure Reporter 以生成 Allure 报告。请注意,具体的配置和步骤可能会因版本变化而有所不同,建议查阅 Jest 和 Allure 的官方文档以获取更详细的指导。
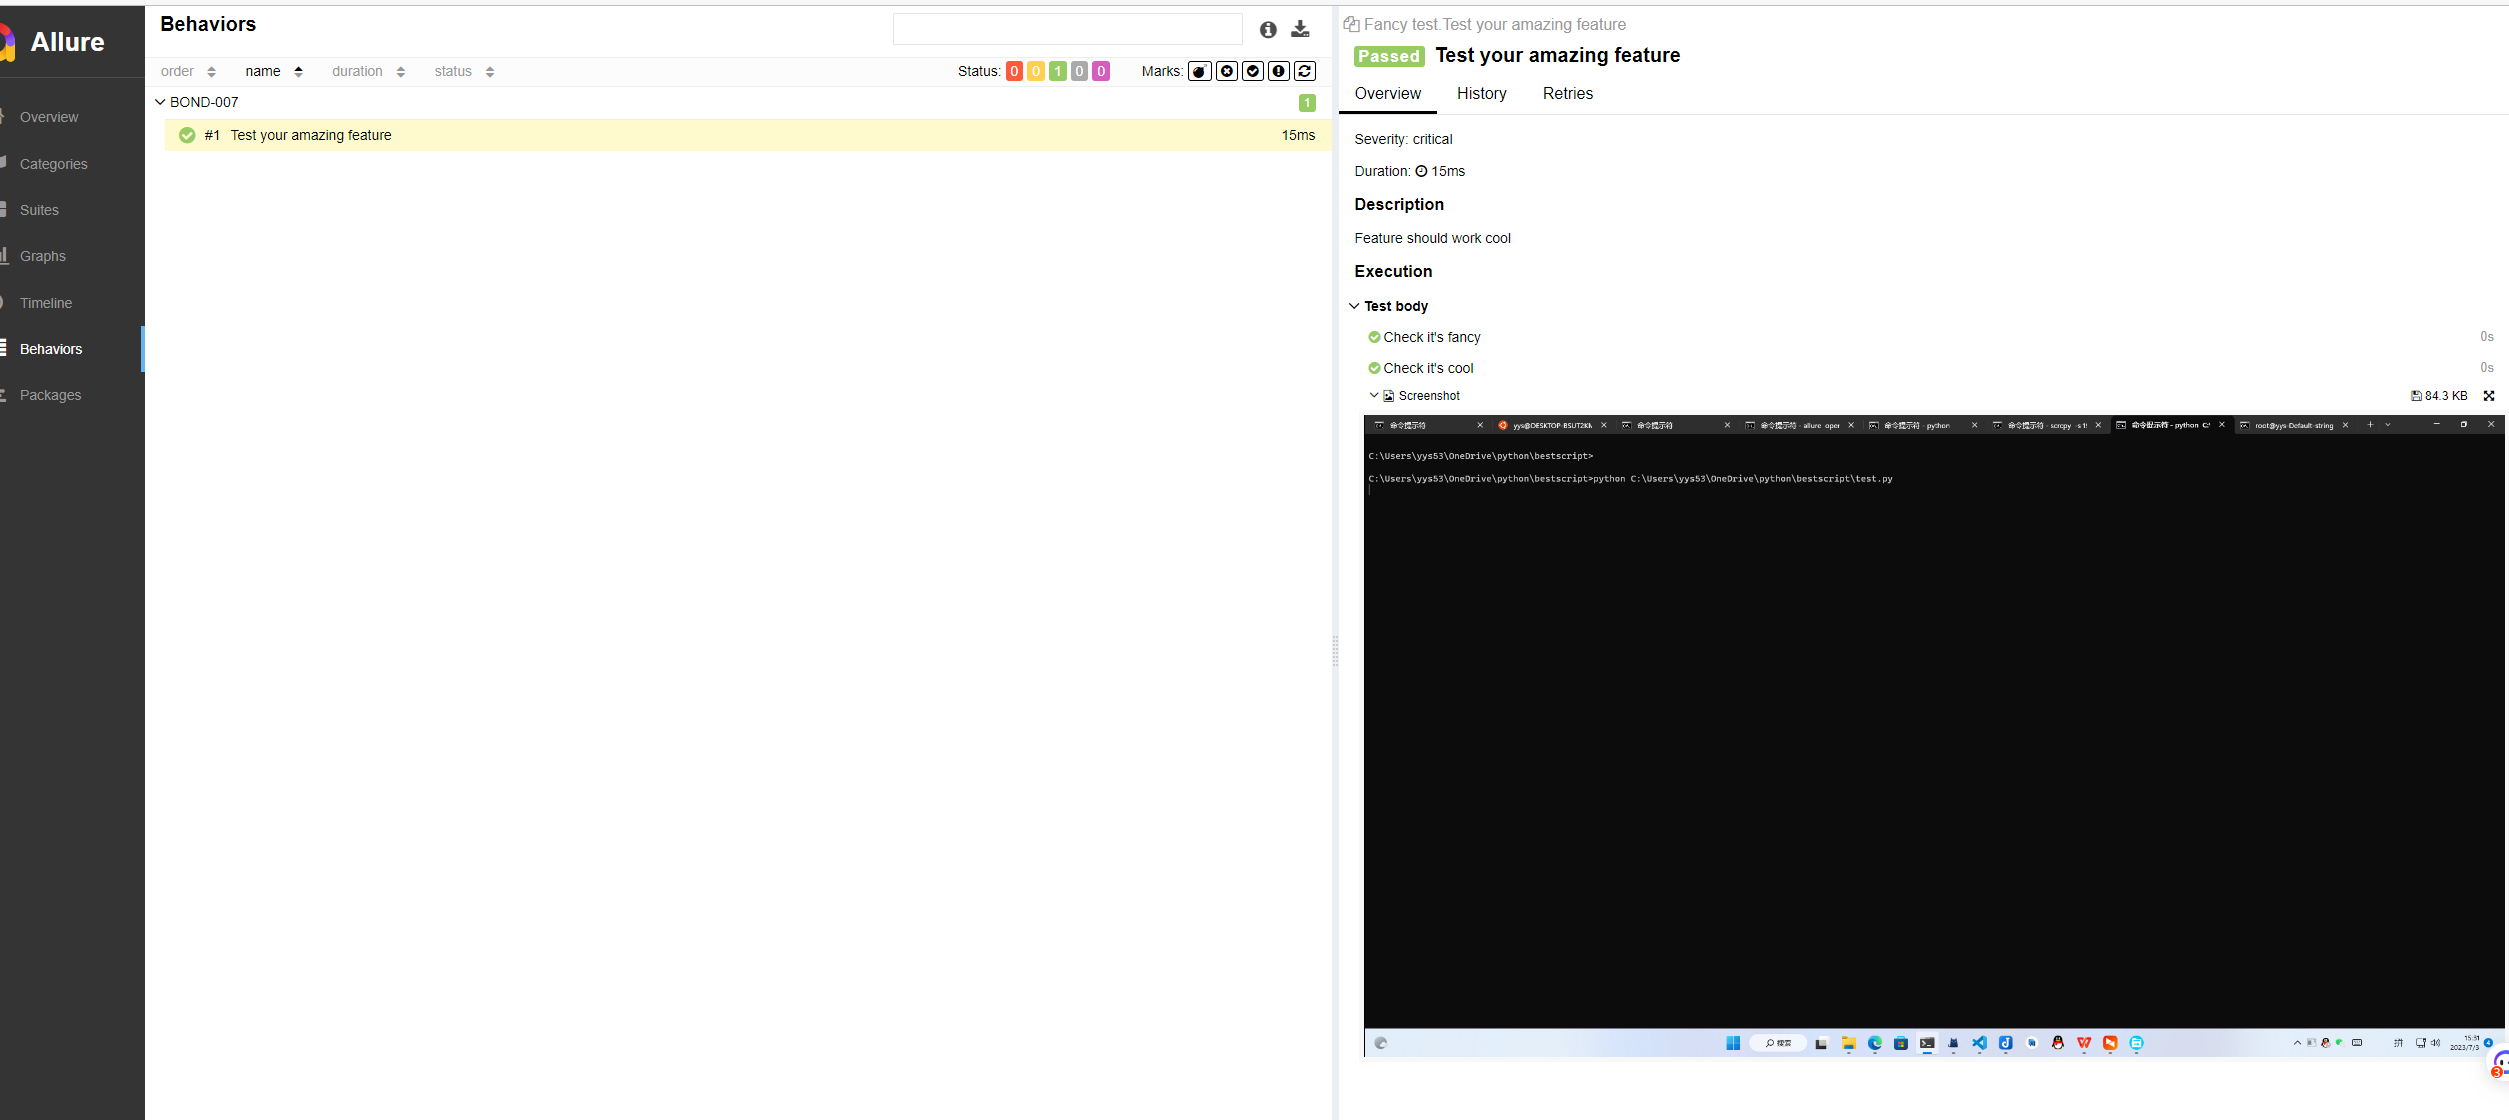
allure报告结果图:
const { Severity } = require("jest-allure/dist/Reporter");

const timeout = 5000;

describe(
    '/ (Home Page)',
    () => {
        let page;

        beforeAll(async () => {
            page = await global.__BROWSER__.newPage();
            await page.goto('https://google.com');
        }, timeout);

        afterAll(async () => {
            await page.close();
        });

        it('should load without error', async () => {
            // 设置Allure报告中的测试套件描述、故事、严重程度、测试ID
            reporter
                .description("Home Page test suite")
                .story("GOOGL-01")
                .severity(Severity.Critical)
                .testId('TEST-01');

            // 在页面上执行JavaScript,获取页面内容的纯文本
            const text = await page.evaluate(() => document.body.textContent);

            // 开始一个Allure报告中的步骤,描述步骤的目的
            reporter.startStep("Check that home page contain google");
            // 使用Jest断言库的expect函数来断言页面内容是否包含 "google" 字符串
            expect(text).toContain('google');
            // 结束当前步骤,将步骤的结果添加到Allure报告中
            reporter.endStep();

            // 开始一个新的步骤,描述截取屏幕截图的目的
            reporter.startStep("Make a screenshot");
            // 使用Puppeteer的page.screenshot方法获取页面的屏幕截图
            const screenshot = await page.screenshot();
            // 将屏幕截图作为附件添加到Allure报告中,指定附件名称和格式
            reporter.addAttachment("Home Page", screenshot, "image/png");
            // 结束当前步骤,将步骤的结果添加到Allure报告中
            reporter.endStep();
        })
    },
    timeout
);
这段代码是一个Jest测试文件,用于测试一个网站的首页加载情况,并在测试过程中使用了 jest-allure 来生成Allure测试报告。下面是代码中注释的解释:
-
const { Severity } = require("jest-allure/dist/Reporter");: 这一行导入了Severity枚举,它是jest-allure模块中用于表示测试严重程度的一部分。jest-allure是一个Jest报告插件,用于将Jest测试结果集成到Allure报告中。 -
const timeout = 5000;: 设置了一个超时时间,用于beforeAll和it块中的测试。 -
describe('/ (Home Page)', () => { ... });: 这是一个 Jest 的测试套件(test suite)的描述块。它包含了一组相关的测试用例,这里描述的是针对网站首页的测试。 -
beforeAll(async () => { ... }, timeout);: 在所有测试用例执行之前,执行一次的钩子函数。在这里,它创建了一个新的浏览器页面并导航到 "https://google.com"。 -
afterAll(async () => { ... });: 在所有测试用例执行完成后,执行一次的钩子函数。在这里,它关闭了之前创建的浏览器页面。 -
it('should load without error', async () => { ... }, timeout);: 这是一个具体的测试用例(test case)的描述块。它描述了一个测试,即首页是否可以成功加载,而且没有错误。 -
reporter.description("Home Page test suite"): 设置Allure报告中的测试套件描述。 -
reporter.story("GOOGL-01"): 设置Allure报告中的故事(story)标签,用于将测试与故事关联起来。 -
reporter.severity(Severity.Critical): 设置Allure报告中的测试严重程度。 -
reporter.testId('TEST-01'): 设置Allure报告中的测试ID。 -
const text = await page.evaluate(() => document.body.textContent);: 使用page.evaluate方法在浏览器页面上下文中执行JavaScript代码,获取页面内容的纯文本。 -
reporter.startStep("Check that home page contain google");: 开始一个Allure报告中的步骤,描述步骤的目的。 -
expect(text).toContain('google');: 使用Jest断言库的expect函数来断言页面内容是否包含 "google" 字符串。 -
reporter.endStep();: 结束当前步骤,将步骤的结果添加到Allure报告中。 -
reporter.startStep("Make a screenshot");: 开始一个新的步骤,描述截取屏幕截图的目的。 -
const screenshot = await page.screenshot();: 使用Puppeteer的page.screenshot方法获取页面的屏幕截图。 -
reporter.addAttachment("Home Page", screenshot, "image/png");: 将屏幕截图作为附件添加到Allure报告中,指定附件名称和格式。 -
reporter.endStep();: 结束当前步骤,将步骤的结果添加到Allure报告中。
这段代码的目的是通过Puppeteer自动化测试工具,测试一个网站首页是否可以正常加载,并使用 jest-allure 将测试结果整合到Allure测试报告中。报告会包括测试套件描述、故事标签、严重程度、附件截图等信息。
您可以添加描述,屏幕截图,步骤,严重性以及许多其他内容 你的报告中有花哨的东西。
使用以下方法在测试中可用的全局变量:reporter
description(description: string): this;
severity(severity: Severity): this;
epic(epic: string): this;
feature(feature: string): this;
story(story: string): this;
startStep(name: string): this;
endStep(status?: Status): this;
addArgument(name: string): this;
addEnvironment(name: string, value: string): this;
addAttachment(name: string, buffer: any, type: string): this;
addLabel(name: string, value: string): this;
addParameter(paramName: string, name: string, value: string): this;
要在Allure报告中添加MP4视频附件,您可以使用类似的方法。以下是将MP4视频添加到Allure报告中的步骤:
-
将视频复制到测试结果目录: 将您想要添加到报告中的MP4视频文件复制到您的测试结果目录(一般是
allure-results文件夹)下。 -
使用
addAttachment添加附件: 在测试代码中,使用addAttachment方法来添加视频附件。确保传递正确的附件路径和文件类型。const fs = require("fs"); // 引入Node.js的文件系统模块 // ... it('should load without error', async () => { // ... reporter.startStep("Add a video"); // 添加MP4视频附件,这里假设视频在 allVideos 文件夹下 reporter.addAttachment( "Video", fs.readFileSync("allVideos/video.mp4"), // 读取附件文件内容 "video/mp4" // 指定文件类型 ); reporter.endStep(); });
在上面的示例中,fs.readFileSync 用于读取文件内容,您需要提供正确的文件路径。确保文件路径和类型与实际情况匹配。
-
确保报告配置支持视频附件: 默认情况下,Allure报告可能不会在页面上直接播放视频。要确保视频能够正常显示,您可能需要进行一些自定义配置。
例如,您可以使用 Allure 配置文件(allureConfig.json)来自定义附件显示。在配置文件中,您可以指定附件的类型以及如何在报告中显示它们。以下是一个示例配置:
{
  "attachments": {
    "video": {
      "maxAttachmentSizeMb": 10,
      "url": "attachment/{testUuid}/{attachmentName}"
    }
  }
}
这个示例配置指定了视频附件的最大大小和URL格式。您可以根据需要进行调整。
请注意,确保文件路径和类型正确,并进行适当的测试,以确保附件能够被正确添加到报告中并能够在报告中显示。附件的显示方式也可能因Allure版本和自定义配置而异。
你可以通过以下命令来查看全局安装的 Jest 版本:
npm list -g jest
如果你想查看项目中的 Jest 版本,可以在项目目录中运行以下命令:
npm list jest
D:\node>npm list jest
node@ D:\node
`-- jest@29.6.2
报错内容
Timeout - Async callback was not invoked within the 5000 ms timeout specified by jest.setTimeout.Error:
Jest 提供了 jest.setTimeout 函数来设置测试的超时时间。当一个异步测试的执行时间超过了设置的超时时间,Jest 会报错并中止测试。这个超时时间的默认值是 5000 毫秒(5 秒),但有时候某些测试需要更长的时间来执行,因此您可以使用 jest.setTimeout 来增加超时时间,以确保测试有足够的时间来完成。
您可以在测试文件中的顶部添加以下代码来设置全局的超时时间:
jest.setTimeout(10000); // 将超时时间设置为 10000 毫秒(10 秒)
这将使所有的测试都具有 10 秒的超时时间。如果您只想为特定的测试设置不同的超时时间,您可以在测试块中使用第二个参数来设置超时时间,如下所示:
test('your test description', async () => {
  // 测试代码
}, 15000); // 将这个测试的超时时间设置为 15000 毫秒(15 秒)
通过设置适当的超时时间,您可以确保您的异步测试有足够的时间来执行完成,避免因为时间不足而导致测试失败。不过,也要注意不要过度延长超时时间,以免影响测试执行的效率。
Allure是一个用于生成漂亮的测试报告的测试框架,它通常与测试框架(如pytest、JUnit等)一起使用。要将本地HTML文件添加到Allure报告中并显示出来,你可以使用Allure的自定义附件功能。以下是如何执行此操作的一般步骤:
- 安装Allure-Pytest插件(如果你使用pytest作为测试框架):
pip install allure-pytest
- 在测试代码中添加自定义附件。这将生成HTML文件并将其添加到Allure报告中。你可以使用Python的
allure库来完成这一操作。
import allure

@allure.title("Add Local HTML to Allure Report")
def test_add_html_attachment():
    # 你的测试逻辑代码
    # ...

    # 添加本地HTML文件到Allure报告
    with open('path/to/your/local.html', 'rb') as html_file:
        allure.attach(html_file.read(), name="Local HTML Report", attachment_type=allure.attachment_type.HTML)
- 运行测试并生成Allure报告:
pytest your_test_file.py
- 生成Allure报告:
allure serve allure-results
上述代码中,test_add_html_attachment是你的测试用例,它将在报告中显示。allure.attach用于将本地HTML文件添加到报告中,并将其显示为附件。确保将'path/to/your/local.html'替换为实际的本地HTML文件路径。
运行上述命令后,你应该能够在浏览器中查看生成的Allure报告,其中包含了你的本地HTML文件作为附件。
请注意,你需要确保在系统上安装了Allure CLI(命令行界面),以便能够运行allure serve命令来查看生成的报告。如果尚未安装Allure CLI,可以根据官方文档中的指南进行安装:https://docs.qameta.io/allure/
点击→5.解决ESM支持
npm install --save-dev allure-jest
npm install --save-dev jest-environment-node
jest.config.js 配置
import { Status } from "allure-js-commons";
import os from "node:os";

export default {
  testEnvironment: "allure-jest/node",
  testEnvironmentOptions: {
    resultsDir: "allure-results",
    links: {
      issue: {
        nameTemplate: "Issue #%s",
        urlTemplate: "https://issues.example.com/%s",
      },
      tms: {
        nameTemplate: "TMS #%s",
        urlTemplate: "https://tms.example.com/%s",
      },
      jira: {
        urlTemplate: (v) => `https://jira.example.com/browse/${v}`,
      },
    },
    categories: [
      {
        name: "foo",
        messageRegex: "bar",
        traceRegex: "baz",
        matchedStatuses: [Status.FAILED, Status.BROKEN],
      },
    ],
    environmentInfo: {
      os_platform: os.platform(),
      os_release: os.release(),
      os_version: os.version(),
      node_version: process.version,
    },
  },
};
package.json
node.js v22.12.0 及以上
{
  "devDependencies": {
    "allure-commandline": "^2.32.2",
    "allure-jest": "^3.2.0",
    "cross-spawn": "^7.0.6",
    "jest": "^29.7.0",
    "jest-circus": "^29.7.0",
    "jest-environment-jsdom": "^29.7.0"
  },
  "scripts": {
    "test": "node runTests.js",
    "test:debug": "cross-env jest --runInBand --coverage",
    "test:ci": "ALLURE_RESULTS_DIR=./allure-results2 npm test"
  },
  "dependencies": {
    "@xmldom/xmldom": "^0.9.7",
    "cross-env": "^7.0.3",
    "jest-cli": "^29.7.0",
    "jest-config": "^29.7.0",
    "parse-json": "^8.1.0",
    "picocolors": "^1.1.1",
    "webdriverio": "^9.7.1",
    "xpath": "^0.0.34"
  }
}
好的,以下是一个包含 allure-jest 主要用法及其示例的表格。
Allure-Jest 用法速查表
| 用法 | 描述 | 示例 |
|---|---|---|
| 全局配置 | ||
allure.label(name, value) |
添加一个标签,通常用于分类测试用例(例如 feature、story、severity) | allure.label('feature', '用户登录'); |
allure.parameter(name, value) |
添加测试参数,有助于理解测试用例使用的输入值 | allure.parameter('username', 'testuser'); |
allure.link(url, name) |
添加一个链接,可以链接到需求、缺陷跟踪系统等 | allure.link('https://example.com/issue/123', '相关 Issue'); |
allure.issue(name, url) |
相当于 allure.link 的特殊形式,用于链接到 Issue 系统 |
allure.issue('BUG-456', 'https://example.com/bugs/BUG-456'); |
allure.tms(name, url) |
相当于 allure.link 的特殊形式,用于链接到 TMS 系统 |
allure.tms('TMS-789', 'https://example.com/tms/TMS-789'); |
allure.owner(owner) |
设置测试用例的负责人 | allure.owner('John Doe'); |
allure.severity(severity) |
设置测试用例的严重程度(blocker, critical, normal, minor, trivial) | allure.severity('critical'); |
allure.epic(epic) |
将测试用例归类到特定的史诗(Epic)级别 | allure.epic('用户管理'); |
allure.feature(feature) |
将测试用例归类到特定的功能(Feature)级别 | allure.feature('登录功能'); |
allure.story(story) |
将测试用例归类到特定的用户故事(Story)级别 | allure.story('使用有效用户名和密码登录'); |
| 测试步骤 |
| :----------------------------- | :------------------------------------------------------------------------------------------------------- | :------------------------------------------------------------------------ |
| allure.step(name, [function])| 创建一个测试步骤。 name 是步骤的名称,function 是步骤的具体执行代码。 可以嵌套。 | allure.step('执行登录操作', () => { // 登录逻辑 }); |
| allure.attachment(name, content, type)| 添加附件到测试结果,例如截图、日志文件等。 name 是附件的名称,content 是附件的内容,type 是 MIME 类型。 | allure.attachment('Console Log', 'console output', 'text/plain'); |
| 在 describe 块中使用 |
| :----------------------------- | :------------------------------------------------------------------------------------------------------- | :------------------------------------------------------------------------ |
| describe.configure({ ... }) | 配置 describe 块的 Allure 元数据。这允许你为整个测试套件设置标签、链接等。 | javascript describe.configure({ feature: '搜索', story: '关键词搜索', }); describe('搜索功能', () => { it('可以根据关键词找到相关结果', () => { // 测试用例 }); }); |
| hooks |
| beforeAll | 在所有测试用例之前运行。可以使用 Allure API 添加附件或参数。 | javascript beforeAll(() => { allure.attachment('Setup Data', JSON.stringify(setupData), 'application/json'); }); |
| afterAll | 在所有测试用例之后运行。可以使用 Allure API 添加附件或参数。 | javascript afterAll(() => { allure.attachment('Teardown Log', 'Cleanup complete', 'text/plain'); }); |
| beforeEach | 在每个测试用例之前运行。可以使用 Allure API 添加步骤或参数。 | javascript beforeEach(() => { allure.step('准备测试环境'); }); |
| afterEach | 在每个测试用例之后运行。 通常用于添加截图、日志等,方便调试。 | javascript afterEach(() => { const screenshot = browser.takeScreenshot(); allure.attachment('Screenshot', Buffer.from(screenshot, 'base64'), 'image/png'); }); |
示例代码(结合 Jest):
import { allure } from 'allure-jest';

describe('用户登录', () => {
  describe.configure({
    feature: '用户认证',
    story: '登录功能',
  });

  beforeEach(() => {
    allure.step('打开登录页面');
  });

  it('使用有效用户名和密码登录', async () => {
    allure.parameter('username', 'validUser');
    allure.parameter('password', 'validPassword');

    allure.step('输入用户名');
    // ... 输入用户名的代码

    allure.step('输入密码');
    // ... 输入密码的代码

    allure.step('点击登录按钮');
    // ... 点击登录按钮的代码

    allure.step('验证登录成功');
    expect(await isLoggedIn()).toBe(true);
  });

  it('使用无效用户名登录应显示错误信息', async () => {
    allure.parameter('username', 'invalidUser');
    allure.parameter('password', 'validPassword');

    // ... 测试代码

    allure.attachment(
      'Error Message',
      'Invalid username or password',
      'text/plain'
    );
    expect(await getErrorMessage()).toContain('Invalid username');
  });

  afterEach(async () => {
    if (process.env.TAKE_SCREENSHOT_ON_FAIL === 'true' && jest.getState().currentTestName) {
      const screenshot = await takeScreenshot();
      allure.attachment('Screenshot on Failure', Buffer.from(screenshot, 'base64'), 'image/png');
    }
  });
});
注意事项:
- 安装依赖: 确保你已经安装了
allure-jest依赖。 - Allure 命令: 使用 Allure 命令 (例如
allure generate,allure serve) 来生成和查看报告。 - Jest 配置: 确保你的 Jest 配置正确地集成了 Allure (通常通过
setupFilesAfterEnv或类似的选项)。 - 环境变量: 可以使用环境变量 (例如
TAKE_SCREENSHOT_ON_FAIL) 来控制 Allure 的行为。
这个表格和示例应该能帮助你理解和使用 allure-jest。 如果有任何其他问题,请随时提出。
本文作者: 永生
本文链接: https://yys.zone/detail/?id=299
版权声明: 本博客所有文章除特别声明外,均采用 CC BY-NC-SA 4.0 许可协议。转载请注明出处!
评论列表 (0 条评论)