Django 富文本CKEditor、Prism
1.CKEditor的安装
pip install django-ckeditor
pip install pillow
在 settings.py 中的配置
blog/settings.py

INSTALLED_APPS = [
    'ckeditor',  # 富文本编辑器
 'ckeditor_uploader',  # 富文本编辑器上传图片模块
]

# 设置上传图片保存在media目录下
MEDIA_ROOT = os.path.join(BASE_DIR, 'media')
# 设置图片访问统一路由
MEDIA_URL = '/media/'


# 媒体文件配置
CKEDITOR_UPLOAD_PATH = "uploads/"  # 上传图片保存路径,如果没有图片存储或者使用自定义存储位置,那么则直接写  ' ' ,如果是使用django本身的存储方式,那么你就指名一个目录用来存储即可。

# 富文本编辑器ckeditor配置

CKEDITOR_IMAGE_BACKEND = 'pillow'

# 设置图片访问统一路由
MEDIA_URL = '/media/'
# 设置上传图片保存在media目录下
MEDIA_ROOT = os.path.join(BASE_DIR, 'media')

if DEBUG:
    STATICFILES_DIRS = [
        os.path.join(BASE_DIR, 'static')
    ]
else:
    STATIC_ROOT = os.path.join(BASE_DIR, 'static')

# 方法一:推荐配置(自定义配置比较自由)

CKEDITOR_CONFIGS = {
    'default': {
        'width': 'auto',
        'height': '250px',
        'skin': 'moono',  # 加入moono主题
        # tab键转换空格数
        'tabSpaces': 4,
        # 工具栏风格,工具栏按钮_后面的
        'toolbar': 'Custom',
        # 工具栏按钮
        'toolbar_Custom': [
            ['Source', '-', 'Save', 'NewPage', 'Preview', 'Print', '-', 'Templates'],
            ['Cut', 'Copy', 'Paste', 'PasteText', 'PasteFromWord', '-', 'Undo', 'Redo'],
            ['Find', 'Replace', '-', 'SelectAll'],
            ['Form', 'Checkbox', 'Radio', 'TextField', 'Textarea', 'Select', 'Button', 'ImageButton', 'HiddenField'],
            '/',
            ['Bold', 'Italic', 'Underline', 'Strike', 'Subscript', 'Superscript', '-', 'RemoveFormat'],
            ['NumberedList', 'BulletedList', '-', 'Outdent', 'Indent', '-', 'Blockquote', 'CreateDiv', '-',
             'JustifyLeft', 'JustifyCenter', 'JustifyRight', 'JustifyBlock', '-', 'BidiLtr', 'BidiRtl', 'Language'],
            ['Link', 'Unlink', 'Anchor'],
            ['Image', 'Flash', 'Table', 'HorizontalRule', 'Smiley', 'CodeSnippet', 'SpecialChar', 'PageBreak',
             'Iframe'],
            '/',
            ['Styles', 'Format', 'Font', 'FontSize'],
            ['TextColor', 'BGColor'],
            ['ShowBlocks', 'Preview', 'Maximize', 'EmbedSemantic'],

        ],

        # 加入代码块插件
        'extraPlugins': ','.join(['codesnippet',  # 写入custom里面才会显示
                                  'prism',  # 如果没有这条,在编写内容时候栏默认的高亮,不是自定义的
                                  'widget',
                                  'lineutils',
                                  'div',
                                  'autolink',
                                  'autoembed',
                                  'embedsemantic',  # 插入内嵌媒体
                                  'autogrow',
                                  # 'devtools',
                                  'clipboard',
                                  'dialog',
                                  'dialogui',
                                  'elementspath'
                                  ]),

    },
}

 # 方法二:默认配置(不推荐,因为有关于插件,有的去不掉)

CKEDITOR_CONFIGS = {
    'default': {
        'toolbar': 'full',  # 工具条功能
        'width': 'auto',
        'height': '250px',
        'skin': 'moono',    # 加入moono主题
        # 加入代码块插件, Prism代码高亮
         'extraPlugins': ','.join(['codesnippet', 'prism', 'widget', 'lineutils']),  # 只有prism插件放到plug才可以使用,不然不显示
    },
}
注意: CKEDITOR_UPLOAD_PATH 这个参数是上传图片保存路径,如果没有图片存储或者使用自定义存储位置,那么则直接写 ‘’ ,如果是使用django本身的存储方式,那么你就指名一个目录用来存储即可。
设置CKEditor路由器
在主路由器的urls.py中添加:
如果是使用django本身的存储方式:
blog/urls.py
from django.conf import settings
from django.conf.urls.static import static
from django.urls import include

urlpatterns = [
       # django的 ckedit
    path('ckeditor/', include('ckeditor_uploader.urls')),
] + static(settings.MEDIA_URL, document_root=settings.MEDIA_ROOT)
应用
在 models.py 文件下使用:
# from ckeditor.fields import RichTextField # 不支持上传文件的富文本字段
from ckeditor_uploader.fields import RichTextUploadingField  # 支持上传文件的富文本字段

    # 文章正文
    content = RichTextUploadingField()

    # 评论内容
    content = RichTextUploadingField()
说明:
ckeditor.fields.RichTextField 不支持上传文件的富文本字段
ckeditor_uploader.fields.RichTextUploadingField 支持上传文件的富文本字段
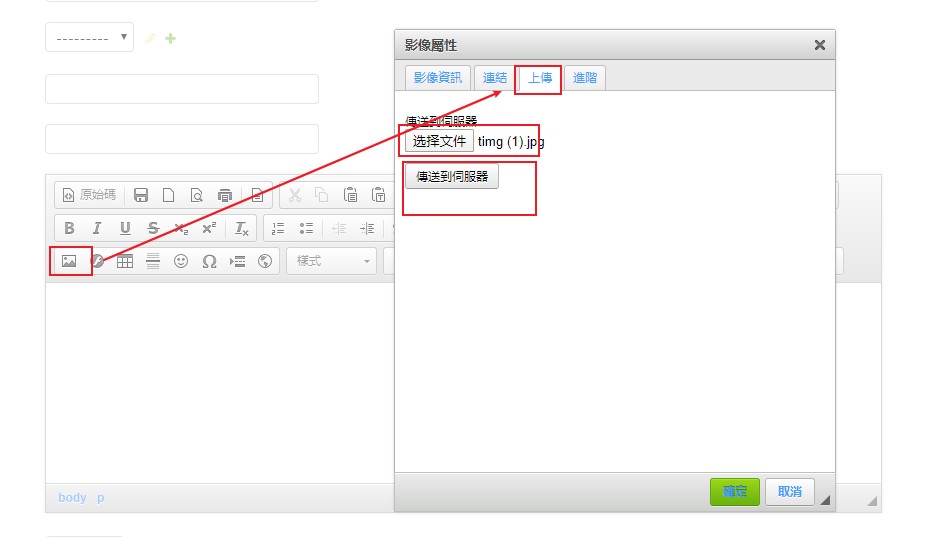
效果图:
2.django官方文档
django-ckeditor 我在用20250423
3.代码高亮
代码高亮需要添加额外的插件Prism。在Prism插件官方页面下载(也可以点击这里直接下载)后,将解压出来的prism放到env\Lib\site-packages\ckeditor\static\ckeditor\ckeditor\plugins目录下。注意env是你创建的虚拟环境的目录。
之前你安装的所有库都在这个env目录中的。
然后在Prism官网选择主题:
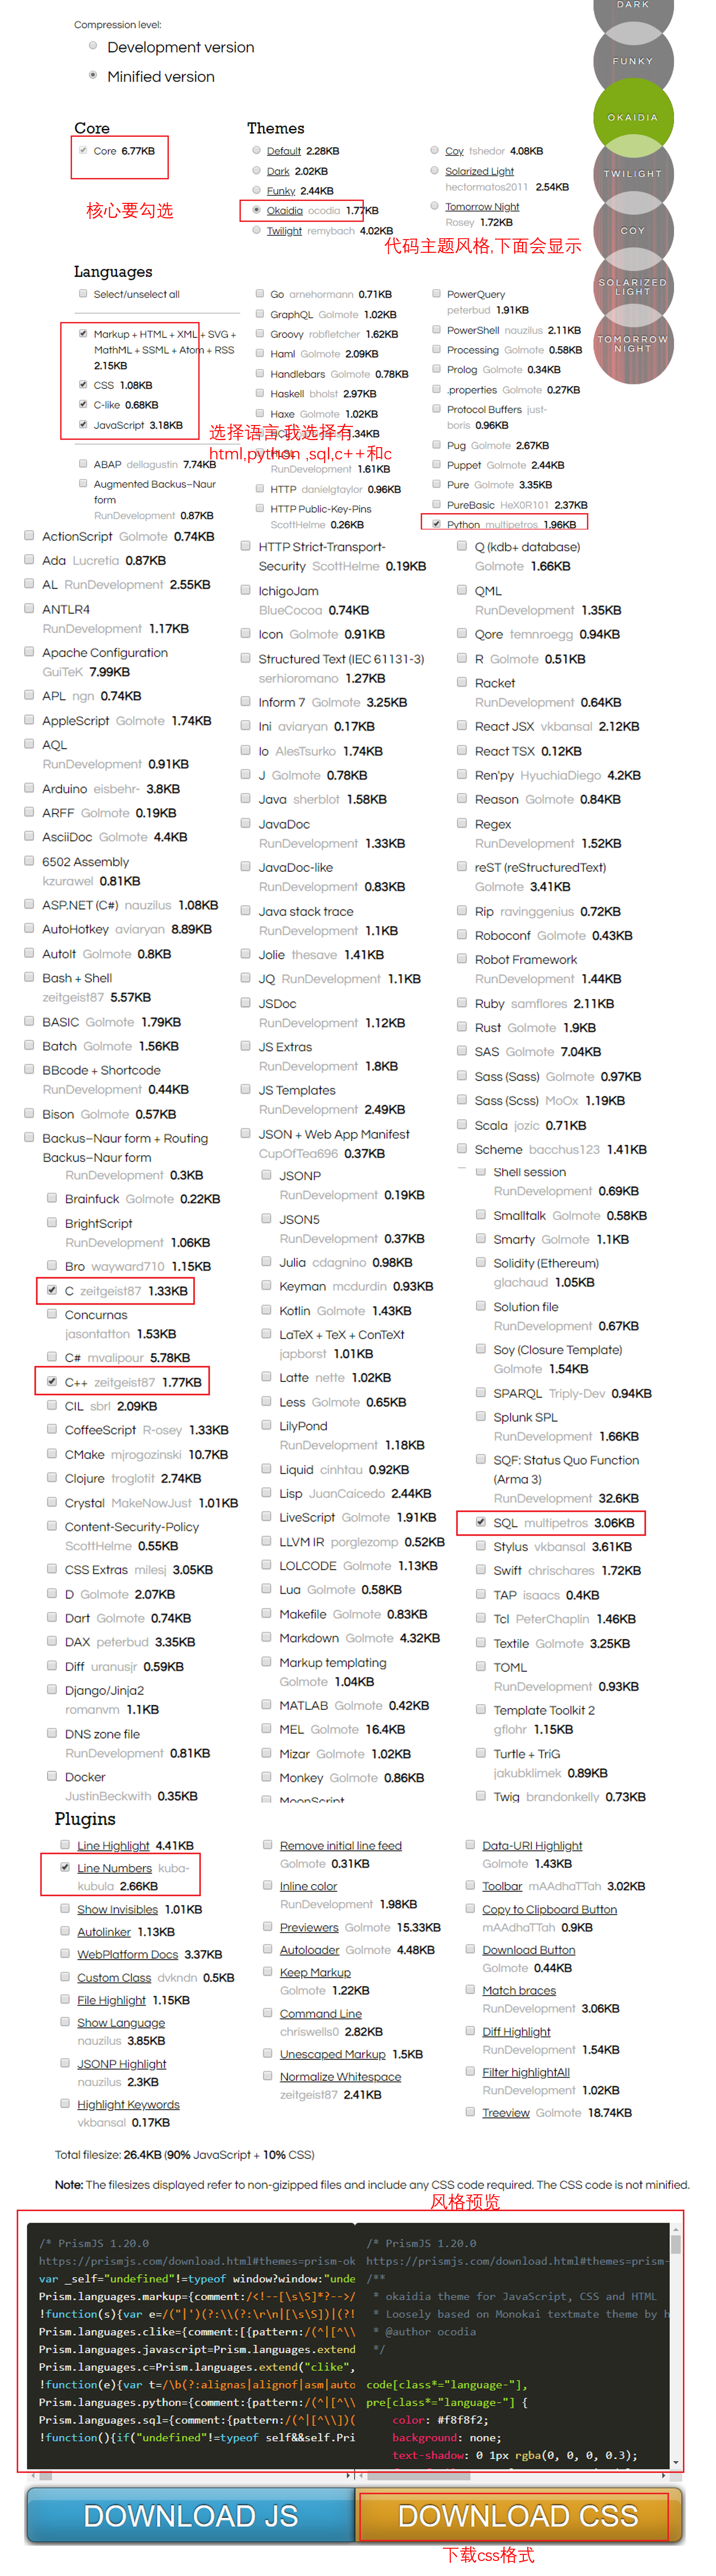
- 根据喜好选择一个喜欢的主题
- 然后选择需要高亮的语言。不清楚就可以全选
- 勾选行号插件
- 最后点击
DOWNLOAD CSS下载样式
在static目录中新建prism目录,将下载好的CSS文件放进去。
注意这里的static是项目中的静态文件目录(与前面的章节相同),而不是env文件夹中的static目录。
然后在需要代码高亮的模板文件中引用prism的静态文件,对代码进行渲染:
templates/detail.html

...

<script src="{% static 'ckeditor/ckeditor/plugins/prism/lib/prism/prism_patched.min.js' %}"></script>
<link rel="stylesheet" href="{% static 'prism/prism.css' %}">

...
将Prism、widget、lineutils插件添加到配置文件中。后面两个编辑器自带,不用单独下载,添上就可以了:
blog/settings.py

# 添加 Prism 相关插件
'extraPlugins': ','.join(['codesnippet', 'prism', 'widget', 'lineutils']),
这样就完成了:
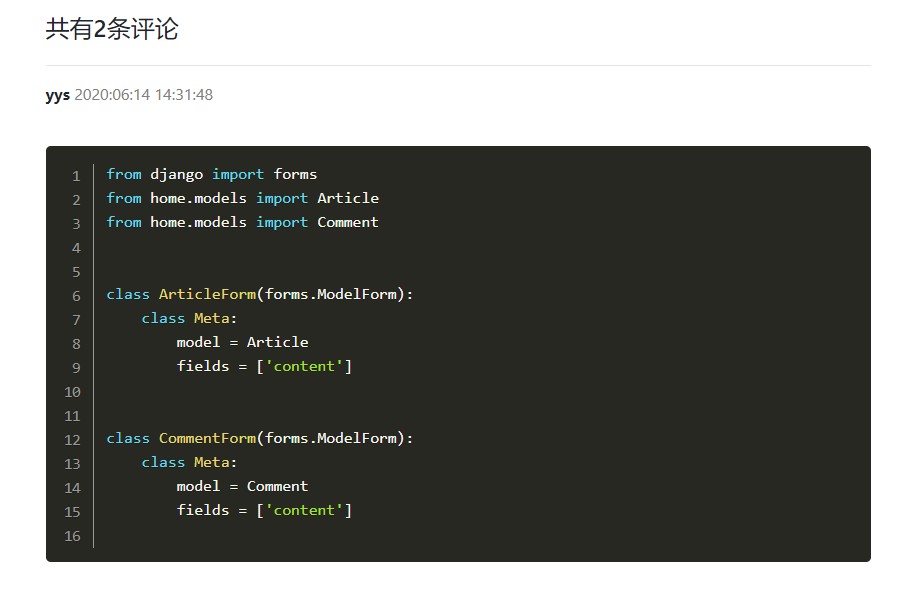
代码高亮效果不错!
在前台使用Ckeditor
为了让用户在前台也能使用富文本编辑器,还得对代码稍加改动。
首先需要把评论的表单传递到文章详情页面中。因此修改article_detail视图:
users/forms.py


from django import forms
from home.models import Article
from home.models import Comment


class ArticleForm(forms.ModelForm):
    class Meta:
        model = Article
        fields = ['content']


class CommentForm(forms.ModelForm):
    class Meta:
        model = Comment
        fields = ['content']
home/views.py

...
# 引入评论表单
from comment.forms import CommentForm

...
# 文章详情
def article_detail(request, id):
    ...

    # 引入评论表单
    comment_form = CommentForm()
    context = {
        ...
        'comment_form': comment_form,
    }
    ...
然后将detail.html原来评论表单中的正文部分(即前面章节写的<textarea>)替换如下:
templates/detail.html

...

<!-- 发表评论 -->
<form ...>
{% csrf_token %}
    <div class="form-group">
        <label for="body">...</label>

        <!-- 将之前的<textarea>替换掉 -->
        <!-- <textarea type="text"
                       class="form-control"
                       id="body"
                       name="body"
                       rows="2"></textarea>  -->
        <div>
            {{ comment_form.media }}
            {{ comment_form.content }}
        </div>

    </div>
    <!-- 提交按钮 -->
    ...
</form>

...
其中的comment_form.media是编辑器自身的渲染代码,comment_form.body则是评论正文字段。
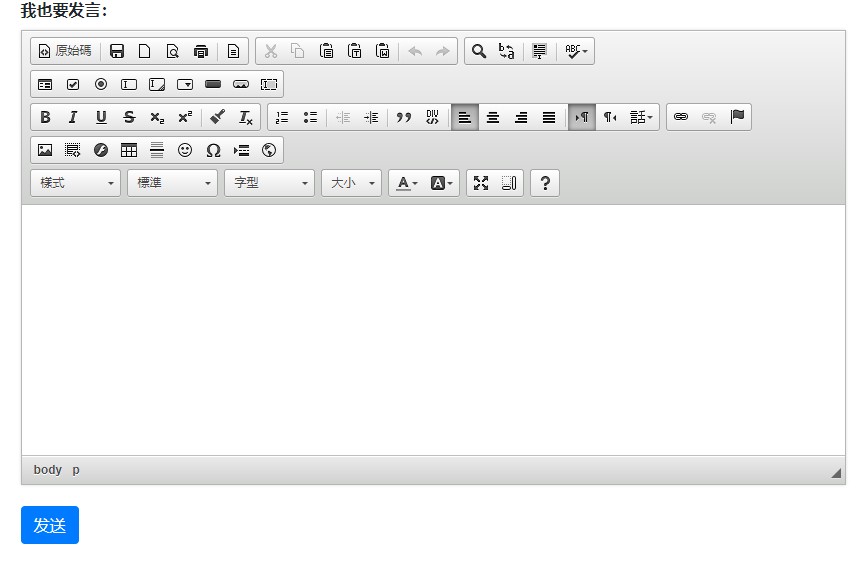
看看效果:
4.自动隐藏和显示菜单栏和设置风格
_top和_content 是ckedit菜单栏和内容的id后缀,从图可以看出
<script>
    {#  自动隐藏菜单栏,#}
    $(document).ready(function () {
        CKEDITOR.on('instanceReady', function (ev) {
            document.getElementById(ev.editor.id + '_top').style.display = 'none';


            ev.editor.on('focus', function (e) {
                document.getElementById(ev.editor.id + '_top').style.display = 'block';
                document.getElementById(ev.editor.id + '_contents').style.height = '600px';

            });
            ev.editor.on('blur', function (e) {
                document.getElementById(ev.editor.id + '_top').style.display = 'none';


            });
        });
    });
</script>
当然发表文章也类似!!

评论列表 (0 条评论)