智能应用(人体感应灯)
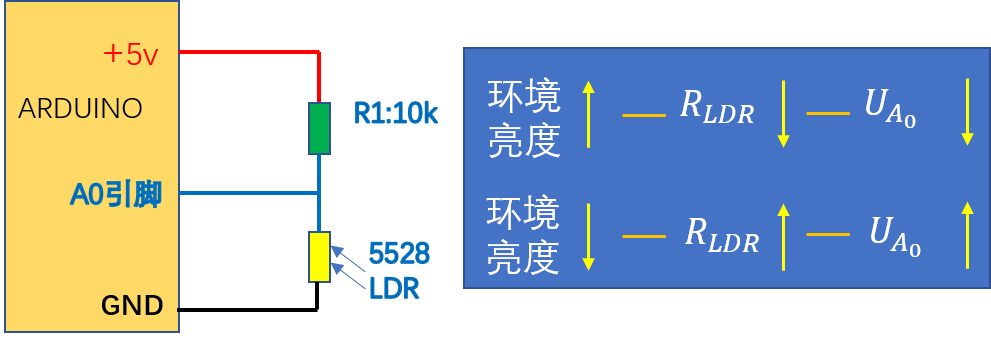
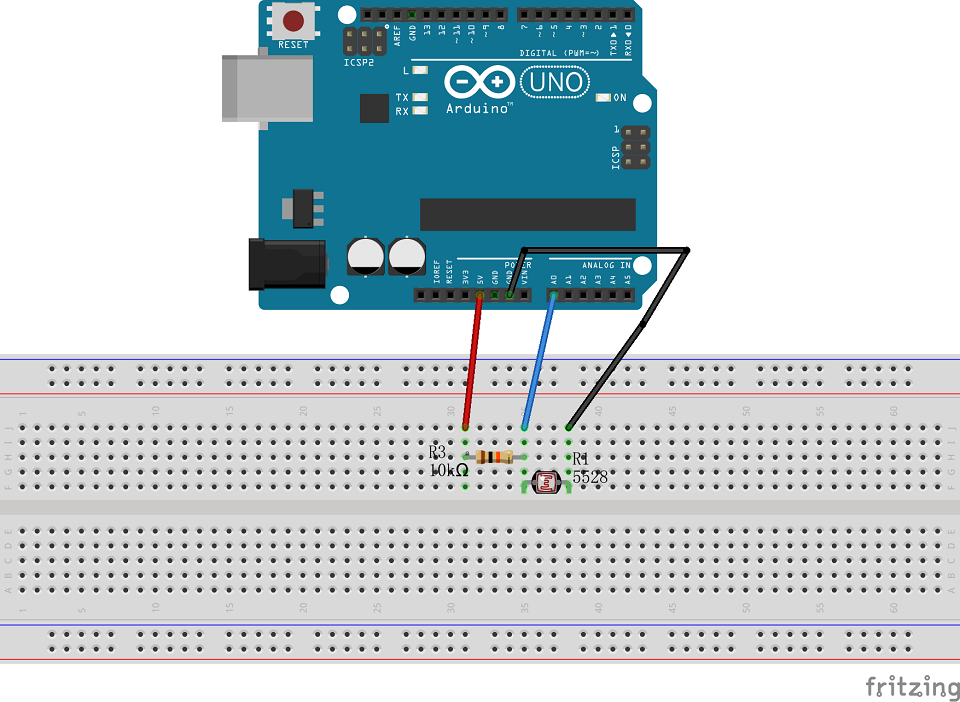
光敏电阻应用于 Arduino
void setup() {
  Serial.begin(9600); //启动串口通讯

}

void loop() {
  Serial.print("LDR Reading: ");//通过串口监视器
  Serial.println(analogRead(A0)); //输出LDR的的读数,其他数字引脚不行
  delay(10);
}
esp8266用此代码也可以成功,连接A0上
LDR ReadingLDR Reading: 81
LDR Reading: 83
LDR Reading: 82
LDR Reading: 82
LDR Reading: 82
LDR Reading: 82
LDR Reading: 82
LDR Reading: 84
LDR Reading: 82
LDR Reading: 82
LDR Reading: 81
光敏电阻主要技术参数
|
型号 |
光谱响应范围 |
峰值波长 |
最高工作电压 |
容许功耗 |
环境温度 |
亮电阻 |
暗电阻 |
\(\gamma_{10}^{100}\) |
响应时间 |
照度 |
|
|
(10Lux) |
(0Lux) |
(ms) |
光电阻 |
||||||||
|
(nm) |
(nm) |
(v) |
(mW) |
(℃) |
(kΩ) |
(MΩ) |
上升 |
下降 |
特性 |
||
|
MG5506 |
400-760 |
540 |
150 |
100 |
-30~+70 |
4-7 |
0.2 |
0.6 |
20 |
30 |
|
|
MG5516 |
5-10 |
0.2 |
0.6 |
2 |
|||||||
|
MG5528 |
8-20 |
1 |
0.7 |
3 |
|||||||
|
MG5538 |
18-50 |
2 |
0.7 |
4 |
|||||||
|
MG5539 |
30-90 |
5 |
0.8 |
5 |
|||||||
|
MG5549 |
45-140 |
10 |
0.8 |
6 |
|||||||
|
MG5516 5516-2 |
400-760 |
560 |
150 |
100 |
-30~+70 |
5-10 |
0.5 |
0.6 |
20 |
30 |
2 |
|
MG5628 5528-2 |
8-20 |
2 |
0.6 |
3 |
|||||||
|
MG5637 5537-2 |
18-50 |
5 |
0.7 |
4 |
|||||||
|
MG5639 5539-2 |
30-90 |
8 |
0.8 |
5 |
|||||||
|
MG5649 5549-2 |
50-150 |
20 |
0.8 |
6 |
|||||||
|
场所/环境 |
光照度 |
|
晴天 |
30000~130000lux |
|
晴天室内 |
100~1000lux |
|
阴天 |
3000~10000lux |
|
阴天室外 |
50~500lux |
|
阴天室内 |
5~50lux |
|
黄昏室内 |
10lux |
|
日出日落 |
300lux |
|
黑夜 |
0.001~0.02lux |
|
月夜 |
0.02~0.3lux |
|
月圆 |
0.30~0.3lux |
|
星光 |
0.0002~0.00002lux |
|
阴暗夜晚 |
0.003~0.0007lux |
|
夜间路灯 |
0.1lux |
|
生产车间 |
10~500lux |
|
办公室 |
30~50lux |
|
餐厅 |
10~30lux |
|
走廊 |
5~10lux |
|
停车场 |
1~5lux |
|
距60W台灯60cm桌面 |
300 lux |
|
室内日光灯 |
100lux |
|
电视台演播室 |
1000lux |
|
黑白电视机荧光屏 |
120lux |
|
彩色电视机荧光屏 |
80lux |
|
阅读书刊时所需的照度 |
50~60lux |
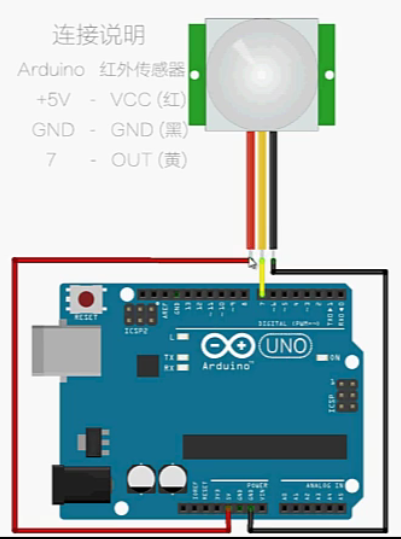
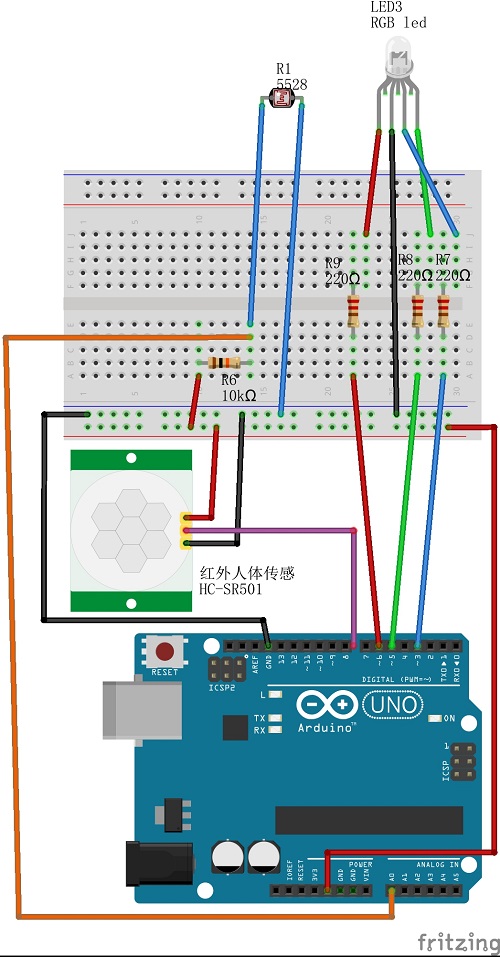
红外人体感应传感器模块与Arduino连接
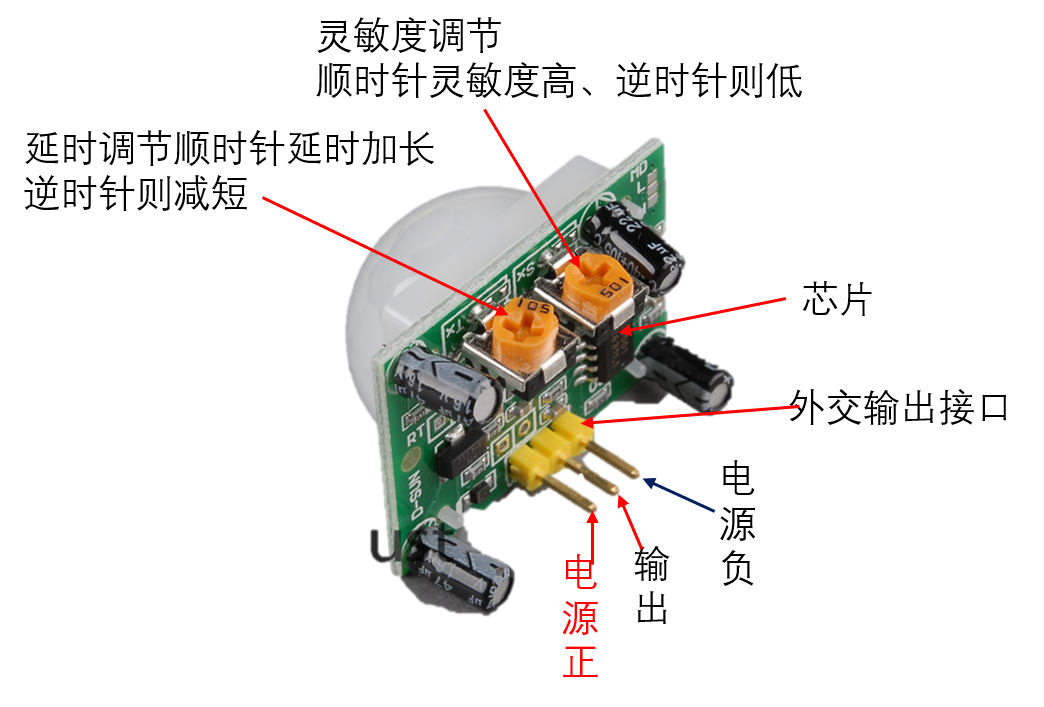
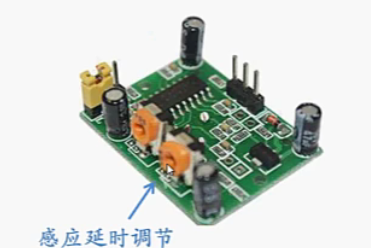
人体感应传感器模块感应延时调节
感应延时调节顺时针旋转感应延时加长(最大约200秒)
反之感应延时减短(最小约8秒)
人体感应传感器模块触发方式
触发方式选择跳线
触发方式:(可跳线选择)
L-不可重复触发方式
H-可重复触发方式
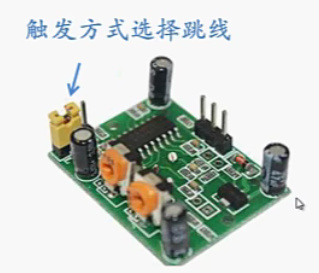
这两种方式最大区别在于模块在输出高电平的延迟时间内,是否再次检查监测区域内的红外状态有无变化。
L-不可重复触发方式:即感应输出高电平后,延时时间内不再检查监测区域有无红外状态改变,当延时一结束,输出将自动从高电平变成低电平;
H-可重复触发方式:即感应输出高电平后,延时时间内持续不断地检查监测区域有无红外状态改变,如果在延时结束前再次检查到区域内有红外状态改变,模块将重新开始延时;
两种触发方式区别:倒计时期间是否检查红外区域内的状况。
L-不可重复触发方式:即感应输出高电平后,延时时间段一结束,输出将自动从高电平变成低电平;
H-可重复触发方式:即感应输出高电平后,在延时时间段内,如果有人体在其感应范围活动,其输出将一直保持高电平,直到人离开后才延时将高电平变为低电平
一般默认为可重复触发方式
int irSensorPin = 3; //连接红外传感器引脚
bool irSensorOutput; //红外传感器输出信号

void setup(){
  pinMode(irSensorPin, INPUT);
  Serial.begin(9600);
  Serial.println("welcome to Motion Sensor");
}

void loop(){
  irSensorOutput = digitalRead(irSensorPin); //读取红外传感器输出
  if(irSensorOutput == HIGH){ //如果红外传感器输出高电平
    Serial.println("IR Motion Sensor OUTPUT:HIGH");
  }
  else{
    Serial.println("IR Motion Sensor OUTPUT:LOW");
  }
}
+ 连接3.3v
-连接 gnd
输出 连接 d7
int irSensorPin = 13; //连接esp8266的D7上
bool irSensorOutput; //红外传感器输出信号

void setup(){
  pinMode(irSensorPin, INPUT);
  Serial.begin(9600);
  Serial.println("welcome to Motion Sensor");
}

void loop(){
  irSensorOutput = digitalRead(irSensorPin); //读取红外传感器输出
  if(irSensorOutput == HIGH){ //如果红外传感器输出高电平
    Serial.println("IR Motion Sensor OUTPUT:HIGH");
  }
  else{
    Serial.println("IR Motion Sensor OUTPUT:LOW");
  }
}
+ RGB LED的基本结构
+ 如何控制RGB LED颜色
const int rLedPin = 3; //引脚R
const int gLedPin = 5; //引脚G
const int bLedPin = 6; //引脚B

int ledR  = 0; //R Led 亮度
int ledG  = 0; //G Led 亮度
int ledB  = 0; //B Led 亮度

void setup() {
  pinMode(rLedPin, OUTPUT);
  pinMode(gLedPin, OUTPUT);
  pinMode(bLedPin, OUTPUT);
  Serial.begin(9600);
  Serial.println("Welcome to Taichi-Maker RGB Led Tutorial.");
  Serial.println("Please Input RGB value(eg. r128g100b20).");
}

void loop() {

  if (Serial.available()>0) {
    char serialCmdChar = Serial.read();
    serialCmd(serialCmdChar);
  }
  delay(50);
}

void serialCmd(char serialCmdChar) {  //r128g100b20
  switch (serialCmdChar){
    case 'r':
      ledR = Serial.parseInt();
      break;

    case 'g':
      ledG = Serial.parseInt();
      break;

    case 'b':
      ledB = Serial.parseInt();
      break;

    case 'c':
      ledR = 0;
      ledG = 0;
      ledB = 0;
  }

  analogWrite(rLedPin, ledR);
  delay(100);
  analogWrite(gLedPin, ledG);
  delay(100);
  analogWrite(bLedPin, ledB);
  delay(100);

  Serial.print ("Red Value = ");
  Serial.println (ledR);
  Serial.print ("Green Value = ");
  Serial.println (ledG);
  Serial.print ("Blue Value = ");
  Serial.println (ledB);
  Serial.println ("-------------");
}
Welcome to Taichi-Maker RGB Led Tutorial.
Please Input RGB value(eg. r128g100b20).
Red Value = 128
Green Value = 0
Blue Value = 0
-------------
Red Value = 128
Green Value = 100
Blue Value = 0
-------------
Red Value = 128
Green Value = 100
Blue Value = 20
-------------
Red Value = 128
Green Value = 100
Blue Value = 20
-------------
小夜灯测试
#define rLedPin 6 //RGB-LED引脚R
#define gLedPin 5 //RGB-LED引脚G
#define bLedPin 3 //RGB-LED引脚B
#define irSensorPin 8 //红外人体感应模块信号输出
#define lightSensorPin A0 //光敏电阻分压电路信号输出

int ledR  = 0; //R Led 亮度
int ledG  = 0; //G Led 亮度
int ledB  = 0; //B Led 亮度

bool irReading;   //红外人体感应模块输出
int lightReading; //光敏电阻分压电路信号输出
int ledColorIndex;

void setup() {
  //设置引脚为相应工作模式
  pinMode(rLedPin, OUTPUT); //pinMode(6, OUTPUT);
  pinMode(gLedPin, OUTPUT);
  pinMode(bLedPin, OUTPUT);
  pinMode(irSensorPin, INPUT);

  Serial.begin(9600);
  Serial.println("Taichi-Maker Night-Light Test Sketch.");
}

void loop() {
  lightReading = analogRead(lightSensorPin);   //测试光敏电阻
  delay(500);
  irReading = digitalRead(irSensorPin);  //测试红外人体感应传感器
  delay(500);
  rgbLedTest();   //测试LED

  Serial.println("=====Sensor Test Report=====");
  Serial.print("lightReading = "); Serial.println(lightReading);
  Serial.print("irReading = "); Serial.println(irReading);
  Serial.println("============================");
}

void rgbLedTest(){  //led测试程序
  ledColorIndex++;
  switch (ledColorIndex) {
    case 1:  //点亮红色LED
      redTest();
      break;
    case 2: //熄灭LED
      blackTest();
      break;
    case 3: //点亮绿色LED
      greenTest();
      break;
    case 4: //熄灭LED
      blackTest();
      break;
    case 5: //点亮绿色LED
      greenTest();
      break;
    case 6: //熄灭LED
      blackTest();
      break;
    case 7: //点亮蓝色LED
      blueTest();
      break;
    case 8: //熄灭LED
      blackTest();
      break;
    case 9: //点亮蓝色LED
      blueTest();
      break;
    case 10: //熄灭LED
      blackTest();
      break;
    case 11: //点亮蓝色LED
      blueTest();
      break;
    case 12: //熄灭LED
      blackTest();
      break;
  }
  if (ledColorIndex == 12) ledColorIndex = 0; //led测试循环
}

void redTest(){  //测试红色LED
  digitalWrite(rLedPin, HIGH);
  digitalWrite(gLedPin, LOW);
  digitalWrite(bLedPin, LOW);
}

void greenTest(){  //测试绿色LED
  digitalWrite(rLedPin, LOW);
  digitalWrite(gLedPin, HIGH);
  digitalWrite(bLedPin, LOW);
}

void blueTest(){  //测试蓝色LED
  digitalWrite(rLedPin, LOW);
  digitalWrite(gLedPin, LOW);
  digitalWrite(bLedPin, HIGH);
}

void blackTest(){ //LED熄灭
  digitalWrite(rLedPin, LOW);
  digitalWrite(gLedPin, LOW);
  digitalWrite(bLedPin, LOW);
}
小夜灯控制程序
#define rLedPin 6 //RGB-LED引脚R
#define gLedPin 5 //RGB-LED引脚G
#define bLedPin 3 //RGB-LED引脚B
#define irSensorPin 8 //红外人体感应模块信号输出
#define lightSensorPin A0 //光敏电阻分压电路信号输出

// 用户可以通过变量 ledR、ledG、ledB 自定义RGB-LED颜色
int ledR  = 99; //R Led 亮度
int ledG  = 185; //G Led 亮度
int ledB  = 33; //B Led 亮度

bool irReading;   //存储红外人体感应模块输出
int lightReading; //存储光敏电阻分压电路信号输出

void setup() {
  //设置引脚为相应工作模式
  pinMode(rLedPin, OUTPUT);
  pinMode(gLedPin, OUTPUT);
  pinMode(bLedPin, OUTPUT);
  pinMode(irSensorPin, INPUT);

  Serial.begin(9600);
  Serial.println("Welcome to Taichi-Maker RGB Led Night-Light.");
}

void loop() {
  irReading = digitalRead(irSensorPin); //读取红外人体感应模块
  lightReading = analogRead(lightSensorPin); //读取光敏电阻分压电路信号输出

  if(irReading == HIGH && lightReading >= 900){ //如感应到人且亮度达到需照明程度
    lightOn(1);                                 //点亮小夜灯照明
  } else {                                      //如未感应到人且亮度未达到需照明程度
    lightOn(0);                                 //保持小夜灯熄灭
  }

  //通过串口监视器实时输出各个传感器检测的数据结果
  //可用于调试小夜灯工作参数使用
  Serial.println("");
  Serial.println("===========================");
  Serial.print("irReading = "); Serial.println(irReading);
  Serial.print("lightReading = "); Serial.println(lightReading);
  Serial.println("===========================");
  delay(50);
}

//以下lightOn函数通过参数on的数值
//来控制小夜灯RGB-LED是否点亮
void lightOn(bool on){
  if (on == 1) { //如参数on的数值为1则点亮小夜灯
    analogWrite(rLedPin, ledR);
    delay(10);
    analogWrite(gLedPin, ledG);
    delay(10);
    analogWrite(bLedPin, ledB);
    delay(10);
  }  else {  //否则保持小夜灯熄灭
    analogWrite(rLedPin, 0);
    delay(10);
    analogWrite(gLedPin, 0);
    delay(10);
    analogWrite(bLedPin, 0);
    delay(10);
  }
}
实例2
#define rLedPin 6 //RGB-LED引脚R
#define gLedPin 5 //RGB-LED引脚G
#define bLedPin 3 //RGB-LED引脚B
#define irSensorPin 8 //红外人体感应模块信号输出
#define lightSensorPin A0 //光敏电阻分压电路信号输出

// 用户可以通过变量 ledR、ledG、ledB 自定义RGB-LED颜色
int ledR  = 99; //R Led 亮度
int ledG  = 185; //G Led 亮度
int ledB  = 33; //B Led 亮度

bool irReading;   //存储红外人体感应模块输出
int lightReading; //存储光敏电阻分压电路信号输出

void setup() {
  //设置引脚为相应工作模式
  pinMode(rLedPin, OUTPUT);
  pinMode(gLedPin, OUTPUT);
  pinMode(bLedPin, OUTPUT);
  pinMode(irSensorPin, INPUT);

  Serial.begin(9600);
  Serial.println("Welcome to Taichi-Maker RGB Led Night-Light.");
}

void loop() {
  irReading = digitalRead(irSensorPin); //读取红外人体感应模块
  lightReading = analogRead(lightSensorPin); //读取光敏电阻分压电路信号输出

  if(irReading == HIGH && lightReading >= 500){ //如感应到人且亮度达到需照明程度
    lightOn(1);                                 //点亮小夜灯照明
  } else {                                      //如未感应到人且亮度未达到需照明程度
    lightOn(0);                                 //保持小夜灯熄灭
  }

  //通过串口监视器实时输出各个传感器检测的数据结果
  //可用于调试小夜灯工作参数使用
  Serial.println("");
  Serial.println("===========================");
  Serial.print("irReading = "); Serial.println(irReading);
  Serial.print("lightReading = "); Serial.println(lightReading);
  Serial.println("===========================");
  delay(50);
}

//以下lightOn函数通过参数on的数值
//来控制小夜灯RGB-LED是否点亮
void lightOn(bool on){
  if (on == 1) { //如参数on的数值为1则点亮小夜灯
    analogWrite(rLedPin, ledR);
    delay(10);
    analogWrite(gLedPin, ledG);
    delay(10);
    analogWrite(bLedPin, ledB);
    delay(10);
  }  else {  //否则保持小夜灯熄灭
    analogWrite(rLedPin, 0);
    delay(10);
    analogWrite(gLedPin, 0);
    delay(10);
    analogWrite(bLedPin, 0);
    delay(10);
  }
}
小夜灯控制程序-3
#define rLedPin 6 //RGB-LED引脚R
#define gLedPin 5 //RGB-LED引脚G
#define bLedPin 3 //RGB-LED引脚B
#define irSensorPin 8 //红外人体感应模块信号输出
#define lightSensorPin A0 //光敏电阻分压电路信号输出

int ledR  = 0; //R Led 亮度
int ledG  = 0; //G Led 亮度
int ledB  = 0; //B Led 亮度

bool irReading;   //红外人体感应模块输出
int lightReading; //光敏电阻分压电路信号输出
bool onOffState; //小夜灯开关状态

unsigned long previousIRMillis;    //上一次检查红外传感器的时间
unsigned long previousLightMillis; //上一次检查光敏传感器的时间
int irCheckInterval = 500;         //红外传感器检查时间间隔
int lightCheckInterval = 1000;     //光敏传感器检查时间间隔

int colorIndex;             //颜色序列号
int colorChangeDelay = 1;   //颜色改变速度控制变量(数值越大,颜色改变速度越慢)
void setup() {
  //设置引脚为相应工作模式
  pinMode(rLedPin, OUTPUT); //pinMode(6, OUTPUT);
  pinMode(gLedPin, OUTPUT);
  pinMode(bLedPin, OUTPUT);
  pinMode(irSensorPin, INPUT);

  Serial.begin(9600);
  Serial.println("Welcome to Taichi-Maker RGB Led Night-Light.");
  Serial.println("System Start Sensor Check.");

  irReading = digitalRead(irSensorPin);       //读取红外人体感应模块
  lightReading = analogRead(lightSensorPin);  //读取光敏电阻分压电路信号输出

  //通过串口监视器实时输出各个传感器检测的数据结果
  //可用于调试小夜灯工作参数使用
  Serial.println("");
  Serial.println("======Checking Sensor.=====");
  Serial.println("===========================");
  Serial.print("irReading = "); Serial.println(irReading);
  Serial.print("lightReading = "); Serial.println(lightReading);
  Serial.println("===========================");
  Serial.println("");

}

void loop() {
  unsigned long currentMillis = millis();   //millis函数可用来获取Arduino开机后运行的时间

  irCheck(currentMillis);     //检查红外传感器时间(currentMillis为当前Arduino开机运行的时间)
  lightCheck(currentMillis);  //检查光敏电阻时间(currentMillis为当前Arduino开机运行的时间)

  if (irReading ==HIGH ) {
    irCheckInterval = 30000;                 //感应到人时人体传感器检查时间间隔较长
  } else {
    irCheckInterval = 500;                   //未感应到人时人体传感器检查时间间隔较短
  }

  /*
   * 以下语句将循环改变RGB-LED的颜色。
   * 函数ledShowColor中共定义了约1536种颜色,
   * 而每种颜色都被编上一个独立的序号,
   * 且相邻两个编号色彩之间的色差极小。
   * 于是RGB-LED在循环显示这些色彩时,
   * 小夜灯将会产生逐渐颜色变化的效果。
  */
if(irReading ==HIGH && lightReading>=880){   //如感应到人且亮度达到需照明程度
    if (onOffState == 0) fadeOn();           //点亮小夜灯照明
    onOffState = 1;

    //检查颜色序号是否达到上限
    if (colorIndex <= 1535) {  //如颜色序号没达到上限
      colorIndex++;            //另颜色序号递增
    } else if ( colorIndex > 1535) {   //如颜色序号达到上限
      colorIndex = 0;                  //另颜色序号归零
    }

    ledShowColor(colorIndex);

  } else {                                   //如未感应到人且亮度未达到需照明程度

    if (onOffState == 1) fadeOff();          //保持小夜灯熄灭
    onOffState = 0;

  }
}

void fadeOn(){
  Serial.println("");
  Serial.println("Fade ON");
  int i;
  while(i < 255){
    i++;
    ledR++;
    ledG++;
    ledB++;
    analogWrite (rLedPin, ledR);
    analogWrite (gLedPin, ledG);
    analogWrite (bLedPin, ledB);
    Serial.println("");
    Serial.print("ledR = ");Serial.println(ledR);
    Serial.print("ledG = ");Serial.println(ledG);
    Serial.print("ledB = ");Serial.println(ledB);
  }
}

void fadeOff(){
  Serial.println("");
  Serial.println("Fade OFF");
  while(ledR > 0){
    ledR--;
    analogWrite (rLedPin, ledR);
    Serial.print("ledR = ");Serial.println(ledR);
  }
  while(ledB > 0){
    ledB--;
    analogWrite (bLedPin, ledB);
    Serial.print("ledB = ");Serial.println(ledB);
  }
  while(ledG > 0){
    ledG--;
    analogWrite (gLedPin, ledG);
    Serial.print("ledG = ");Serial.println(ledG);
  }
  colorIndex = 0;
}


void ledShowColor(int ledColorIndex){

  /*
   * ledColorIndex参数为颜色序列号。
   * 以下语句根据参数ledColorIndex让RGB-LED显示相应颜色。
   * 从而产生小夜灯色彩渐变的效果。
   * 您可以将程序上传并观察小夜灯在工作时候的串口监视器数据输出
   * 从而找到小夜灯颜色变化的规律。
  */

  if (ledColorIndex >= 0 && ledColorIndex <= 255){
    ledR = 255 - ledColorIndex;
    analogWrite (rLedPin, ledR);
  } else if(ledColorIndex >= 256 && ledColorIndex <= 511){
    ledR = ledColorIndex -256;
    analogWrite (rLedPin, ledR);
  } else if(ledColorIndex >= 512 && ledColorIndex <= 767){
    ledG = 767 - ledColorIndex;
    analogWrite (gLedPin, ledG);
  } else if(ledColorIndex >= 768 && ledColorIndex <= 1023){
    ledG = ledColorIndex - 768;
    analogWrite (gLedPin, ledG);
  } else if(ledColorIndex >= 1024 && ledColorIndex <= 1279){
    ledB = 1279 - ledColorIndex;
    analogWrite (bLedPin, ledB);
  } else if(ledColorIndex >= 1280 && ledColorIndex <= 1535){
    ledB = ledColorIndex - 1280;
    analogWrite (bLedPin, ledB);
  }

  Serial.println("");
  Serial.print("ledR = ");Serial.println(ledR);
  Serial.print("ledG = ");Serial.println(ledG);
  Serial.print("ledB = ");Serial.println(ledB);

  delay(colorChangeDelay);
}

void irCheck(unsigned long thisIRMillis) {
  /*
   * 每一次调用irCheck函数,都需要将当前Arduino的开机
   * 时间传递给irCheck函数的thisIRMillis参数。
   * 而irCheck函数中的previousIRMillis变量是上一次传感器检查时间
   * 通过比较变量thisIRMillis和变量previousIRMillis之间的间隔
   * (当前的Arduino开机运行时间和上一次检查传感器时间的间隔)
   * 来确定Arduino是否需要该检查传感器了。而控制这个时间间隔
   * 的变量就是irCheckInterval。
  */
  if ((unsigned long)(thisIRMillis - previousIRMillis >= irCheckInterval)) {  //如果时间间隔到达了
    irReading = digitalRead(irSensorPin);       //读取红外人体感应模块

    //通过串口监视器实时输出传感器检测的数据结果
    //可用于调试小夜灯工作参数使用
    Serial.println("");
    Serial.println("=== Checking IR Sensor ====");
    Serial.println("===========================");
    Serial.print("irReading = "); Serial.println(irReading);
    Serial.print("thisIRMillis = "); Serial.println(thisIRMillis);
    Serial.print("previousIRMillis = "); Serial.println(previousIRMillis);
    Serial.println("===========================");
    Serial.println("");

    // 每一次检查完传感器以后,都要将这一次检查传感器的时间更新给previousIRMillis。
    // 这一个操作是通过将thisIRMillis存储的时间信息赋值给previousIRMillis完成的。
    // 这样下次irCheck函数被调用时,previousIRMillis将保持为最近一次传感器检查时间。
    previousIRMillis = thisIRMillis;
  }
}

void lightCheck(unsigned long thisLightMillis) {
   //检查是否到达时间间隔
  if ((unsigned long)(thisLightMillis - previousLightMillis >= lightCheckInterval)) {  //如果时间间隔到达了
    lightReading = analogRead(lightSensorPin);  //读取光敏电阻分压电路信号输出

    //通过串口监视器实时输出各个传感器检测的数据结果
    //可用于调试小夜灯工作参数使用
    Serial.println("");
    Serial.println("== Checking Light Sensor ==");
    Serial.println("===========================");
    Serial.print("lightReading = "); Serial.println(lightReading);
    Serial.print("thisLightMillis = "); Serial.println(thisLightMillis);
    Serial.print("previousLightMillis = "); Serial.println(previousLightMillis);
    Serial.println("===========================");
    Serial.println("");

    previousLightMillis = thisLightMillis;  // 记录最新一次的传感器检查时间
  }
}
写入
#include <EEPROM.h>

/** 被写入数据的EEPROM地址编号 (即.即哪一个存储地址将要被写入数据) **/
int addr = 0;

void setup() {
  /** setup内无内容 **/
}


void loop() {
  /***
    如使用EEPROM存储模拟输入引脚所读取到的数值(即使用analogRead函数
    读取Arduino开发板的模拟输入引脚并且将读取到的数值存储于EEPROM),
    则需要将该数值除以4。原因是用analogRead函数所读取到的数值为0-1023
    而EEPROM只能储存0-255的数值。(EEPROM每一个存储地址可以储存一个字节,
    因此只能存储0-255的数值。)
  ***/

  int val = 123;  // 将要存储于EEPROM的整数数值

  /***
    将数值写入相应EEPROM地址。该数值即使在断开
    Arduino开发板电源后,仍将保持在开发板的EEPROM中不变。
  ***/
  EEPROM.write(addr, val);

  /***

    转入下一存储地址。当存储地址序列号达到EEPROM的存储空间结尾,
    返回到EEPROM开始地址。

    不同型号Arduino开发板具有不同大小的EEPROM存储空间,即:
    - Arduno Duemilanove: 512b EEPROM 存储空间.
    - Arduino Uno:        1kb EEPROM 存储空间 (允许使用的EEPROM地址序列号为 0-1023 ).
    - Arduino Mega:       4kb EEPROM 存储空间.
  ***/
  addr = addr + 1;
  if (addr == EEPROM.length()) {
    addr = 0;
  }

  delay(10);
}
读出
/*
 * EEPROM Read
 *
 * 读取所有EEPROM储存数值并显示于计算机屏幕供用户查看。
 *
 * 本实例程序注释中文翻译:太极创客(WWW.TAICHI-MAKER.COM )
 * 如需要获得EEPROM的使用中文说明以及Arduino开发板开发的更多资料和
 * 视频教程,请参见太极创客网站:
 *
 * WWW.TAICHI-MAKER.COM
 *
 * 2017-11-22
 *
 */

#include <EEPROM.h>

//从EEPROM的第一个字节(地址序号0)开始读取
int address = 0;
byte value;

void setup() {
  //初始化串口通讯并等待初始化完成
  Serial.begin(9600);
  while (!Serial) {
    ; // 等待初始化串口通讯初始化完成
  }
}

void loop() {
  //从当前EEPROM存储地址中读取数据
  value = EEPROM.read(address);

  Serial.print(address);
  Serial.print("\t");
  Serial.print(value, DEC);
  Serial.println();

  /***
    转入下一存储单元。当存储序列号达到EEPROM的结尾,
    返回到EEPROM开始。

    不同型号Arduino开发板具有不同大小的EEPROM存储空间,即:
    - Arduno Duemilanove: 512b EEPROM 存储空间.
    - Arduino Uno:        1kb EEPROM 存储空间 (允许使用的EEPROM地址序列号为 0-1023 ).
    - Arduino Mega:       4kb EEPROM 存储空间.
  ***/
  address = address + 1;
  if (address == EEPROM.length()) {
    address = 0;
  }

  delay(500);
}
优化SRAM-1
串口监视器输出时用
Serial. println("Taichi-Maker") ;( SRAM)→Serial. println(("Taichi-Maker")); (Flash)
优化SRAM-2
将常量存放在 FLASH中
PROGMEM
const int a= 125;(SRAM)→const int PROGMeM=125;(Flash)
优化SRAM-3
共享SRAM局部变量
独享SRAM全局变量
尽量多使用局部变量代替全局变量
优化SRAM-4
SRAM 2KB
bool a; (1字节)2048 个
int a;(2字节) 1024个
尽量使用占用内存少的数据类型
|
数据类型 |
占用字节 |
数值范围 |
备注 |
|
|
|
只用作函数声明,表示没有返回值 |
|
|
1 |
true,false |
|
|
|
1 |
-128~127 |
Arduino中的char是有符号的,等价于signed char。 |
|
|
1 |
0~255 |
等同于byte和uint8_t类型 |
|
|
1 |
0~255 |
byte类型不是C/C++标准类型,他是Arduino平台下特有的,它实际就是无符号8位整型数据。 |
|
|
2 |
-32768~32767 |
在基于ATMega的8位微控制器的Arduino开发板如Arduino UNO,Ardunio Mega2560,int占用2字节内存。而对于32位Arduino开发板(如Arduino Due,SAMD)int占4字节。 |
|
|
2 |
0~65535 |
等同于word和uint16_t类型 |
|
|
2 |
0~65535 |
|
|
|
4 |
-2147483648~2147483647 |
|
|
|
4 |
0 ~ 4,294,967,295 |
等同于uint32_t类型 |
|
|
short |
2 |
-32768~32767 |
|
|
4 |
-3.4028235E+38~3.4028235E+38 |
只有6~7位小数精度 |
|
|
4 |
-3.4028235E+38~3.4028235E+38 |
在Arduino Due上有8个字节,其余的跟float一样 |
|
|
|
|
相当于char类型的数组 |
方法1:工具→管理库→搜索下载
方法2:下载好zip的,
项目→加载库→添加.zip库
方法3:下载好库,如果zip的先解压
放到C:\Users\用户名\Documents\Arduino\libraries下,重启arduino
下载库名:IRremote
作者: shirriff, z3to
github:https://github.com/Arduino-IRremote/Arduino-IRremote
接收不成功返回0
#include <IRremote.h>
#define  RECV_PIN 11

IRrecv irrecv(RECV_PIN);   // 红外遥控初始化
decode_results results;   // 储存接收到的红外遥控信息

void setup()
{
  pinMode(LED_BUILTIN, OUTPUT);
  digitalWrite(LED_BUILTIN, LOW);
  Serial.begin(9600);
  Serial.println("Enabling IRin");
  irrecv.enableIRIn();     // 启动红外接收
  Serial.println("Enabled IRin");
}

void loop() {
  /*
  decode()库函数用于判断红外接收器所接收到的红外信号是否可以被解析。
  如可以成功解析,则返回非零数值。并将解析结果存储于results中。
  如无法成功解析,则返回零。

  每一次解析完成,都需要调用resume()函数从而让Arduino开始准备接收下一个红外
  遥控指令。
  */
  if (irrecv.decode(&results)) {
    Serial.println(results.value, HEX);  // results.value为红外遥控信号的具体数值

    if(results.value == 0xF7C03F) //如果控制信息数值为F7C03F
    {
        Serial.println("Command Received: Turn On LED.");
        digitalWrite(LED_BUILTIN, HIGH);
    }

    if(results.value == 0xF740BF) //如果控制信息数值为F740BF
    {
        Serial.println("Command Received: Turn Off LED.");
        digitalWrite(LED_BUILTIN, LOW);
    }

    irrecv.resume(); // 恢复接收下一个红外遥控信号
  }
  delay(100);
}

#include <IRremote.h>
IRsend irsend;

void setup() {
}

void loop() {
  for (int i = 0; i < 3; i++) {
    irsend.sendNEC(0xF7C03F, 32);  //发射NEC红外遥控协议F7C03F指令码
    delay(40);
  }
  /*
  *
  * IRremote库支持NEC, Sony, Philips RC5, Philips RC6等协议指令。
  * 本示例程序中Arduino将通过调用函数sendSony(0xa90, 12) 来发射Sony协议指令。
  * 该函数的两个参数中, 0xa90为指令信息内容,12位指令信息位数。
  *
  * 假如需要发射NEC协议指令则可以调用函数sendNEC(0xF7C03F, 32)。
  * 其中0xF740BF为指令信息内容,32位指令信息位数。
  *
  * 如果需要发射其它遥控协议指令请参考以下程序代码:
  * sendNEC(unsigned long data, int nbits);   //发射NEC协议指令
  * sendSony(unsigned long data, int nbits);  //发射Sony协议指令
  * void sendRC5(unsigned long data, int nbits);   //发射Philips RC5协议指令
  * void sendRC6(unsigned long data, int nbits);   //发射Philips RC6协议指令
  * void sendSharp(unsigned long data, int nbits); //发射Sharp协议指令
  * void sendPanasonic(unsigned int address, unsigned long data); //发射Panasonic协议指令
  * void sendJVC(unsigned long data, int nbits, int repeat);  //发射JVC协议指令
  * void sendRaw(unsigned int buf[], int len, int hz);        //发射原始指令
  */
  delay(5000); //延迟5秒
}
* 学霸型红外遥控器
* 太极创客 http://www.taichi-maker.com/
* Ver. 1.2 - 01/07/2017
* =====================功能说明=====================
* 利用Arduino开发板记录并“重放”红外遥控信号
* 用户可以使用家中控制电器用的红外遥控器对准本装置的
* 红外接收器,本装置可将接收到的红外遥控信号记录至EEPROM。
* 当用户按下"发射"按键时,红外LED会发射记录的红外遥控信号
* 从而控制家中电器。
*
* 本示例程序主要内容借鉴Ken Shirriff 的 IRremote 库示例程序IRrecord。
*
* 本程序基于Ken Shirriff开发的IRremote库。如需获得该库文件
* 可前往以下网址获得:
* http://arcfn.com (Ken Shirriff个人博客)
* http://www.taichi-maker.com/ (太极创客官网)
*
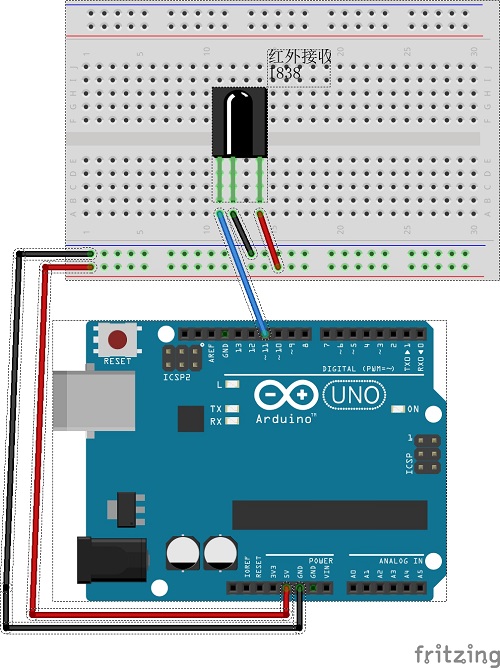
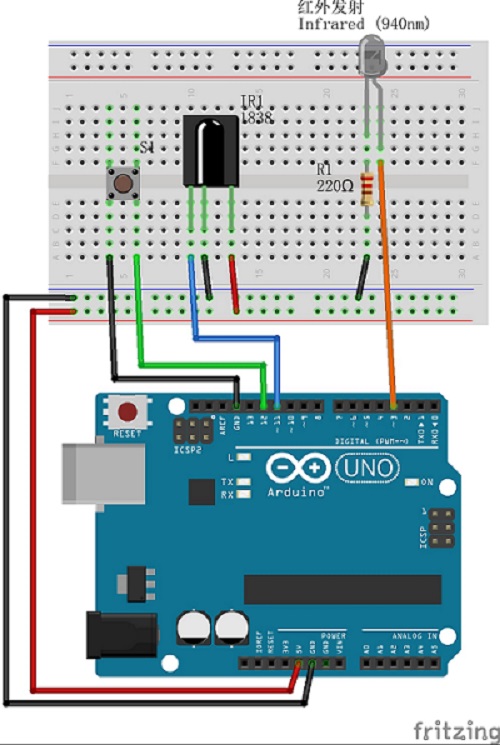
* =====================电路连接======================
* 红外接收器 1838B OUT 引脚 --- Arduino Uno 引脚 11
* 红外发射 LED 正极 --- Arduino Uno 引脚 3
* 按键开关 --- Arduino Uno 引脚 12
*
* 如需获得详细电路连接说明图,请参阅太极创客网站:
* http://WWW.TAICHI-MAKER.COM
*
* 此示例程序为配合太极创客制作的
* 《零基础入门学用ARDUINO教程-智能应用篇》使用
* 版本更新说明
* V1.1 使用put get来 进行EEPROM存取
* V1.2 针对IRrecord代码进行优化
*/
#include <IRremote.h>
#include <EEPROM.h>
#define codeTypeEAddr 0 // 存放红外信号编码类型EEPROM地址
#define codeLenEAddr 1 // 存放红外信号编码长度EEPROM地址
#define toggleEAddr 2 // 存放红外信号RC5/RC6类型EEPROM地址
#define codeValueEAddr 3 // 存放红外信号数值EEPROM地址
#define RECV_PIN 11 // 红外接收器 OUT 引脚 --- Arduino 引脚11
#define BUTTON_PIN 12 // 按键开关 --- Arduino 引脚12
#define STATUS_PIN LED_BUILTIN // 状态显示LED --- 开发板内置LED
IRrecv irrecv(RECV_PIN); // 红外遥控接收器对象
IRsend irsend; // 红外遥控发射对象
decode_results results; // 储存接收到的红外遥控信息
void setup() {
Serial.begin(9600);
irrecv.enableIRIn(); // 启动红外接收
pinMode(BUTTON_PIN, INPUT_PULLUP);
pinMode(STATUS_PIN, OUTPUT);
delay(10);
loadEepromValues(); // 从EEPROM中读取红外信号信息(具体信息请见函数部分)
}
// 红外信号存储变量
int codeType; // 红外信号编码类型
unsigned long codeValue; // 存放红外信号数值(如果不是raw型)
unsigned int rawCodes[RAWBUF]; // raw型信号
int codeLen; // 红外信号编码长度
int toggle; // 红外信号RC5/RC6类型
// 记录收到的红外信号
void storeCode(decode_results *results) {
codeType = results->decode_type;
int count = results->rawlen;
if (codeType == UNKNOWN) { //如果收到的信号是无法识别的协议,则存储为raw型数据
Serial.println("Received unknown code, saving as raw");
codeLen = results->rawlen - 1;
// 存储raw型信号:
// 将首个数值放弃(间隙)
// 将信号转化为毫秒
// 细微调整信号内容,将信息变短将空档间隙变长从而取消红外接收信号的扰动
for (int i = 1; i <= codeLen; i++) {
if (i % 2) {
// 信号
rawCodes[i - 1] = results->rawbuf[i]*USECPERTICK - MARK_EXCESS;
Serial.print(" m");
}
else {
// 空档间隙
rawCodes[i - 1] = results->rawbuf[i]*USECPERTICK + MARK_EXCESS;
Serial.print(" s");
}
Serial.print(rawCodes[i - 1], DEC);
}
Serial.println("");
}
else {
if (codeType == NEC) { //如果是NEC协议类型
Serial.print("Received NEC: ");
if (results->value == REPEAT) {
// Don't record a NEC repeat value as that's useless.
Serial.println("repeat; ignoring.");
return;
}
}
else if (codeType == SONY) { //如果是SONY协议类型
Serial.print("Received SONY: ");
}
else if (codeType == PANASONIC) { //如果是PANASONIC协议类型
Serial.print("Received PANASONIC: ");
}
else if (codeType == JVC) { //如果是JVC协议类型
Serial.print("Received JVC: ");
}
else if (codeType == RC5) { //如果是RC5协议类型
Serial.print("Received RC5: ");
}
else if (codeType == RC6) { //如果是RC6协议类型
Serial.print("Received RC6: ");
}
else {
Serial.print("Unexpected codeType "); //无法识别信号
Serial.print(codeType, DEC);
Serial.println("");
}
Serial.println(results->value, HEX); //输出信号数值
codeValue = results->value;
codeLen = results->bits;
}
writeEepromVal(); //将收到的信号信息储存于eeprom
}
// 发射红外信号
void sendCode(int repeat) {
if (codeType == NEC) { //如果是NEC协议信号
if (repeat) { //且如果是发射重复信号
irsend.sendNEC(REPEAT, codeLen); //发射NEC协议的重复信号
Serial.println("Sent NEC repeat");
}
else {
irsend.sendNEC(codeValue, codeLen); //否则发射NEC协议红外指令信号
Serial.print("Sent NEC ");
Serial.println(codeValue, HEX); //串口监视器输出红外指令信号数值
}
}
else if (codeType == SONY) { // 发射的信号是SONY协议
irsend.sendSony(codeValue, codeLen); // 发射SONY协议红外指令信号
Serial.print("Sent Sony ");
Serial.println(codeValue, HEX);
}
else if (codeType == PANASONIC) { // 发射的信号是PANASONIC协议
irsend.sendPanasonic(codeValue, codeLen); // 发射PANASONIC协议红外指令信号
Serial.print("Sent Panasonic");
Serial.println(codeValue, HEX);
}
else if (codeType == JVC) { // 发射的信号是JVC协议
irsend.sendJVC(codeValue, codeLen, false); // 发射JVC协议红外指令信号
Serial.print("Sent JVC");
Serial.println(codeValue, HEX);
}
else if (codeType == RC5 || codeType == RC6) { // 发射的信号是RC5或RC6协议
if (!repeat) {
// 新按键按下后反转toggle位
toggle = 1 - toggle;
}
// 将toggle位放入信号代码中发送
codeValue = codeValue & ~(1 << (codeLen - 1));
codeValue = codeValue | (toggle << (codeLen - 1));
if (codeType == RC5) { // 发射的信号是RC5协议
Serial.print("Sent RC5 ");
Serial.println(codeValue, HEX);
irsend.sendRC5(codeValue, codeLen);
}
else { // 发射的信号是RC6协议
irsend.sendRC6(codeValue, codeLen);
Serial.print("Sent RC6 ");
Serial.println(codeValue, HEX);
}
}
else if (codeType == UNKNOWN /* i.e. raw */) {
// 假设信号频率 38 KHz
irsend.sendRaw(rawCodes, codeLen, 38);
Serial.println("Sent raw");
}
}
int lastButtonState; // 此变量用于判断发射红外信号的按键开关所处的状态
void loop() {
int buttonState = !digitalRead(BUTTON_PIN); // 读取当前的按键开关状态(检查用户是否按下了按键开关)
if (lastButtonState == HIGH && buttonState == LOW) { // 如果按键开关是被按下后再抬起的
Serial.println("Released"); // 通过串口监视器输出"按键抬起"
irrecv.enableIRIn(); // 启动红外接收器信号接收
}
if (buttonState) { // 如果按键开关处于被按下的状态
Serial.println("Pressed, sending"); // 通过串口监视器输出"按键按下"
digitalWrite(STATUS_PIN, HIGH); // 闪烁状态显示红外LED告知用户当前"学霸遥控器"正在发射红外信号(点亮LED)
sendCode(lastButtonState == buttonState); // 更新按键开关状态变量
digitalWrite(STATUS_PIN, LOW); // 闪烁状态显示红外LED告知用户当前"学霸遥控器"正在发射红外信号(熄灭LED)
delay(50); // 信号发射间歇
} else if (irrecv.decode(&results)) { // 如果按键开关处于没有被按下的状态,则实时检查红外接收器并对接收到的信号进行解码
// 如果接收到的红外信号可以通过decode函数成功解码
digitalWrite(STATUS_PIN, HIGH); // 闪烁状态显示红外LED告知用户当前"学霸遥控器"正在发射红外信号(点亮LED)
storeCode(&results); // 将解码的红外信号信息进行储存(非EEPROM储存)
irrecv.resume(); // 恢复红外接收器
digitalWrite(STATUS_PIN, LOW); // 闪烁状态显示红外LED告知用户当前"学霸遥控器"正在发射红外信号(熄灭LED)
}
lastButtonState = buttonState; // 更新按键开关状态变量
}
// 通过EEPROM读取红外信号信息
// 每次Arduino通电后,都会从EEPROM中读取存储的红外信号信息。
// 从而确保"学霸遥控器"在断电后依然可以保持上一次运行时所存储的
// 红外信号信息。
void loadEepromValues(){
codeType = EEPROM.read(codeTypeEAddr);
delay(10);
codeLen = EEPROM.read(codeLenEAddr);
delay(10);
toggle = EEPROM.read(toggleEAddr);
delay(10);
toggle = EEPROM.read(toggleEAddr);
delay(10);
EEPROM.get(codeValueEAddr, codeValue);
}
// 将红外信号信息储存于EEPROM
// 每一次"学霸遥控器"接收到新的红外遥控信号
// 都将最新接收的红外遥控器储存于EEPROM
// 从而确保信号信息不会因为Arduino断电而丢失
void writeEepromVal(){
EEPROM.write(codeTypeEAddr, codeType);
delay(10);
EEPROM.write(codeLenEAddr, codeLen);
delay(10);
EEPROM.write(toggleEAddr, toggleEAddr);
delay(10);
EEPROM.put(codeValueEAddr, codeValue);
delay(10);
}
下载fastled库
名字fastled
作者: Daniel Garcia
github:https://github.com/FastLED/FastLED
一条有30个灯珠的灯带需要的直流电源电流要求
30×60=1800mA
1800×80%约1500mA
#include <FastLED.h>
FASTLED_USING_NAMESPACE
// FastLED "100-lines-of-code" demo reel, showing just a few
// of the kinds of animation patterns you can quickly and easily
// compose using FastLED.
//
// This example also shows one easy way to define multiple
// animations patterns and have them automatically rotate.
//
// -Mark Kriegsman, December 2014
#if defined(FASTLED_VERSION) && (FASTLED_VERSION < 3001000)
#warning "Requires FastLED 3.1 or later; check github for latest code."
#endif
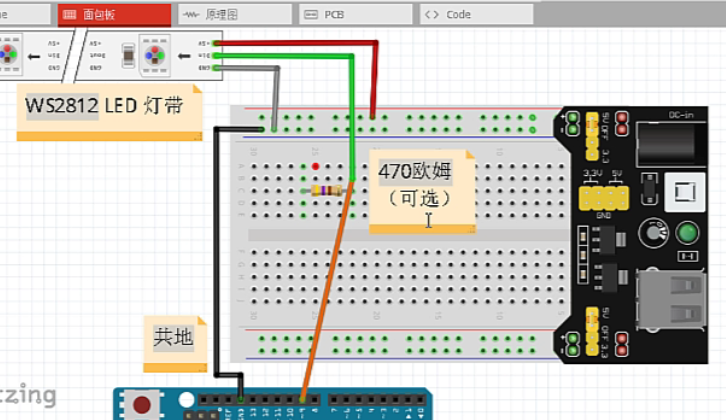
#define DATA_PIN 3 //输入连接哪个引脚
//#define CLK_PIN 4
#define LED_TYPE WS2812 //光带型号
#define COLOR_ORDER GRB
#define NUM_LEDS 60 //灯珠数量
CRGB leds[NUM_LEDS];
#define BRIGHTNESS 96
#define FRAMES_PER_SECOND 120
void setup() {
delay(3000); // 3 second delay for recovery
// tell FastLED about the LED strip configuration
FastLED.addLeds<LED_TYPE,DATA_PIN,COLOR_ORDER>(leds, NUM_LEDS).setCorrection(TypicalLEDStrip);
//FastLED.addLeds<LED_TYPE,DATA_PIN,CLK_PIN,COLOR_ORDER>(leds, NUM_LEDS).setCorrection(TypicalLEDStrip);
// set master brightness control
FastLED.setBrightness(BRIGHTNESS);
}
// List of patterns to cycle through. Each is defined as a separate function below.
typedef void (*SimplePatternList[])();
SimplePatternList gPatterns = { rainbow, rainbowWithGlitter, confetti, sinelon, juggle, bpm };
uint8_t gCurrentPatternNumber = 0; // Index number of which pattern is current
uint8_t gHue = 0; // rotating "base color" used by many of the patterns
void loop()
{
// Call the current pattern function once, updating the 'leds' array
gPatterns[gCurrentPatternNumber]();
// send the 'leds' array out to the actual LED strip
FastLED.show();
// insert a delay to keep the framerate modest
FastLED.delay(1000/FRAMES_PER_SECOND);
// do some periodic updates
EVERY_N_MILLISECONDS( 20 ) { gHue++; } // slowly cycle the "base color" through the rainbow
EVERY_N_SECONDS( 10 ) { nextPattern(); } // change patterns periodically
}
#define ARRAY_SIZE(A) (sizeof(A) / sizeof((A)[0]))
void nextPattern()
{
// add one to the current pattern number, and wrap around at the end
gCurrentPatternNumber = (gCurrentPatternNumber + 1) % ARRAY_SIZE( gPatterns);
}
void rainbow()
{
// FastLED's built-in rainbow generator
fill_rainbow( leds, NUM_LEDS, gHue, 7);
}
void rainbowWithGlitter()
{
// built-in FastLED rainbow, plus some random sparkly glitter
rainbow();
addGlitter(80);
}
void addGlitter( fract8 chanceOfGlitter)
{
if( random8() < chanceOfGlitter) {
leds[ random16(NUM_LEDS) ] += CRGB::White;
}
}
void confetti()
{
// random colored speckles that blink in and fade smoothly
fadeToBlackBy( leds, NUM_LEDS, 10);
int pos = random16(NUM_LEDS);
leds[pos] += CHSV( gHue + random8(64), 200, 255);
}
void sinelon()
{
// a colored dot sweeping back and forth, with fading trails
fadeToBlackBy( leds, NUM_LEDS, 20);
int pos = beatsin16( 13, 0, NUM_LEDS-1 );
leds[pos] += CHSV( gHue, 255, 192);
}
void bpm()
{
// colored stripes pulsing at a defined Beats-Per-Minute (BPM)
uint8_t BeatsPerMinute = 62;
CRGBPalette16 palette = PartyColors_p;
uint8_t beat = beatsin8( BeatsPerMinute, 64, 255);
for( int i = 0; i < NUM_LEDS; i++) { //9948
leds[i] = ColorFromPalette(palette, gHue+(i*2), beat-gHue+(i*10));
}
}
void juggle() {
// eight colored dots, weaving in and out of sync with each other
fadeToBlackBy( leds, NUM_LEDS, 20);
byte dothue = 0;
for( int i = 0; i < 8; i++) {
leds[beatsin16( i+7, 0, NUM_LEDS-1 )] |= CHSV(dothue, 200, 255);
dothue += 32;
}
}
FastLED库-1
实现3个灯亮
/*
 * blinkOne
 * 太极创客 http://www.taichi-maker.com/
 * 03/01/2018
 *
 * =====================功能说明=====================
 * 使用Arduino Uno开发板控制WS2812光带一个灯珠的闪烁。
 *
 * 本示例程序需要Arduino第三方库FastLED。如有需要,可通过以下链接下载该库:
 * http://www.taichi-maker.com/homepage/download/#library-download
 *
 * 如需了解如何为Arduino IDE安装第三方库,请参见以下链接地址的视频教程:
 * http://www.taichi-maker.com/homepage/reference-index/arduino-library-index/install-arduino-library/
 *
 * =====================电路连接======================
 * 此示例程序中,Arduino输出控制信号引脚为9号引脚。
 *
 * 如需获得详细电路连接说明图,请参阅太极创客网站中
 * 有关WS2812 LED光带方面的相关内容,太极创客网站地址:
 *
 *  http://WWW.TAICHI-MAKER.COM
 *
 * 此示例程序为配合太极创客制作的
 * 《零基础入门学用ARDUINO教程-智能应用篇》使用
 */

#include "FastLED.h"            // 此示例程序需要使用FastLED库

#define NUM_LEDS 60             // LED灯珠数量
#define DATA_PIN 3              // Arduino输出控制信号引脚
#define LED_TYPE WS2812         // LED灯带型号
#define COLOR_ORDER GRB         // RGB灯珠中红色、绿色、蓝色LED的排列顺序

uint8_t max_bright = 128;       // LED亮度控制变量,可使用数值为 0 ~ 255, 数值越大则光带亮度越高

CRGB leds[NUM_LEDS];            // 建立光带leds

void setup() {
  Serial.begin(9600);           // 启动串行通讯
  delay(1000);                  // 稳定性等待
  LEDS.addLeds<LED_TYPE, DATA_PIN, COLOR_ORDER>(leds, NUM_LEDS);  // 初始化光带
  FastLED.setBrightness(max_bright);                            // 设置光带亮度
}

void loop() {
  for(int i = 0; i<NUM_LEDS; i++){
    leds[i-1] = CRGB::Red;
    leds[i] = CRGB::Red;          // 设置光带中第一个灯珠颜色为红色,leds[0]为第一个灯珠,leds[1]为第二个灯珠
    leds[i+1] = CRGB::Red;
    FastLED.show();                // 更新LED色彩
    delay(50);                     // 等待50毫秒
    leds[i-1] = CRGB::Green;
    leds[i] = CRGB::Green;          // 设置光带中第一个灯珠颜色为红色,leds[0]为第一个灯珠,leds[1]为第二个灯珠
    leds[i+1] = CRGB::Green;
    FastLED.show();                // 更新LED色彩
    delay(50);
    leds[i-1] = CRGB::Blue;
    leds[i] = CRGB::Blue;          // 设置光带中第一个灯珠颜色为红色,leds[0]为第一个灯珠,leds[1]为第二个灯珠
    leds[i+1] = CRGB::Blue;
    FastLED.show();                // 更新LED色彩
    delay(50);
    leds[i-1] = CRGB::Black;
    leds[i] = CRGB::Black;          // 设置光带中第一个灯珠颜色为红色,leds[0]为第一个灯珠,leds[1]为第二个灯珠
    leds[i+1] = CRGB::Black;
    FastLED.show();                // 更新LED色彩
    delay(50);                     // 等待50毫秒
  }
}

/*
CRGB 颜色名称列表
CRGB::AliceBlue
CRGB::Amethyst
CRGB::AntiqueWhite
CRGB::Aqua
CRGB::Aquamarine
CRGB::Azure
CRGB::Beige
CRGB::Bisque
CRGB::Black
CRGB::BlanchedAlmond
CRGB::Blue
CRGB::BlueViolet
CRGB::Brown
CRGB::BurlyWood
CRGB::CadetBlue
CRGB::Chartreuse
CRGB::Chocolate
CRGB::Coral
CRGB::CornflowerBlue
CRGB::Cornsilk
CRGB::Crimson
CRGB::Cyan
CRGB::DarkBlue
CRGB::DarkCyan
CRGB::DarkGoldenrod
CRGB::DarkGray
CRGB::DarkGreen
CRGB::DarkKhaki
CRGB::DarkMagenta
CRGB::DarkOliveGreen
CRGB::DarkOrange
CRGB::DarkOrchid
CRGB::DarkRed
CRGB::DarkSalmon
CRGB::DarkSeaGreen
CRGB::DarkSlateBlue
CRGB::DarkSlateGray
CRGB::DarkTurquoise
CRGB::DarkViolet
CRGB::DeepPink
CRGB::DeepSkyBlue
CRGB::DimGray
CRGB::DodgerBlue
CRGB::FireBrick
CRGB::FloralWhite
CRGB::ForestGreen
CRGB::Fuchsia
CRGB::Gainsboro
CRGB::GhostWhite
CRGB::Gold
CRGB::Goldenrod
CRGB::Gray
CRGB::Green
CRGB::GreenYellow
CRGB::Honeydew
CRGB::HotPink
CRGB::IndianRed
CRGB::Indigo
CRGB::Ivory
CRGB::Khaki
CRGB::Lavender
CRGB::LavenderBlush
CRGB::LawnGreen
CRGB::LemonChiffon
CRGB::LightBlue
CRGB::LightCoral
CRGB::LightCyan
CRGB::LightGoldenrodYellow
CRGB::LightGreen
CRGB::LightGrey
CRGB::LightPink
CRGB::LightSalmon
CRGB::LightSeaGreen
CRGB::LightSkyBlue
CRGB::LightSlateGray
CRGB::LightSteelBlue
CRGB::LightYellow
CRGB::Lime
CRGB::LimeGreen
CRGB::Linen
CRGB::Magenta
CRGB::Maroon
CRGB::MediumAquamarine
CRGB::MediumBlue
CRGB::MediumOrchid
CRGB::MediumPurple
CRGB::MediumSeaGreen
CRGB::MediumSlateBlue
CRGB::MediumSpringGreen
CRGB::MediumTurquoise
CRGB::MediumVioletRed
CRGB::MidnightBlue
CRGB::MintCream
CRGB::MistyRose
CRGB::Moccasin
CRGB::NavajoWhite
CRGB::Navy
CRGB::OldLace
CRGB::Olive
CRGB::OliveDrab
CRGB::Orange
CRGB::OrangeRed
CRGB::Orchid
CRGB::PaleGoldenrod
CRGB::PaleGreen
CRGB::PaleTurquoise
CRGB::PaleVioletRed
CRGB::PapayaWhip
CRGB::PeachPuff
CRGB::Peru
CRGB::Pink
CRGB::Plaid
CRGB::Plum
CRGB::PowderBlue
CRGB::Purple
CRGB::Red
CRGB::RosyBrown
CRGB::RoyalBlue
CRGB::SaddleBrown
CRGB::Salmon
CRGB::SandyBrown
CRGB::SeaGreen
CRGB::Seashell
CRGB::Sienna
CRGB::Silver
CRGB::SkyBlue
CRGB::SlateBlue
CRGB::SlateGray
CRGB::Snow
CRGB::SpringGreen
CRGB::SteelBlue
CRGB::Tan
CRGB::Teal
CRGB::Thistle
CRGB::Tomato
CRGB::Turquoise
CRGB::Violet
CRGB::Wheat
CRGB::White
CRGB::WhiteSmoke
CRGB::Yellow
CRGB::YellowGreen

*/
fill_solid section 全部点亮/熄灭
根据rgb数值设置
//CRGB ColorName方法定义颜色
CRGB myRGBcolor(50,0,50);
myRGBcolor.r = 0;
#include "FastLED.h"            // 此示例程序需要使用FastLED库

#define NUM_LEDS 60             // LED灯珠数量
#define LED_DT 3                // Arduino输出控制信号引脚
#define LED_TYPE WS2812         // LED灯带型号
#define COLOR_ORDER GRB         // RGB灯珠中红色、绿色、蓝色LED的排列顺序

uint8_t max_bright = 128;       // LED亮度控制变量,可使用数值为 0 ~ 255, 数值越大则光带亮度越高

CRGB leds[NUM_LEDS];            // 建立光带leds

//CRGB ColorName方法定义颜色
CRGB myHSVcolor(80,0,50);   // myRGBcolor(rValue,gValue,bValue)
                            // rValue: 红色数值 0 - 255
                            // gValue: 绿色数值 0 - 255
                            // bValue: 蓝色数值 0 - 255

void setup() {
  LEDS.addLeds<LED_TYPE, LED_DT, COLOR_ORDER>(leds, NUM_LEDS);  // 初始化光带

  FastLED.setBrightness(max_bright);                            // 设置光带亮度
}

void loop () {
  // 演示如何使用CRGB 颜色名称(红色数值,绿色数值,蓝色数值)方法
  myRGBcolor.r = 0; //myRGBcolor(0, 0 ,50)
  myRGBcolor.b = 0; //myRGBcolor(0, 0 ,0)
  fill_solid(leds, NUM_LEDS, myRGBcolor);
  FastLED.show();
  delay(500);

  myRGBcolor.r = 50; //myRGBcolor(50, 0 ,0)
  myRGBcolor.b = 50; //myRGBcolor(50, 0 ,50)
  fill_solid(leds, NUM_LEDS, myRGBcolor);
  FastLED.show();
  delay(500);
} // loop()
HSV(渐变色)
#include "FastLED.h"            // 此示例程序需要使用FastLED库

#define NUM_LEDS 60             // LED灯珠数量
#define LED_DT 3                // Arduino输出控制信号引脚
#define LED_TYPE WS2812         // LED灯带型号
#define COLOR_ORDER GRB         // RGB灯珠中红色、绿色、蓝色LED的排列顺序

uint8_t max_bright = 128;       // LED亮度控制变量,可使用数值为 0 ~ 255, 数值越大则光带亮度越高

CRGB leds[NUM_LEDS];     // 建立光带leds

//HSV方法定义颜色
CHSV myHSVcolor(80,255,200);    //HSV方法定义颜色  myHSVcolor(色调,饱和度,明亮度)

void setup() {

  LEDS.addLeds<LED_TYPE, LED_DT, COLOR_ORDER>(leds, NUM_LEDS);  // 初始化光带

  FastLED.setBrightness(max_bright);                            // 设置光带亮度
}

void loop () {
//  演示如何使用.h方法改变CHSV颜色的某一个数值, s饱和度,v明亮度
  myHSVcolor.h++;  // 修改HSV定义颜色的单一数值
                   // myHSVcolor.h为myHSVcolor的色调数值

  fill_solid(leds, NUM_LEDS, myHSVcolor);
  FastLED.show();
  delay(10);
} // loop()
fill_rainbow(彩虹色)
#include "FastLED.h"            // 此示例程序需要使用FastLED库

#define NUM_LEDS 60             // LED灯珠数量
#define LED_DT 3                // Arduino输出控制信号引脚
#define LED_TYPE WS2812         // LED灯带型号
#define COLOR_ORDER GRB         // RGB灯珠中红色、绿色、蓝色LED的排列顺序

uint8_t max_bright = 128;       // LED亮度控制变量,可使用数值为 0 ~ 255, 数值越大则光带亮度越高

CRGB leds[NUM_LEDS];            // 建立光带leds

uint8_t beginHue;

void setup() {
  LEDS.addLeds<LED_TYPE, LED_DT, COLOR_ORDER>(leds, NUM_LEDS);  // 初始化光带

  FastLED.setBrightness(max_bright);                            // 设置光带亮度
}

void loop () {

//  第四个参数两个灯调值差, beginHue颜色渐变
  beginHue++;
  fill_rainbow(leds, NUM_LEDS, beginHue, 4);
  FastLED.show();
  delay(25);
}
RGB渐变颜色
//fill_gradient_RGB(光带,起始灯珠号,起始RG色彩,结束灯珠号,结束RGB色彩)
  fill_gradient_RGB(leds, 0, CRGB::Red, 59, CRGB::Blue);

fill_gradient_RGB(leds, 0, CRGB(255,255,0), 59, CRGB(255, 0, 0));
HSV渐变颜色
fill_gradient(leds, 0, CHSV(50,255,255), 59, CHSV(150, 255, 255), SHORTEST_HUES);
fill_palette色板
#include "FastLED.h"            // 此示例程序需要使用FastLED库

#define NUM_LEDS 60             // LED灯珠数量
#define LED_DT 3                // Arduino输出控制信号引脚
#define LED_TYPE WS2812         // LED灯带型号
#define COLOR_ORDER GRB         // RGB灯珠中红色、绿色、蓝色LED的排列顺序

uint8_t max_bright = 128;       // LED亮度控制变量,可使用数值为 0 ~ 255, 数值越大则光带亮度越高

CRGB leds[NUM_LEDS];            // 建立光带leds
uint8_t colorIndex;
void setup() {
  LEDS.addLeds<LED_TYPE, LED_DT, COLOR_ORDER>(leds, NUM_LEDS);
  FastLED.setBrightness(max_bright);
}

void loop () {
  //fill_palette (leds,    NUM_LEDS,   0,            8,            OceanColors_p,   255,   LINEARBLEND );
  //fill_palette (led名称, 光珠数字,   起始颜色序号, 光珠间颜色差, palette色板名,   亮度,  TBlendType blendType)

  colorIndex++;
  fill_palette(leds, NUM_LEDS, colorIndex, 4, HeatColors_p, 255, LINEARBLEND );
  FastLED.show();
  delay(15);
}

/* FastLED库系统预设色板
CloudColors_p
LavaColors_p
OceanColors_p
ForestColors_p
RainbowColors_p
RainbowStripeColors_p
PartyColors_p
HeatColors_p
*/
自定义色板
CRGBPalette16 myColorPalette = CRGBPalette16(
                                CRGB::Green,  CRGB::Green,  CRGB::Black,  CRGB::Black,
                             // 0-15 GREEN,   16-31 GREEN,   32-47 Black,  48-63 Black,
                                CRGB::Purple, CRGB::Purple, CRGB::Black,  CRGB::Black,
                             // 64-79 Purple,  80-95 Purple, 96-111 Black, 112-127 Black,
                                CRGB::Green,  CRGB::Green,  CRGB::Black,  CRGB::Black,
                             // 128-143 Green,144-159 Green, 160-175 Black,176-191  Black,
                                CRGB::Purple, CRGB::Purple, CRGB::Black,  CRGB::Black );
                             // 192-207 Purple,208-223 Purple,224-239 Black,240-255 Black

CHSVPalette16 myHSVColorPalette = CHSVPalette16 (
                   CHSV(0, 255, 200),  CHSV(15, 255, 200),  CHSV(31, 255, 200), CHSV(47, 255, 200),
                   CHSV(0, 255, 0),    CHSV(15, 255, 0),    CHSV(31, 255, 0),   CHSV(47, 255, 0),
                   CHSV(0, 255, 200),  CHSV(15, 255, 200),  CHSV(31, 255, 200), CHSV(47, 255, 200),
                   CHSV(0, 0, 200),    CHSV(15, 0, 200),    CHSV(31, 0, 200),   CHSV(47, 0, 200));

const TProgmemPalette16 myProgmemPalette PROGMEM = {
                              CRGB::Red,  CRGB::Gray,  CRGB::Blue,   CRGB::Black,
                              CRGB::Red,  CRGB::Gray,  CRGB::Blue,   CRGB::Black,
                              CRGB::Red,  CRGB::Red,   CRGB::Gray,   CRGB::Gray,
                              CRGB::Blue, CRGB::Blue,  CRGB::Black,  CRGB::Black };
#include <FastLED.h>

FASTLED_USING_NAMESPACE
#if defined(FASTLED_VERSION) && (FASTLED_VERSION < 3001000)
#warning "Requires FastLED 3.1 or later; check github for latest code."
#endif

#define DATA_PIN    9  //输入连接哪个引脚
//#define CLK_PIN   4
#define LED_TYPE    WS2812 //光带型号
#define COLOR_ORDER GRB
#define NUM_LEDS    60  //灯珠数量
CRGB leds[NUM_LEDS];

#define BRIGHTNESS          96
#define FRAMES_PER_SECOND  120


int irSensorPin = 3; //连接红外传感器引脚
bool irSensorOutput; //红外传感器输出信号

void setup(){
  pinMode(irSensorPin, INPUT);
  Serial.begin(9600);
  Serial.println("welcome to Motion Sensor");

//  led
 FastLED.addLeds<LED_TYPE,DATA_PIN,COLOR_ORDER>(leds, NUM_LEDS).setCorrection(TypicalLEDStrip);
  //FastLED.addLeds<LED_TYPE,DATA_PIN,CLK_PIN,COLOR_ORDER>(leds, NUM_LEDS).setCorrection(TypicalLEDStrip);

  // set master brightness control
  FastLED.setBrightness(BRIGHTNESS);
}
typedef void (*SimplePatternList[])();
SimplePatternList gPatterns = { rainbow, rainbowWithGlitter, confetti, sinelon, juggle, bpm };

uint8_t gCurrentPatternNumber = 0; // Index number of which pattern is current
uint8_t gHue = 0; // rotating "base color" used by many of the patterns

void loop(){
  irSensorOutput = digitalRead(irSensorPin); //读取红外传感器输出
  if(irSensorOutput == HIGH && analogRead(A0) > 800){ //如果红外传感器输出高电平
    Serial.println("IR Motion Sensor OUTPUT:HIGH");
    // Call the current pattern function once, updating the 'leds' array

    for(int i=0; i<12000; i++){
        gPatterns[gCurrentPatternNumber]();
        // send the 'leds' array out to the actual LED strip
      FastLED.show();
      // insert a delay to keep the framerate modest
      FastLED.delay(1000/FRAMES_PER_SECOND);

      // do some periodic updates
      EVERY_N_MILLISECONDS( 20 ) { gHue++; } // slowly cycle the "base color" through the rainbow
      EVERY_N_SECONDS( 10 ) { nextPattern(); } // change patterns periodically
      delay(10);
    }


  }
  else{
      fill_gradient_RGB(leds, 0, CRGB(0,0,0), 59, CRGB(0, 0, 0));;
      FastLED.show();
      delay(15);
    Serial.println("IR Motion Sensor OUTPUT:LOW");
  }
  Serial.println(analogRead(A0)); //输出LDR的的读数
}

#define ARRAY_SIZE(A) (sizeof(A) / sizeof((A)[0]))

void nextPattern()
{
  // add one to the current pattern number, and wrap around at the end
  gCurrentPatternNumber = (gCurrentPatternNumber + 1) % ARRAY_SIZE( gPatterns);
}

void rainbow()
{
  // FastLED's built-in rainbow generator
  fill_rainbow( leds, NUM_LEDS, gHue, 7);
}

void rainbowWithGlitter()
{
  // built-in FastLED rainbow, plus some random sparkly glitter
  rainbow();
  addGlitter(80);
}

void addGlitter( fract8 chanceOfGlitter)
{
  if( random8() < chanceOfGlitter) {
    leds[ random16(NUM_LEDS) ] += CRGB::White;
  }
}

void confetti()
{
  // random colored speckles that blink in and fade smoothly
  fadeToBlackBy( leds, NUM_LEDS, 10);
  int pos = random16(NUM_LEDS);
  leds[pos] += CHSV( gHue + random8(64), 200, 255);
}

void sinelon()
{
  // a colored dot sweeping back and forth, with fading trails
  fadeToBlackBy( leds, NUM_LEDS, 20);
  int pos = beatsin16( 13, 0, NUM_LEDS-1 );
  leds[pos] += CHSV( gHue, 255, 192);
}

void bpm()
{
  // colored stripes pulsing at a defined Beats-Per-Minute (BPM)
  uint8_t BeatsPerMinute = 62;
  CRGBPalette16 palette = PartyColors_p;
  uint8_t beat = beatsin8( BeatsPerMinute, 64, 255);
  for( int i = 0; i < NUM_LEDS; i++) { //9948
    leds[i] = ColorFromPalette(palette, gHue+(i*2), beat-gHue+(i*10));
  }
}

void juggle() {
  // eight colored dots, weaving in and out of sync with each other
  fadeToBlackBy( leds, NUM_LEDS, 20);
  byte dothue = 0;
  for( int i = 0; i < 8; i++) {
    leds[beatsin16( i+7, 0, NUM_LEDS-1 )] |= CHSV(dothue, 200, 255);
    dothue += 32;
  }
}
带mqtt协议的天猫精灵,小爱
#include <ESP8266WiFi.h>
#include <PubSubClient.h>
#define BLINKER_WIFI
#define BLINKER_MIOT_OUTLET   //小爱同学
#define BLINKER_DUEROS_OUTLET
#define BLINKER_ALIGENIE_OUTLET //天猫精灵

#include <Blinker.h>

int lresistorPin = A0; //光敏电阻连接esp8266的A0上
int irSensorPin = 13; //HC-sr501 连接esp8266的D7上
int relayPin = 14; //光敏电阻连接esp8266的D5引脚上
bool irSensorOutput; //红外传感器输出信号
char auth[] = "e177f178e7ed";  //这里密钥
char ssid[] = "yang1234";   //这里WIFI名称
char pswd[] = "y123456789";    //这里WIFI密码
BlinkerButton Button1("btn-on");     //定义按钮数据
BlinkerButton Button2("btn-off");
bool oState = false;
int counter = 0;
const int subQoS = 1;     // 客户端订阅主题时使用的QoS级别(截止2020-10-07,仅支持QoS = 1,不支持QoS = 2)

// 设置wifi接入信息(请根据您的WiFi信息进行修改)

const char* mqttServer = "4I7KLY9ORJdev.iotcloud.tencentdevices.com";

 // MQTT服务端连接用户名密码
const char* mqttUserName = "4I7KLY9ORJdev_mqtt;12010126;VZ33F;1646779997";
const char* mqttPassword = "2f0c91ec0559cc42bb576eb6e7bf8522d90ec6d7f2bd3a8aba78b230207a09d6;hmacsha256";

// 如以上MQTT服务器无法正常连接,请前往以下页面寻找解决方案
// http://www.taichi-maker.com/public-mqtt-broker/


WiFiClient wifiClient;
PubSubClient mqttClient(wifiClient);

 void miotPowerState(const String & state)
{
    BLINKER_LOG("need set power state: ", state);

    if (state == BLINKER_CMD_ON) {     //小爱同学控制开命令
        digitalWrite(relayPin, HIGH);

        BlinkerMIOT.powerState("on");

        BlinkerMIOT.print();

        oState = true;
    }
    else if (state == BLINKER_CMD_OFF) {   //小爱同学控制关命令
        digitalWrite(relayPin,LOW);

        BlinkerMIOT.powerState("off");

        BlinkerMIOT.print();

        oState = false;
    }
}

void miotQuery(int32_t queryCode)      //小爱同学控制
{
    BLINKER_LOG("MIOT Query codes: ", queryCode);

    switch (queryCode)
    {
        case BLINKER_CMD_QUERY_ALL_NUMBER :
            BLINKER_LOG("MIOT Query All");
            BlinkerMIOT.powerState(oState ? "on" : "off");
            BlinkerMIOT.print();
            break;
        case BLINKER_CMD_QUERY_POWERSTATE_NUMBER :
            BLINKER_LOG("MIOT Query Power State");
            BlinkerMIOT.powerState(oState ? "on" : "off");
            BlinkerMIOT.print();
            break;
        default :
            BlinkerMIOT.powerState(oState ? "on" : "off");
            BlinkerMIOT.print();
            break;
    }
}

void AliGeniePowerState(const String & state)
{
    BLINKER_LOG("need set power state: ", state);

    if (state == BLINKER_CMD_ON) {     //小爱同学控制开命令
        digitalWrite(relayPin, HIGH);

        BlinkerAliGenie.powerState("on");

        BlinkerAliGenie.print();

        oState = true;
    }
    else if (state == BLINKER_CMD_OFF) {   //小爱同学控制关命令
        digitalWrite(relayPin,LOW);

        BlinkerAliGenie.powerState("off");

        BlinkerAliGenie.print();

        oState = false;
    }
}

void AliGenieQuery(int32_t queryCode)      //天猫精灵控制
{
    BLINKER_LOG("AliGenie Query codes: ", queryCode);

    switch (queryCode)
    {
        case BLINKER_CMD_QUERY_ALL_NUMBER :
            BLINKER_LOG("AliGenie Query All");
            BlinkerAliGenie.powerState(oState ? "on" : "off");
            BlinkerAliGenie.print();
            break;
        case BLINKER_CMD_QUERY_POWERSTATE_NUMBER :
            BLINKER_LOG("AliGenie Query Power State");
            BlinkerAliGenie.powerState(oState ? "on" : "off");
            BlinkerAliGenie.print();
            break;
        default :
            BlinkerAliGenie.powerState(oState ? "on" : "off");
            BlinkerAliGenie.print();
            break;
    }
}

void dataRead(const String & data)      // 如果未绑定的组件被触发,则会执行其中内容
{
    BLINKER_LOG("Blinker readString: ", data);

    Blinker.vibrate();

    uint32_t BlinkerTime = millis();

    Blinker.print("millis", BlinkerTime);
}

void button1_callback(const String & state)     //点灯app内控制按键触发
{

    digitalWrite(relayPin,HIGH);
    BLINKER_LOG("get button state:on", state);

}
void button2_callback(const String & state)     //点灯app内控制按键触发
{

    digitalWrite(relayPin,LOW);
    BLINKER_LOG("get button state:off", state);


}

void setup() {
  Serial.begin(9600);

  //设置ESP8266工作模式为无线终端模式
  WiFi.mode(WIFI_STA);

  // 连接WiFi
  connectWifi();

  // 设置MQTT服务器和端口号
  mqttClient.setServer(mqttServer, 1883);

  // 连接MQTT服务器
  connectMQTTServer();

  pinMode(irSensorPin, INPUT);
  pinMode(relayPin, OUTPUT); //光敏电阻设置引脚输出
  Serial.println("welcome to Motion Sensor");
  BLINKER_DEBUG.stream(Serial);
  BLINKER_DEBUG.debugAll();
  digitalWrite(relayPin, LOW);           //定义io默认为低电平
  Blinker.begin(auth, ssid, pswd);
  Blinker.attachData(dataRead);
  BlinkerAliGenie.attachPowerState(AliGeniePowerState);
  BlinkerAliGenie.attachQuery(AliGenieQuery);
  BlinkerMIOT.attachPowerState(miotPowerState);
  BlinkerMIOT.attachQuery(miotQuery);
  Button1.attach(button1_callback);
  Button2.attach(button2_callback);

}

void loop() {

  Serial.print("LDR Reading: ");//通过串口监视器
   Serial.println(analogRead(lresistorPin)); //输出LDR的的读数,其他数字引脚不行


  irSensorOutput = digitalRead(irSensorPin); //读取红外传感器输出
  if(irSensorOutput == HIGH){ //如果红外传感器输出高电平
    Serial.println("IR Motion Sensor OUTPUT:HIGH");
  }

  else{
    Serial.println("IR Motion Sensor OUTPUT:LOW");
  }

  /*如果检查高电平,关灯*/
  if(digitalRead(relayPin) == HIGH){
    delay(200000);
    digitalWrite(relayPin, LOW);
  }

   if(irSensorOutput == HIGH && analogRead(lresistorPin) >800)
  {
      Serial.println("满足条件");
     digitalWrite(relayPin, HIGH);

     if (mqttClient.connected()) { // 如果开发板成功连接服务器
      // 每隔3秒钟发布一次信息
        pubMQTTmsg("1");  // 发送mqtt开灯
      } else {                  // 如果开发板未能成功连接服务器
        connectMQTTServer();    // 则尝试连接服务器
        pubMQTTmsg("1");  // 发送mqtt开灯
     }
      // 至少亮三分钟,每次触发一次增加1分钟40秒
     for(int i=0; i<=2000; i++)
     {
      delay(60);
      irSensorOutput = digitalRead(irSensorPin); //读取红外传感器输出
      if(irSensorOutput == HIGH && analogRead(lresistorPin) >800)
      {
            //mqtt开灯
           if (mqttClient.connected()) { // 如果开发板成功连接服务器
          // 每隔3秒钟发布一次信息
            pubMQTTmsg("1");  // 发送mqtt开灯
          } else {                  // 如果开发板未能成功连接服务器
            connectMQTTServer();    // 则尝试连接服务器
            pubMQTTmsg("1");  // 发送mqtt开灯
         }
        delay(100000);
      }
     }

     digitalWrite(relayPin, LOW);


       //mqttClient.loop();
       if (mqttClient.connected()) { // 如果开发板成功连接服务器
      // 每隔3秒钟发布一次信息
        pubMQTTmsg("0"); // 发送mqtt关灯
      } else {                  // 如果开发板未能成功连接服务器
        connectMQTTServer();    // 则尝试连接服务器
        pubMQTTmsg("0"); // 发送mqtt关灯
      }

  }

  Blinker.run();

//  if (mqttClient.connected()) { // 如果开发板成功连接服务器
//    // 每隔3秒钟发布一次信息
//      pubMQTTmsg("1");
//
//    // 保持心跳
//    mqttClient.loop();
//  } else {                  // 如果开发板未能成功连接服务器
//    connectMQTTServer();    // 则尝试连接服务器
//  }

}


void connectMQTTServer(){
  // 根据ESP8266的MAC地址生成客户端ID(避免与其它ESP8266的客户端ID重名)
  String clientId = "4I7KLY9ORJdev_mqtt";

  // 连接MQTT服务器
  if (mqttClient.connect(clientId.c_str(), mqttUserName, mqttPassword)) {
    Serial.println("MQTT Server Connected.");
    Serial.println("Server Address: ");
    Serial.println(mqttServer);
    Serial.println("ClientId:");
    Serial.println(clientId);
  } else {
    Serial.print("MQTT Server Connect Failed. Client State:");
    Serial.println(mqttClient.state());
    delay(3000);
  }
}


// 发布信息
void pubMQTTmsg(String texts){
  // 建立发布主题。主题名称以Taichi-Maker-为前缀,后面添加设备的MAC地址。
  // 这么做是为确保不同用户进行MQTT信息发布时,ESP8266客户端名称各不相同,
  String topicString = "4I7KLY9ORJ/dev_mqtt/LED";
  char publishTopic[topicString.length() + 1];
  strcpy(publishTopic, topicString.c_str());

  // 建立发布信息。信息内容以Hello World为起始,后面添加发布次数。
  String messageString = texts;  // 客户端发布信息用数字
  char publishMsg[messageString.length() + 1];
  strcpy(publishMsg, messageString.c_str());

  // 实现ESP8266向主题发布信息
  if(mqttClient.publish(publishTopic, publishMsg, subQoS)){
    Serial.println("Publish Topic:");Serial.println(publishTopic);
    Serial.println("Publish message:");Serial.println(publishMsg);
  } else {
    Serial.println("Message Publish Failed.");
  }
}

// ESP8266连接wifi
void connectWifi(){

  WiFi.begin(ssid, pswd);

  //等待WiFi连接,成功连接后输出成功信息
  while (WiFi.status() != WL_CONNECTED) {
    delay(1000);
    Serial.print(".");
  }
  Serial.println("");
  Serial.println("WiFi Connected!");
  Serial.println("");

}
服务器带天猫精灵,小爱,带mysql(修改ip,数据库名,数据库密码)
#include <ESP8266WiFi.h>
#include <PubSubClient.h>
#include <MySQL_Connection.h>    // Arduino连接Mysql的库
#include <MySQL_Cursor.h>

#define BLINKER_WIFI
#define BLINKER_MIOT_OUTLET   //小爱同学
#define BLINKER_DUEROS_OUTLET
#define BLINKER_ALIGENIE_OUTLET //天猫精灵
#include <Blinker.h>
#include <Ticker.h>
Ticker ticker;

int ledPin = 0;
char auth[] = "bb5faa703f50";  //这里密钥
char ssid[] = "yang1234";   //这里WIFI名称
char pswd[] = "y123456789";    //这里WIFI密码
BlinkerButton Button1("btn-on");     //定义按钮数据
BlinkerButton Button2("btn-off");
bool oState = false;
int counter = 0;

const int subQoS = 1;     // 客户端订阅主题时使用的QoS级别(截止2020-10-07,仅支持QoS = 1,不支持QoS = 2)
const bool cleanSession = false; // 清除会话(如QoS>0必须要设为false)

const char* willTopic = "willTopic"; // 遗嘱主题名称
const char* willMsg = "willMsg";     // 遗嘱主题信息
const int willQos = 0;               // 遗嘱QoS
const int willRetain = false;        // 遗嘱保留

const char* mqttServer = "4I7KLY9ORJ.iotcloud.tencentdevices.com";
// 如以上MQTT服务器无法正常连接,请前往以下页面寻找解决方案
// http://www.taichi-maker.com/public-mqtt-broker/
 // 云端连接用户名密码
const char* mqttUserName = "4I7KLY9ORJdev;12010126;NB6RR;1646777246";
const char* mqttPassword = "bba47318ac52335da17a34d195097ffe0b776cbb831945d8575324eda24682ed;hmacsha256";

WiFiClient wifiClient;
PubSubClient mqttClient(wifiClient);

/*=====mysql=========*/
IPAddress server_addr(ip);// 安装Mysql的电脑的IP地址如192.168.31.96
// Mysql中添加一条数据的命令
char mysqluser[] = "数据库用户名";
char mysqlpwd[] = "数据库密码";
char INSERT_SQL[] = "update yys.mqtt set event='%s' where id=1";
MySQL_Connection conn(&client);
MySQL_Cursor* cursor;    //


 void miotPowerState(const String & state)
{
    BLINKER_LOG("need set power state: ", state);

    if (state == BLINKER_CMD_ON) {     //小爱同学控制开命令
        digitalWrite(ledPin, LOW);

        BlinkerMIOT.powerState("on");

        BlinkerMIOT.print();

        oState = true;
    }
    else if (state == BLINKER_CMD_OFF) {   //小爱同学控制关命令
        digitalWrite(ledPin,HIGH);

        BlinkerMIOT.powerState("off");

        BlinkerMIOT.print();

        oState = false;
    }
}

void miotQuery(int32_t queryCode)      //小爱同学控制
{
    BLINKER_LOG("MIOT Query codes: ", queryCode);

    switch (queryCode)
    {
        case BLINKER_CMD_QUERY_ALL_NUMBER :
            BLINKER_LOG("MIOT Query All");
            BlinkerMIOT.powerState(oState ? "on" : "off");
            BlinkerMIOT.print();
            break;
        case BLINKER_CMD_QUERY_POWERSTATE_NUMBER :
            BLINKER_LOG("MIOT Query Power State");
            BlinkerMIOT.powerState(oState ? "on" : "off");
            BlinkerMIOT.print();
            break;
        default :
            BlinkerMIOT.powerState(oState ? "on" : "off");
            BlinkerMIOT.print();
            break;
    }
}

void AliGeniePowerState(const String & state)
{
    BLINKER_LOG("need set power state: ", state);

    if (state == BLINKER_CMD_ON) {     //小爱同学控制开命令
        digitalWrite(ledPin, LOW);

        BlinkerAliGenie.powerState("on");

        BlinkerAliGenie.print();

        oState = true;
    }
    else if (state == BLINKER_CMD_OFF) {   //小爱同学控制关命令
        digitalWrite(ledPin,HIGH);

        BlinkerAliGenie.powerState("off");

        BlinkerAliGenie.print();

        oState = false;
    }
}

void AliGenieQuery(int32_t queryCode)      //天猫精灵控制
{
    BLINKER_LOG("AliGenie Query codes: ", queryCode);

    switch (queryCode)
    {
        case BLINKER_CMD_QUERY_ALL_NUMBER :
            BLINKER_LOG("AliGenie Query All");
            BlinkerAliGenie.powerState(oState ? "on" : "off");
            BlinkerAliGenie.print();
            break;
        case BLINKER_CMD_QUERY_POWERSTATE_NUMBER :
            BLINKER_LOG("AliGenie Query Power State");
            BlinkerAliGenie.powerState(oState ? "on" : "off");
            BlinkerAliGenie.print();
            break;
        default :
            BlinkerAliGenie.powerState(oState ? "on" : "off");
            BlinkerAliGenie.print();
            break;
    }
}

void dataRead(const String & data)      // 如果未绑定的组件被触发,则会执行其中内容
{
    BLINKER_LOG("Blinker readString: ", data);

    Blinker.vibrate();

    uint32_t BlinkerTime = millis();

    Blinker.print("millis", BlinkerTime);
}

void button1_callback(const String & state)     //点灯app内控制按键触发
{

    digitalWrite(ledPin,LOW);
    BLINKER_LOG("get button state:on", state);


}
void button2_callback(const String & state)     //点灯app内控制按键触发
{

    digitalWrite(ledPin,HIGH);
    BLINKER_LOG("get button state:off", state);


}

void setup() {
  pinMode(ledPin, OUTPUT);              //定义io口为输出
  digitalWrite(ledPin, HIGH);           //定义io默认为高电平
  Serial.begin(9600);               // 启动串口通讯

  //设置ESP8266工作模式为无线终端模式
  WiFi.mode(WIFI_STA);

  // 连接WiFi
  connectWifi();

  // 设置MQTT服务器和端口号
  mqttClient.setServer(mqttServer, 1883);
  // 设置MQTT订阅回调函数
  mqttClient.setCallback(receiveCallback);

  // 连接MQTT服务器
  connectMQTTserver();

    BLINKER_DEBUG.stream(Serial);
    BLINKER_DEBUG.debugAll();
    Blinker.begin(auth, ssid, pswd);
    Blinker.attachData(dataRead);
    BlinkerAliGenie.attachPowerState(AliGeniePowerState);
    BlinkerAliGenie.attachQuery(AliGenieQuery);
    BlinkerMIOT.attachPowerState(miotPowerState);
    BlinkerMIOT.attachQuery(miotQuery);
    Button1.attach(button1_callback);
    Button2.attach(button2_callback);
    /*mysql*/
   if (conn.connect(server_addr, 3306, mysqluser, mysqlpwd))         // 连接数据库
    Serial.println("mysql is OK.");
  else
    Serial.println("mysql connect FAILED.");
  cursor = new MySQL_Cursor(&conn);    // 创建一个数据库游标实例

   ticker.attach(600, turoffLed);

}


void turoffLed(){
  if (digitalRead(ledPin) == LOW){
    digitalWrite(ledPin, HIGH);  //如果还没关灯,则关灯
  }

}

/*mysql 写入数据库*/
void write_mysql(String infomation){
    char buff[128];   // 定义数据的数组
    sprintf(buff,INSERT_SQL, infomation.c_str()); // 讲tem和hem中数据放入SQL中
    MySQL_Cursor *cur_mem = new MySQL_Cursor(&conn);  // 创建一个Mysql实例
    cur_mem->execute(buff);// 将值插入数据库中
    Serial.println("Off 写入数据库");
    delete cur_mem;   // 删除mysql实例为下次采集作准备
    Serial.println("Off 写入数据库结束");
}

void loop() {

  if (mqttClient.connected()) { // 如果开发板成功连接服务器
    mqttClient.loop();          // 处理信息以及心跳
  } else {                      // 如果开发板未能成功连接服务器
    connectMQTTserver();        // 则尝试连接服务器
  }

  Blinker.run();
}

// 连接MQTT服务器并订阅信息
void connectMQTTserver(){
  // 根据ESP8266的MAC地址生成客户端ID(避免与其它ESP8266的客户端ID重名)
  String clientId = "4I7KLY9ORJdev";

  // 连接MQTT服务器
  if (mqttClient.connect(clientId.c_str(), mqttUserName, mqttPassword, willTopic, willQos, willRetain, willMsg, cleanSession)) {
    Serial.println("MQTT Server Connected.");
    Serial.println("Server Address:");
    Serial.println(mqttServer);
    Serial.println("ClientId: ");
    Serial.println(clientId);
    subscribeTopic(); // 订阅指定主题
  } else {
    Serial.print("MQTT Server Connect Failed. Client State:");
    Serial.println(mqttClient.state());
    delay(5000);
  }
}

// 收到信息后的回调函数
void receiveCallback(char* topic, byte* payload, unsigned int length) {
  Serial.print("Message Received [");
  Serial.print(topic);
  Serial.print("] ");
  for (int i = 0; i < length; i++) {
    Serial.print((char)payload[i]);
  }
  Serial.println("");
  Serial.print("Message Length(Bytes) ");
  Serial.println(length);

  if ((char)payload[0] == '1') {     // 如果收到的信息以“1”为开始
    digitalWrite(ledPin, LOW);  // 则点亮LED。
    Serial.println("LED ON");
    write_mysql("on");

  } else {
    digitalWrite(ledPin, HIGH); // 否则熄灭LED。
    Serial.println("LED Off");
    write_mysql("off");

  }
}

// 订阅指定主题
void subscribeTopic(){

  // 建立订阅主题。主题名称以Taichi-Maker-Sub为前缀,后面添加设备的MAC地址。
  // 这么做是为确保不同设备使用同一个MQTT服务器测试消息订阅时,所订阅的主题名称不同
  String topicString = "4I7KLY9ORJ/dev/LED";
  char subTopic[topicString.length() + 1];
  strcpy(subTopic, topicString.c_str());

  // 通过串口监视器输出是否成功订阅主题以及订阅的主题名称
  if(mqttClient.subscribe(subTopic, subQoS)){
    Serial.println("Subscrib Topic:");
    Serial.println(subTopic);
  } else {
    Serial.print("Subscribe Fail...");
  }
}

// ESP8266连接wifi
void connectWifi(){

  WiFi.begin(ssid, pswd);

  //等待WiFi连接,成功连接后输出成功信息
  while (WiFi.status() != WL_CONNECTED) {
    delay(1000);
    Serial.print(".");
  }
  Serial.println("");
  Serial.println("WiFi Connected!");
  Serial.println("");
}
带网页版ajax
需要上传文件:
https://cloud.189.cn/t/aaYRZvfmQbEr
#include <ESP8266WiFi.h>
#include <ESP8266WiFiMulti.h>
#include <ESP8266WebServer.h>
#include <FS.h>

int lresistorPin = A0; //光敏电阻连接esp8266的A0上
int irSensorPin = 13; //HC-sr501 连接esp8266的D7上
int relayPin = 14; //光敏电阻连接esp8266的D5引脚上
bool irSensorOutput; //红外传感器输出信号
int count = 0;

ESP8266WiFiMulti wifiMulti;     // 建立ESP8266WiFiMulti对象,对象名称是 'wifiMulti'

ESP8266WebServer esp8266_server(80);    // 建立网络服务器对象,该对象用于响应HTTP请求。监听端口(80)

void setup() {
  Serial.begin(9600);          // 启动串口通讯
  Serial.println("");
  pinMode(irSensorPin, INPUT);
  pinMode(relayPin, OUTPUT);   // 初始化NodeMCU控制板载LED引脚为OUTPUT
  digitalWrite(relayPin, LOW);// 初始化LED引脚状态

  wifiMulti.addAP("yang1234", "y123456789"); // 将需要连接的一系列WiFi ID和密码输入这里
  wifiMulti.addAP("ssid_from_AP_2", "your_password_for_AP_2"); // ESP8266-NodeMCU再启动后会扫描当前网络
  wifiMulti.addAP("ssid_from_AP_3", "your_password_for_AP_3"); // 环境查找是否有这里列出的WiFi ID。如果有
  Serial.println("Connecting ...");                            // 则尝试使用此处存储的密码进行连接。

  int i = 0;
  while (wifiMulti.run() != WL_CONNECTED) { // 尝试进行wifi连接。
    delay(1000);
    Serial.print(i++); Serial.print(' ');
  }

  // WiFi连接成功后将通过串口监视器输出连接成功信息
  Serial.println('\n');
  Serial.print("Connected to ");
  Serial.println(WiFi.SSID());              // 通过串口监视器输出连接的WiFi名称
  Serial.print("IP address:\t");
  Serial.println(WiFi.localIP());           // 通过串口监视器输出ESP8266-NodeMCU的IP

  if(SPIFFS.begin()){                       // 启动闪存文件系统
    Serial.println("SPIFFS Started.");
  } else {
    Serial.println("SPIFFS Failed to Start.");
  }

  esp8266_server.on("/setLED", handleLED);
  esp8266_server.on("/readADC", handleADC);

  esp8266_server.onNotFound(handleUserRequest); // 处理其它网络请求

  // 启动网站服务
  esp8266_server.begin();
  Serial.println("HTTP server started");
}

void loop(void) {
  esp8266_server.handleClient();
  Serial.print("LDR Reading: ");//通过串口监视器
   Serial.println(analogRead(lresistorPin)); //输出LDR的的读数,其他数字引脚不行
  irSensorOutput = digitalRead(irSensorPin); //读取红外传感器输出
  if(irSensorOutput == HIGH){ //如果红外传感器输出高电平
    Serial.println("IR Motion Sensor OUTPUT:HIGH");
  }

  else{
    Serial.println("IR Motion Sensor OUTPUT:LOW");
  }

  if(irSensorOutput == HIGH && analogRead(lresistorPin) >800)
  {
      Serial.println("满足条件");

     digitalWrite(relayPin, HIGH);
     for(int i=0; i<=100; i++)
     {
      delay(60);
      irSensorOutput = digitalRead(irSensorPin); //读取红外传感器输出
      if(irSensorOutput == HIGH && analogRead(lresistorPin) >800)
      {
        delay(10000);
      }
     }

     digitalWrite(relayPin, LOW);

  }
}

void handleLED() {
 String ledState = "OFF";
 String LED_State = esp8266_server.arg("LEDstate"); //参考xhttp.open("GET", "setLED?LEDstate="+led, true);
 Serial.println(LED_State);

 if(LED_State == "1"){
  digitalWrite(relayPin,HIGH); //LED 点亮
  ledState = "ON"; //反馈参数
 } else {
  digitalWrite(relayPin,LOW); //LED 熄灭
  ledState = "OFF"; //反馈参数
 }

 esp8266_server.send(200, "text/plain", ledState); //发送网页
}

void handleADC() {
 int a = analogRead(relayPin);
 String adcValue = String(a);

 esp8266_server.send(200, "text/plain", adcValue); //发送模拟输入引脚到客户端ajax请求
}

// 处理用户浏览器的HTTP访问
void handleUserRequest() {

  // 获取用户请求资源(Request Resource)
  String reqResource = esp8266_server.uri();
  Serial.print("reqResource: ");
  Serial.println(reqResource);

  // 通过handleFileRead函数处处理用户请求资源
  bool fileReadOK = handleFileRead(reqResource);

  // 如果在SPIFFS无法找到用户访问的资源,则回复404 (Not Found)
  if (!fileReadOK){
    esp8266_server.send(404, "text/plain", "404 Not Found");
  }
}

bool handleFileRead(String resource) {            //处理浏览器HTTP访问

  if (resource.endsWith("/")) {                   // 如果访问地址以"/"为结尾
    resource = "/index.html";                     // 则将访问地址修改为/index.html便于SPIFFS访问
  }

  String contentType = getContentType(resource);  // 获取文件类型

  if (SPIFFS.exists(resource)) {                     // 如果访问的文件可以在SPIFFS中找到
    File file = SPIFFS.open(resource, "r");          // 则尝试打开该文件
    esp8266_server.streamFile(file, contentType);// 并且将该文件返回给浏览器
    file.close();                                // 并且关闭文件
    return true;                                 // 返回true
  }
  return false;                                  // 如果文件未找到,则返回false
}

// 获取文件类型
String getContentType(String filename){
  if(filename.endsWith(".htm")) return "text/html";
  else if(filename.endsWith(".html")) return "text/html";
  else if(filename.endsWith(".css")) return "text/css";
  else if(filename.endsWith(".js")) return "application/javascript";
  else if(filename.endsWith(".png")) return "image/png";
  else if(filename.endsWith(".gif")) return "image/gif";
  else if(filename.endsWith(".jpg")) return "image/jpeg";
  else if(filename.endsWith(".ico")) return "image/x-icon";
  else if(filename.endsWith(".xml")) return "text/xml";
  else if(filename.endsWith(".pdf")) return "application/x-pdf";
  else if(filename.endsWith(".zip")) return "application/x-zip";
  else if(filename.endsWith(".gz")) return "application/x-gzip";
  return "text/plain";
}
#include <ESP8266WiFi.h>
#include <PubSubClient.h>
#define BLINKER_WIFI
#define BLINKER_MIOT_OUTLET   //小爱同学
#define BLINKER_DUEROS_OUTLET
#define BLINKER_ALIGENIE_OUTLET //天猫精灵

#include <Blinker.h>
/*dht11*/
#include <SimpleDHT.h>
int pinDHT11 = D4;
SimpleDHT11 dht11(pinDHT11);
// read without samples.
byte temperature = 0;
byte humidity = 0;
int err = SimpleDHTErrSuccess;

/*oled*/
#include <Arduino.h>
#include <U8g2lib.h>
#ifdef U8X8_HAVE_HW_SPI
#include <SPI.h>
#endif
#ifdef U8X8_HAVE_HW_I2C
#include <Wire.h>
#endif
U8G2_SSD1306_128X64_NONAME_F_SW_I2C u8g2(U8G2_R0, /* clock=*/ D2, /* data=*/ D1, /* reset=*/ U8X8_PIN_NONE);   // All Boards without Reset of the Display
char* on_or_off;

int lresistorPin = A0; //光敏电阻连接esp8266的A0上
int irSensorPin = 13; //HC-sr501 连接esp8266的D7上
int relayPin = 14; //光敏电阻连接esp8266的D5引脚上
bool irSensorOutput; //红外传感器输出信号
char auth[] = "cf434ea75693";  //这里密钥
char ssid[] = "yang1234";   //这里WIFI名称
char pswd[] = "y123456789";    //这里WIFI密码
BlinkerButton Button1("btn-on");     //定义按钮数据
BlinkerButton Button2("btn-off");
bool oState = false;
int counter = 0;
const int subQoS = 1;     // 客户端订阅主题时使用的QoS级别(截止2020-10-07,仅支持QoS = 1,不支持QoS = 2)

// 设置wifi接入信息(请根据您的WiFi信息进行修改)

const char* mqttServer = "4I7KLY9ORJdev.iotcloud.tencentdevices.com";

 // MQTT服务端连接用户名密码
const char* mqttUserName = "4I7KLY9ORJdev_mqtt;12010126;VZ33F;1646779997";
const char* mqttPassword = "2f0c91ec0559cc42bb576eb6e7bf8522d90ec6d7f2bd3a8aba78b230207a09d6;hmacsha256";

// 如以上MQTT服务器无法正常连接,请前往以下页面寻找解决方案
// http://www.taichi-maker.com/public-mqtt-broker/


WiFiClient wifiClient;
PubSubClient mqttClient(wifiClient);

 void miotPowerState(const String & state)
{
    BLINKER_LOG("need set power state: ", state);

    if (state == BLINKER_CMD_ON) {     //小爱同学控制开命令
        digitalWrite(relayPin, HIGH);

        BlinkerMIOT.powerState("on");

        BlinkerMIOT.print();

        oState = true;
    }
    else if (state == BLINKER_CMD_OFF) {   //小爱同学控制关命令
        digitalWrite(relayPin,LOW);

        BlinkerMIOT.powerState("off");

        BlinkerMIOT.print();

        oState = false;
    }
}

void miotQuery(int32_t queryCode)      //小爱同学控制
{
    BLINKER_LOG("MIOT Query codes: ", queryCode);

    switch (queryCode)
    {
        case BLINKER_CMD_QUERY_ALL_NUMBER :
            BLINKER_LOG("MIOT Query All");
            BlinkerMIOT.powerState(oState ? "on" : "off");
            BlinkerMIOT.print();
            break;
        case BLINKER_CMD_QUERY_POWERSTATE_NUMBER :
            BLINKER_LOG("MIOT Query Power State");
            BlinkerMIOT.powerState(oState ? "on" : "off");
            BlinkerMIOT.print();
            break;
        default :
            BlinkerMIOT.powerState(oState ? "on" : "off");
            BlinkerMIOT.print();
            break;
    }
}

void AliGeniePowerState(const String & state)
{
    BLINKER_LOG("need set power state: ", state);

    if (state == BLINKER_CMD_ON) {     //小爱同学控制开命令
        digitalWrite(relayPin, HIGH);

        BlinkerAliGenie.powerState("on");

        BlinkerAliGenie.print();

        oState = true;
    }
    else if (state == BLINKER_CMD_OFF) {   //小爱同学控制关命令
        digitalWrite(relayPin,LOW);

        BlinkerAliGenie.powerState("off");

        BlinkerAliGenie.print();

        oState = false;
    }
}

void AliGenieQuery(int32_t queryCode)      //天猫精灵控制
{
    BLINKER_LOG("AliGenie Query codes: ", queryCode);

    switch (queryCode)
    {
        case BLINKER_CMD_QUERY_ALL_NUMBER :
            BLINKER_LOG("AliGenie Query All");
            BlinkerAliGenie.powerState(oState ? "on" : "off");
            BlinkerAliGenie.print();
            break;
        case BLINKER_CMD_QUERY_POWERSTATE_NUMBER :
            BLINKER_LOG("AliGenie Query Power State");
            BlinkerAliGenie.powerState(oState ? "on" : "off");
            BlinkerAliGenie.print();
            break;
        default :
            BlinkerAliGenie.powerState(oState ? "on" : "off");
            BlinkerAliGenie.print();
            break;
    }
}

void dataRead(const String & data)      // 如果未绑定的组件被触发,则会执行其中内容
{
    BLINKER_LOG("Blinker readString: ", data);

    Blinker.vibrate();

    uint32_t BlinkerTime = millis();

    Blinker.print("millis", BlinkerTime);
}

void button1_callback(const String & state)     //点灯app内控制按键触发
{

    digitalWrite(relayPin,HIGH);
    BLINKER_LOG("get button state:on", state);

}
void button2_callback(const String & state)     //点灯app内控制按键触发
{

    digitalWrite(relayPin,LOW);
    BLINKER_LOG("get button state:off", state);


}

void setup() {
  Serial.begin(9600);

  //设置ESP8266工作模式为无线终端模式
  WiFi.mode(WIFI_STA);

  // 连接WiFi
  connectWifi();

  // 设置MQTT服务器和端口号
  mqttClient.setServer(mqttServer, 1883);

  // 连接MQTT服务器
  connectMQTTServer();

  pinMode(irSensorPin, INPUT);
  pinMode(relayPin, OUTPUT); //光敏电阻设置引脚输出
  Serial.println("welcome to Motion Sensor");
  BLINKER_DEBUG.stream(Serial);
  BLINKER_DEBUG.debugAll();
  digitalWrite(relayPin, LOW);           //定义io默认为低电平
  Blinker.begin(auth, ssid, pswd);
  Blinker.attachData(dataRead);
  BlinkerAliGenie.attachPowerState(AliGeniePowerState);
  BlinkerAliGenie.attachQuery(AliGenieQuery);
  BlinkerMIOT.attachPowerState(miotPowerState);
  BlinkerMIOT.attachQuery(miotQuery);
  Button1.attach(button1_callback);
  Button2.attach(button2_callback);
 /*oled*/
  u8g2.begin();
  u8g2.enableUTF8Print();        // enable UTF8 support for the Arduino print() function
}

void loop() {

  Serial.print("LDR Reading: ");//通过串口监视器
  Serial.println(analogRead(lresistorPin)); //输出LDR的的读数,其他数字引脚不行


  irSensorOutput = digitalRead(irSensorPin); //读取红外传感器输出
  if(irSensorOutput == HIGH){ //如果红外传感器输出高电平
    Serial.println("IR Motion Sensor OUTPUT:HIGH");
  }

  else{
    Serial.println("IR Motion Sensor OUTPUT:LOW");
  }


   if(irSensorOutput == HIGH && analogRead(lresistorPin) >800)
  {
      Serial.println("满足条件");
     digitalWrite(relayPin, HIGH);

     if (mqttClient.connected()) { // 如果开发板成功连接服务器
      // 每隔3秒钟发布一次信息
        pubMQTTmsg("1");  // 发送mqtt开灯
      } else {                  // 如果开发板未能成功连接服务器
        connectMQTTServer();    // 则尝试连接服务器
        pubMQTTmsg("1");  // 发送mqtt开灯
     }
      // 至少亮2分钟,每次触发一次增加1分钟40秒
     for(int i=0; i<=150; i++)
     {
      /*oled_dht11*/
      oled_dht_status();

      delay(60);
      irSensorOutput = digitalRead(irSensorPin); //读取红外传感器输出
      if(irSensorOutput == HIGH && analogRead(lresistorPin) >800)
      {
            //mqtt开灯
           if (mqttClient.connected()) { // 如果开发板成功连接服务器
          // 每隔3秒钟发布一次信息
            pubMQTTmsg("1");  // 发送mqtt开灯
          } else {                  // 如果开发板未能成功连接服务器
            connectMQTTServer();    // 则尝试连接服务器
            pubMQTTmsg("1");  // 发送mqtt开灯
         }
        delay(100000);
      }
     }

     digitalWrite(relayPin, LOW);


       //mqttClient.loop();
       if (mqttClient.connected()) { // 如果开发板成功连接服务器
      // 每隔3秒钟发布一次信息
        pubMQTTmsg("0"); // 发送mqtt关灯
      } else {                  // 如果开发板未能成功连接服务器
        connectMQTTServer();    // 则尝试连接服务器
        pubMQTTmsg("0"); // 发送mqtt关灯
      }

  }
  Blinker.run();

   /*oled_dht11*/
   oled_dht_status();
}

void oled_dht_status()
{
    /*dht11*/

  if ((err = dht11.read(&temperature, &humidity, NULL)) != SimpleDHTErrSuccess) {
    Serial.print("Read DHT11 failed, err=");
    Serial.println(err);
    delay(100);
    return;
  }
  Serial.print("Sample OK: ");
  Serial.print((int)temperature); Serial.print(" ℃, ");
  Serial.print((int)humidity); Serial.println(" %");
    /*oled*/
  if (digitalRead(relayPin) == LOW){
    on_or_off = "关";
  }
  else{
    on_or_off = "开";
  }

  u8g2.setFont(u8g2_font_unifont_t_chinese1);  // use chinese2 for all the glyphs of "你好世界"
  u8g2.setFontDirection(0);
  u8g2.clearBuffer();
  u8g2.setCursor(0, 15);
  u8g2.print("灯的状态:");
  u8g2.print(on_or_off);
  u8g2.setCursor(0, 30);
  u8g2.print("室内温度:");
  u8g2.print((int)temperature);        // Chinese "Hello World"
  u8g2.print("℃");
  u8g2.setCursor(0, 45);
   u8g2.print("室内湿度:");
  u8g2.print((int)humidity);
  u8g2.print("%");
  u8g2.sendBuffer();

}

void connectMQTTServer(){
  // 根据ESP8266的MAC地址生成客户端ID(避免与其它ESP8266的客户端ID重名)
  String clientId = "4I7KLY9ORJdev_mqtt";

  // 连接MQTT服务器
  if (mqttClient.connect(clientId.c_str(), mqttUserName, mqttPassword)) {
    Serial.println("MQTT Server Connected.");
    Serial.println("Server Address: ");
    Serial.println(mqttServer);
    Serial.println("ClientId:");
    Serial.println(clientId);
  } else {
    Serial.print("MQTT Server Connect Failed. Client State:");
    Serial.println(mqttClient.state());
    delay(3000);
  }
}


// 发布信息
void pubMQTTmsg(String texts){
  // 建立发布主题。主题名称以Taichi-Maker-为前缀,后面添加设备的MAC地址。
  // 这么做是为确保不同用户进行MQTT信息发布时,ESP8266客户端名称各不相同,
  String topicString = "4I7KLY9ORJ/dev_mqtt/LED";
  char publishTopic[topicString.length() + 1];
  strcpy(publishTopic, topicString.c_str());

  // 建立发布信息。信息内容以Hello World为起始,后面添加发布次数。
  String messageString = texts;  // 客户端发布信息用数字
  char publishMsg[messageString.length() + 1];
  strcpy(publishMsg, messageString.c_str());

  // 实现ESP8266向主题发布信息
  if(mqttClient.publish(publishTopic, publishMsg, subQoS)){
    Serial.println("Publish Topic:");Serial.println(publishTopic);
    Serial.println("Publish message:");Serial.println(publishMsg);
  } else {
    Serial.println("Message Publish Failed.");
  }
}

// ESP8266连接wifi
void connectWifi(){

  WiFi.begin(ssid, pswd);

  //等待WiFi连接,成功连接后输出成功信息
  while (WiFi.status() != WL_CONNECTED) {
    delay(1000);
    Serial.print(".");
  }
  Serial.println("");
  Serial.println("WiFi Connected!");
  Serial.println("");

}
esp8266不是esp10s,两种继电器高低电平相反
#include <ESP8266WiFi.h>
#include <PubSubClient.h>
#include <MySQL_Connection.h>    // Arduino连接Mysql的库
#include <MySQL_Cursor.h>

#define BLINKER_WIFI
#define BLINKER_MIOT_OUTLET   //小爱同学
#define BLINKER_DUEROS_OUTLET
#define BLINKER_ALIGENIE_OUTLET //天猫精灵
#include <Blinker.h>
#include <Ticker.h>
Ticker ticker;

int ledPin = 14; //继电器引脚,esp8266为D5引脚
char auth[] = "3a4bda6cc038";  //这里密钥
char ssid[] = "yang1234";   //这里WIFI名称
char pswd[] = "y123456789";    //这里WIFI密码
BlinkerButton Button1("btn-on");     //定义按钮数据
BlinkerButton Button2("btn-off");
bool oState = false;
int counter = 0;

const int subQoS = 1;     // 客户端订阅主题时使用的QoS级别(截止2020-10-07,仅支持QoS = 1,不支持QoS = 2)
const bool cleanSession = false; // 清除会话(如QoS>0必须要设为false)

const char* willTopic = "willTopic"; // 遗嘱主题名称
const char* willMsg = "willMsg";     // 遗嘱主题信息
const int willQos = 0;               // 遗嘱QoS
const int willRetain = false;        // 遗嘱保留

const char* mqttServer = "HXPGUPSKUC.iotcloud.tencentdevices.com";
// 如以上MQTT服务器无法正常连接,请前往以下页面寻找解决方案
// http://www.taichi-maker.com/public-mqtt-broker/
 // 云端连接用户名密码
const char* mqttUserName = "HXPGUPSKUCswitch;12010126;ZUDGM;1656197907";
const char* mqttPassword = "3567c978546d7a92680cdb72a2c8d10b88493c0384ba57a18308efc685286bf3;hmacsha256";
String clientId = "HXPGUPSKUCswitch";
String topicString = "HXPGUPSKUC/switch/sw_sw";

WiFiClient wifiClient;
PubSubClient mqttClient(wifiClient);

/*=====mysql=========*/
IPAddress server_addr(ip);// 安装Mysql的电脑的IP地址如192,168,31,96(ip不带引号,逗号隔开)
// Mysql中添加一条数据的命令
char mysqluser[] = "数据库名";
char mysqlpwd[] = "数据库密码";
char INSERT_SQL[] = "update yys.mqtt set event='%s' where id=1";
MySQL_Connection conn(&client);
MySQL_Cursor* cursor;    //


 void miotPowerState(const String & state)
{
    BLINKER_LOG("need set power state: ", state);

    if (state == BLINKER_CMD_ON) {     //小爱同学控制开命令
        digitalWrite(ledPin, HIGH);

        BlinkerMIOT.powerState("on");

        BlinkerMIOT.print();

        oState = true;
    }
    else if (state == BLINKER_CMD_OFF) {   //小爱同学控制关命令
        digitalWrite(ledPin,LOW);

        BlinkerMIOT.powerState("off");

        BlinkerMIOT.print();

        oState = false;
    }
}

void miotQuery(int32_t queryCode)      //小爱同学控制
{
    BLINKER_LOG("MIOT Query codes: ", queryCode);

    switch (queryCode)
    {
        case BLINKER_CMD_QUERY_ALL_NUMBER :
            BLINKER_LOG("MIOT Query All");
            BlinkerMIOT.powerState(oState ? "on" : "off");
            BlinkerMIOT.print();
            break;
        case BLINKER_CMD_QUERY_POWERSTATE_NUMBER :
            BLINKER_LOG("MIOT Query Power State");
            BlinkerMIOT.powerState(oState ? "on" : "off");
            BlinkerMIOT.print();
            break;
        default :
            BlinkerMIOT.powerState(oState ? "on" : "off");
            BlinkerMIOT.print();
            break;
    }
}

void AliGeniePowerState(const String & state)
{
    BLINKER_LOG("need set power state: ", state);

    if (state == BLINKER_CMD_ON) {     //小爱同学控制开命令
        digitalWrite(ledPin, HIGH);

        BlinkerAliGenie.powerState("on");

        BlinkerAliGenie.print();

        oState = true;
    }
    else if (state == BLINKER_CMD_OFF) {   //小爱同学控制关命令
        digitalWrite(ledPin,LOW);

        BlinkerAliGenie.powerState("off");

        BlinkerAliGenie.print();

        oState = false;
    }
}

void AliGenieQuery(int32_t queryCode)      //天猫精灵控制
{
    BLINKER_LOG("AliGenie Query codes: ", queryCode);

    switch (queryCode)
    {
        case BLINKER_CMD_QUERY_ALL_NUMBER :
            BLINKER_LOG("AliGenie Query All");
            BlinkerAliGenie.powerState(oState ? "on" : "off");
            BlinkerAliGenie.print();
            break;
        case BLINKER_CMD_QUERY_POWERSTATE_NUMBER :
            BLINKER_LOG("AliGenie Query Power State");
            BlinkerAliGenie.powerState(oState ? "on" : "off");
            BlinkerAliGenie.print();
            break;
        default :
            BlinkerAliGenie.powerState(oState ? "on" : "off");
            BlinkerAliGenie.print();
            break;
    }
}

void dataRead(const String & data)      // 如果未绑定的组件被触发,则会执行其中内容
{
    BLINKER_LOG("Blinker readString: ", data);

    Blinker.vibrate();

    uint32_t BlinkerTime = millis();

    Blinker.print("millis", BlinkerTime);
}

void button1_callback(const String & state)     //点灯app内控制按键触发
{

    digitalWrite(ledPin,HIGH);
    BLINKER_LOG("get button state:on", state);


}
void button2_callback(const String & state)     //点灯app内控制按键触发
{

    digitalWrite(ledPin,LOW);
    BLINKER_LOG("get button state:off", state);


}

void setup() {
  pinMode(ledPin, OUTPUT);              //定义io口为输出
  digitalWrite(ledPin, LOW);           //定义io默认为地电平
  Serial.begin(9600);               // 启动串口通讯

  //设置ESP8266工作模式为无线终端模式
  WiFi.mode(WIFI_STA);

  // 连接WiFi
  connectWifi();

  // 设置MQTT服务器和端口号
  mqttClient.setServer(mqttServer, 1883);
  // 设置MQTT订阅回调函数
  mqttClient.setCallback(receiveCallback);

  // 连接MQTT服务器
  connectMQTTserver();

    BLINKER_DEBUG.stream(Serial);
    BLINKER_DEBUG.debugAll();
    Blinker.begin(auth, ssid, pswd);
    Blinker.attachData(dataRead);
    BlinkerAliGenie.attachPowerState(AliGeniePowerState);
    BlinkerAliGenie.attachQuery(AliGenieQuery);
    BlinkerMIOT.attachPowerState(miotPowerState);
    BlinkerMIOT.attachQuery(miotQuery);
    Button1.attach(button1_callback);
    Button2.attach(button2_callback);
    /*mysql*/
   if (conn.connect(server_addr, 3306, mysqluser, mysqlpwd))         // 连接数据库
    Serial.println("mysql is OK.");
  else
    Serial.println("mysql connect FAILED.");
  cursor = new MySQL_Cursor(&conn);    // 创建一个数据库游标实例

   ticker.attach(600, turoffLed);

}


void turoffLed(){


}

/*mysql 写入数据库*/
void write_mysql(String infomation){
    char buff[128];   // 定义数据的数组
    sprintf(buff,INSERT_SQL, infomation.c_str()); // 讲tem和hem中数据放入SQL中
    MySQL_Cursor *cur_mem = new MySQL_Cursor(&conn);  // 创建一个Mysql实例
    cur_mem->execute(buff);// 将值插入数据库中
    Serial.println("Off 写入数据库");
    delete cur_mem;   // 删除mysql实例为下次采集作准备
    Serial.println("Off 写入数据库结束");
}

void loop() {

//  if (digitalRead(ledPin) == HIGH){
//    delay(7200000); //等待2小时
//    digitalWrite(ledPin, LOW);  //如果还没关插座,则关插座
//  }

  if (mqttClient.connected()) { // 如果开发板成功连接服务器
    mqttClient.loop();          // 处理信息以及心跳
  } else {                      // 如果开发板未能成功连接服务器
    connectMQTTserver();        // 则尝试连接服务器
  }

  Blinker.run();
}

// 连接MQTT服务器并订阅信息
void connectMQTTserver(){
  // 根据ESP8266的MAC地址生成客户端ID(避免与其它ESP8266的客户端ID重名)


  // 连接MQTT服务器
  if (mqttClient.connect(clientId.c_str(), mqttUserName, mqttPassword, willTopic, willQos, willRetain, willMsg, cleanSession)) {
    Serial.println("MQTT Server Connected.");
    Serial.println("Server Address:");
    Serial.println(mqttServer);
    Serial.println("ClientId: ");
    Serial.println(clientId);
    subscribeTopic(); // 订阅指定主题
  } else {
    Serial.print("MQTT Server Connect Failed. Client State:");
    Serial.println(mqttClient.state());
    delay(5000);
  }
}

// 收到信息后的回调函数
void receiveCallback(char* topic, byte* payload, unsigned int length) {
  Serial.print("Message Received [");
  Serial.print(topic);
  Serial.print("] ");
  for (int i = 0; i < length; i++) {
    Serial.print((char)payload[i]);
  }
  Serial.println("");
  Serial.print("Message Length(Bytes) ");
  Serial.println(length);

  if ((char)payload[0] == '1') {     // 如果收到的信息以“1”为开始
    digitalWrite(ledPin, HIGH);  // 则点亮LED。
    Serial.println("LED ON");
    write_mysql("on");

  } else {
    digitalWrite(ledPin, LOW); // 否则熄灭LED。
    Serial.println("LED Off");
    write_mysql("off");

  }
}

// 订阅指定主题
void subscribeTopic(){

  // 建立订阅主题。主题名称以Taichi-Maker-Sub为前缀,后面添加设备的MAC地址。
  // 这么做是为确保不同设备使用同一个MQTT服务器测试消息订阅时,所订阅的主题名称不同

  char subTopic[topicString.length() + 1];
  strcpy(subTopic, topicString.c_str());

  // 通过串口监视器输出是否成功订阅主题以及订阅的主题名称
  if(mqttClient.subscribe(subTopic, subQoS)){
    Serial.println("Subscrib Topic:");
    Serial.println(subTopic);
  } else {
    Serial.print("Subscribe Fail...");
  }
}

// ESP8266连接wifi
void connectWifi(){

  WiFi.begin(ssid, pswd);

  //等待WiFi连接,成功连接后输出成功信息
  while (WiFi.status() != WL_CONNECTED) {
    delay(1000);
    Serial.print(".");
  }
  Serial.println("");
  Serial.println("WiFi Connected!");
  Serial.println("");
}
#include <ESP8266WiFi.h>
#include <PubSubClient.h>

#define BLINKER_WIFI
#define BLINKER_MIOT_OUTLET   //小爱同学
#define BLINKER_DUEROS_OUTLET
#define BLINKER_ALIGENIE_OUTLET //天猫精灵
#include <Blinker.h>
#include <Ticker.h>
Ticker ticker;

int ledPin = 0; //继电器引脚,esp8266为D5引脚
char auth[] = "065a2b1fb392";  //这里密钥
char ssid[] = "yang1234";   //这里WIFI名称
char pswd[] = "y123456789";    //这里WIFI密码
BlinkerButton Button1("btn-on");     //定义按钮数据
BlinkerButton Button2("btn-off");
bool oState = false;
int counter = 0;

const int subQoS = 1;     // 客户端订阅主题时使用的QoS级别(截止2020-10-07,仅支持QoS = 1,不支持QoS = 2)
const bool cleanSession = false; // 清除会话(如QoS>0必须要设为false)

const char* willTopic = "willTopic"; // 遗嘱主题名称
const char* willMsg = "willMsg";     // 遗嘱主题信息
const int willQos = 0;               // 遗嘱QoS
const int willRetain = false;        // 遗嘱保留

const char* mqttServer = "9WAPNFRRP5.iotcloud.tencentdevices.com";
// 如以上MQTT服务器无法正常连接,请前往以下页面寻找解决方案
// http://www.taichi-maker.com/public-mqtt-broker/
 // 云端连接用户名密码
const char* mqttUserName = "9WAPNFRRP5my_lt;12010126;3RIDC;1656740030";
const char* mqttPassword = "5c587a0f210601417310e9d1500548ce41744ea0524a2b00998ba1c1435c44e0;hmacsha256";
String clientId = "9WAPNFRRP5my_lt";
String topicString = "9WAPNFRRP5/my_lt/light";

WiFiClient wifiClient;
PubSubClient mqttClient(wifiClient);


 void miotPowerState(const String & state)
{
    BLINKER_LOG("need set power state: ", state);

    if (state == BLINKER_CMD_ON) {     //小爱同学控制开命令
        digitalWrite(ledPin, LOW);

        BlinkerMIOT.powerState("on");

        BlinkerMIOT.print();

        oState = true;
    }
    else if (state == BLINKER_CMD_OFF) {   //小爱同学控制关命令
        digitalWrite(ledPin,HIGH);

        BlinkerMIOT.powerState("off");

        BlinkerMIOT.print();

        oState = false;
    }
}

void miotQuery(int32_t queryCode)      //小爱同学控制
{
    BLINKER_LOG("MIOT Query codes: ", queryCode);

    switch (queryCode)
    {
        case BLINKER_CMD_QUERY_ALL_NUMBER :
            BLINKER_LOG("MIOT Query All");
            BlinkerMIOT.powerState(oState ? "on" : "off");
            BlinkerMIOT.print();
            break;
        case BLINKER_CMD_QUERY_POWERSTATE_NUMBER :
            BLINKER_LOG("MIOT Query Power State");
            BlinkerMIOT.powerState(oState ? "on" : "off");
            BlinkerMIOT.print();
            break;
        default :
            BlinkerMIOT.powerState(oState ? "on" : "off");
            BlinkerMIOT.print();
            break;
    }
}

void AliGeniePowerState(const String & state)
{
    BLINKER_LOG("need set power state: ", state);

    if (state == BLINKER_CMD_ON) {     //小爱同学控制开命令
        digitalWrite(ledPin, LOW);

        BlinkerAliGenie.powerState("on");

        BlinkerAliGenie.print();

        oState = true;
    }
    else if (state == BLINKER_CMD_OFF) {   //小爱同学控制关命令
        digitalWrite(ledPin,HIGH);

        BlinkerAliGenie.powerState("off");

        BlinkerAliGenie.print();

        oState = false;
    }
}

void AliGenieQuery(int32_t queryCode)      //天猫精灵控制
{
    BLINKER_LOG("AliGenie Query codes: ", queryCode);

    switch (queryCode)
    {
        case BLINKER_CMD_QUERY_ALL_NUMBER :
            BLINKER_LOG("AliGenie Query All");
            BlinkerAliGenie.powerState(oState ? "on" : "off");
            BlinkerAliGenie.print();
            break;
        case BLINKER_CMD_QUERY_POWERSTATE_NUMBER :
            BLINKER_LOG("AliGenie Query Power State");
            BlinkerAliGenie.powerState(oState ? "on" : "off");
            BlinkerAliGenie.print();
            break;
        default :
            BlinkerAliGenie.powerState(oState ? "on" : "off");
            BlinkerAliGenie.print();
            break;
    }
}

void dataRead(const String & data)      // 如果未绑定的组件被触发,则会执行其中内容
{
    BLINKER_LOG("Blinker readString: ", data);

    Blinker.vibrate();

    uint32_t BlinkerTime = millis();

    Blinker.print("millis", BlinkerTime);
}

void button1_callback(const String & state)     //点灯app内控制按键触发
{

    digitalWrite(ledPin,LOW);
    BLINKER_LOG("get button state:on", state);


}
void button2_callback(const String & state)     //点灯app内控制按键触发
{

    digitalWrite(ledPin,HIGH);
    BLINKER_LOG("get button state:off", state);


}

void setup() {
  pinMode(ledPin, OUTPUT);              //定义io口为输出
  digitalWrite(ledPin, HIGH);           //定义io默认为地电平
  Serial.begin(9600);               // 启动串口通讯

  //设置ESP8266工作模式为无线终端模式
  WiFi.mode(WIFI_STA);

  // 连接WiFi
  connectWifi();

  // 设置MQTT服务器和端口号
  mqttClient.setServer(mqttServer, 1883);
  // 设置MQTT订阅回调函数
  mqttClient.setCallback(receiveCallback);

  // 连接MQTT服务器
  connectMQTTserver();

    BLINKER_DEBUG.stream(Serial);
    BLINKER_DEBUG.debugAll();
    Blinker.begin(auth, ssid, pswd);
    Blinker.attachData(dataRead);
    BlinkerAliGenie.attachPowerState(AliGeniePowerState);
    BlinkerAliGenie.attachQuery(AliGenieQuery);
    BlinkerMIOT.attachPowerState(miotPowerState);
    BlinkerMIOT.attachQuery(miotQuery);
    Button1.attach(button1_callback);
    Button2.attach(button2_callback);

//   ticker.attach(600, turoffLed);

}


void turoffLed(){

}


void loop() {

//  if (digitalRead(ledPin) == HIGH){
//    delay(7200000); //等待2小时
//    digitalWrite(ledPin, LOW);  //如果还没关插座,则关插座
//  }

  if (mqttClient.connected()) { // 如果开发板成功连接服务器
    mqttClient.loop();          // 处理信息以及心跳
  } else {                      // 如果开发板未能成功连接服务器
    connectMQTTserver();        // 则尝试连接服务器
  }

  Blinker.run();
}

// 连接MQTT服务器并订阅信息
void connectMQTTserver(){
  // 根据ESP8266的MAC地址生成客户端ID(避免与其它ESP8266的客户端ID重名)


  // 连接MQTT服务器
  if (mqttClient.connect(clientId.c_str(), mqttUserName, mqttPassword, willTopic, willQos, willRetain, willMsg, cleanSession)) {
    Serial.println("MQTT Server Connected.");
    Serial.println("Server Address:");
    Serial.println(mqttServer);
    Serial.println("ClientId: ");
    Serial.println(clientId);
    subscribeTopic(); // 订阅指定主题
  } else {
    Serial.print("MQTT Server Connect Failed. Client State:");
    Serial.println(mqttClient.state());
    delay(5000);
  }
}

// 收到信息后的回调函数
void receiveCallback(char* topic, byte* payload, unsigned int length) {
  Serial.print("Message Received [");
  Serial.print(topic);
  Serial.print("] ");
  for (int i = 0; i < length; i++) {
    Serial.print((char)payload[i]);
  }
  Serial.println("");
  Serial.print("Message Length(Bytes) ");
  Serial.println(length);

  if ((char)payload[0] == '1') {     // 如果收到的信息以“1”为开始
    digitalWrite(ledPin, LOW);  // 则点亮LED。
    Serial.println("LED ON");

  } else {
    digitalWrite(ledPin, HIGH); // 否则熄灭LED。
    Serial.println("LED Off");


  }
}

// 订阅指定主题
void subscribeTopic(){

  // 建立订阅主题。主题名称以Taichi-Maker-Sub为前缀,后面添加设备的MAC地址。
  // 这么做是为确保不同设备使用同一个MQTT服务器测试消息订阅时,所订阅的主题名称不同

  char subTopic[topicString.length() + 1];
  strcpy(subTopic, topicString.c_str());

  // 通过串口监视器输出是否成功订阅主题以及订阅的主题名称
  if(mqttClient.subscribe(subTopic, subQoS)){
    Serial.println("Subscrib Topic:");
    Serial.println(subTopic);
  } else {
    Serial.print("Subscribe Fail...");
  }
}

// ESP8266连接wifi
void connectWifi(){

  WiFi.begin(ssid, pswd);

  //等待WiFi连接,成功连接后输出成功信息
  while (WiFi.status() != WL_CONNECTED) {
    delay(1000);
    Serial.print(".");
  }
  Serial.println("");
  Serial.println("WiFi Connected!");
  Serial.println("");
}
#include <ESP8266WiFi.h>
#include <ESP8266WiFiMulti.h>
#include <ESP8266WebServer.h>
#include <FS.h>
#include <Servo.h>

#define BLINKER_WIFI
#define BLINKER_MIOT_OUTLET   //小爱同学
#define BLINKER_DUEROS_OUTLET
#define BLINKER_ALIGENIE_OUTLET //天猫精灵
#include <Blinker.h>
#include <Ticker.h>

int ledPin = 0; //继电器引脚,esp8266为D5引脚
char auth[] = "e5e1b23e9e94";  //这里密钥
char ssid[] = "yang1234";   //这里WIFI名称
char pswd[] = "y123456789";    //这里WIFI密码
BlinkerButton Button1("btn-on");     //定义按钮数据
BlinkerButton Button2("btn-off");
bool oState = false;


#include "FastLED.h"            // 此示例程序需要使用FastLED库
#define NUM_LEDS 60             // LED灯珠数量
#define LED_DT D6                // Arduino输出控制信号引脚
#define LED_TYPE WS2812         // LED灯带型号
#define COLOR_ORDER GRB         // RGB灯珠中红色、绿色、蓝色LED的排列顺序

uint8_t max_bright = 128;       // LED亮度控制变量,可使用数值为 0 ~ 255, 数值越大则光带亮度越高
int relay = 14;

CRGB leds[NUM_LEDS];            // 建立光带leds


ESP8266WebServer esp8266_server(80);// 建立ESP8266WebServer对象,该对象用于响应HTTP请求。监听端口(80)

int ledPwmVal;
uint8_t beginHue;

void setup() {
  Serial.begin(9600);
  LEDS.addLeds<LED_TYPE, LED_DT, COLOR_ORDER>(leds, NUM_LEDS);  // 初始化光带

  FastLED.setBrightness(max_bright);                            // 设置光带亮度
   pinMode(relay, OUTPUT); //继电器
  digitalWrite(relay, LOW); // 默认低电平


  wifiMulti.addAP("yang1234", "y123456789"); // 将需要连接的一系列WiFi ID和密码输入这里
  wifiMulti.addAP("ssid_from_AP_2", "your_password_for_AP_2"); // ESP8266-NodeMCU再启动后会扫描当前网络
  wifiMulti.addAP("ssid_from_AP_3", "your_password_for_AP_3"); // 环境查找是否有这里列出的WiFi ID。如果有
  Serial.println("Connecting ...");                            // 则尝试使用此处存储的密码进行连接。

  int i = 0;
  while (wifiMulti.run() != WL_CONNECTED) { // 尝试进行wifi连接。
    delay(1000);
    Serial.print(i++); Serial.print(' ');
  }

  // WiFi连接成功后将通过串口监视器输出连接成功信息
  Serial.println('\n');
  Serial.print("Connected to ");
  Serial.println(WiFi.SSID());              // 通过串口监视器输出连接的WiFi名称
  Serial.print("IP address:\t");
  Serial.println(WiFi.localIP());           // 通过串口监视器输出ESP8266-NodeMCU的IP

  if(SPIFFS.begin()){                       // 启动闪存文件系统
    Serial.println("SPIFFS Started.");
  } else {
    Serial.println("SPIFFS Failed to Start.");
  }

  //初始化网络服务器
  esp8266_server.on("/LED-Control", handleLEDControl);
  esp8266_server.onNotFound(handleUserRequest); // 处理其它网络请求

  // 启动网站服务
  esp8266_server.begin();
  Serial.println("HTTP server started");

//  小爱和天猫精灵
  BLINKER_DEBUG.stream(Serial);
    BLINKER_DEBUG.debugAll();
    Blinker.begin(auth, ssid, pswd);
    Blinker.attachData(dataRead);
    BlinkerAliGenie.attachPowerState(AliGeniePowerState);
    BlinkerAliGenie.attachQuery(AliGenieQuery);
    BlinkerMIOT.attachPowerState(miotPowerState);
    BlinkerMIOT.attachQuery(miotQuery);
    Button1.attach(button1_callback);
    Button2.attach(button2_callback);

}


//色
typedef void (*SimplePatternList[])();
SimplePatternList gPatterns = { rainbow, rainbowWithGlitter, confetti, sinelon, juggle, bpm };
uint8_t gCurrentPatternNumber = 0; // Index number of which pattern is current
uint8_t gHue = 0; // rotating "base color" used by many of the patterns

#define ARRAY_SIZE(A) (sizeof(A) / sizeof((A)[0]))

void nextPattern()
{
  // add one to the current pattern number, and wrap around at the end
  gCurrentPatternNumber = (gCurrentPatternNumber + 1) % ARRAY_SIZE( gPatterns);
}

void rainbow()
{
  // FastLED's built-in rainbow generator
  fill_rainbow( leds, NUM_LEDS, gHue, 7);
}

void rainbowWithGlitter()
{
  // built-in FastLED rainbow, plus some random sparkly glitter
  rainbow();
  addGlitter(80);
}

void addGlitter( fract8 chanceOfGlitter)
{
  if( random8() < chanceOfGlitter) {
    leds[ random16(NUM_LEDS) ] += CRGB::White;
  }
}

void confetti()
{
  // random colored speckles that blink in and fade smoothly
  fadeToBlackBy( leds, NUM_LEDS, 10);
  int pos = random16(NUM_LEDS);
  leds[pos] += CHSV( gHue + random8(64), 200, 255);
}

void sinelon()
{
  // a colored dot sweeping back and forth, with fading trails
  fadeToBlackBy( leds, NUM_LEDS, 20);
  int pos = beatsin16( 13, 0, NUM_LEDS-1 );
  leds[pos] += CHSV( gHue, 255, 192);
}

void bpm()
{
  // colored stripes pulsing at a defined Beats-Per-Minute (BPM)
  uint8_t BeatsPerMinute = 62;
  CRGBPalette16 palette = PartyColors_p;
  uint8_t beat = beatsin8( BeatsPerMinute, 64, 255);
  for( int i = 0; i < NUM_LEDS; i++) { //9948
    leds[i] = ColorFromPalette(palette, gHue+(i*2), beat-gHue+(i*10));
  }
}

void juggle() {
  // eight colored dots, weaving in and out of sync with each other
  fadeToBlackBy( leds, NUM_LEDS, 20);
  byte dothue = 0;
  for( int i = 0; i < 8; i++) {
    leds[beatsin16( i+7, 0, NUM_LEDS-1 )] |= CHSV(dothue, 200, 255);
    dothue += 32;
  }
}

void loop () {
// 电灯
  Blinker.run();

  esp8266_server.handleClient();  //处理网络请求
  Serial.println(ledPwmVal);
  if (ledPwmVal <= 255 && ledPwmVal > 0 ){

    CHSV myHSVcolor(ledPwmVal,ledPwmVal, ledPwmVal);
    myHSVcolor.h++;
    fill_solid(leds, NUM_LEDS, myHSVcolor);
    FastLED.show();
    delay(25);
  }
  else if (ledPwmVal >= 255){

    gPatterns[gCurrentPatternNumber]();
    // send the 'leds' array out to the actual LED strip
    FastLED.show();
    // insert a delay to keep the framerate modest
    FastLED.delay(1000/max_bright);
    // do some periodic updates
    EVERY_N_MILLISECONDS( 20 ) { gHue++; } // slowly cycle the "base color" through the rainbow
    EVERY_N_SECONDS( 10 ) { nextPattern(); } // change
  }
  else{
      fill_gradient_RGB(leds, 0, CRGB(0,0,0), 59, CRGB(0, 0, 0));;
      FastLED.show();
      delay(15);
    }

}


void handleLEDControl(){
  /*需要修改的地方*/

  // 从浏览器发送的信息中获取PWM控制数值(字符串格式)
  String ledPwm = esp8266_server.arg("ledPwm");

  // 将字符串格式的PWM控制数值转换为整数
  ledPwmVal = ledPwm.toInt();

  // 实施引脚PWM设置
  //  第四个参数两个灯调值差, beginHue颜色渐变
  if (ledPwmVal == 0){
    digitalWrite(relay, LOW);
  }
  if (ledPwmVal == 1){
     digitalWrite(relay, HIGH);
    }

  // 建立基本网页信息显示当前数值以及返回链接
  String httpBody = "Led PWM: " + ledPwm + "<p><a href=\"/LED.html\"><-LED Page</a></p>";
  esp8266_server.send(200, "text/html", httpBody);
}

// 处理用户浏览器的HTTP访问
void handleUserRequest() {

  // 获取用户请求资源(Request Resource)
  String reqResource = esp8266_server.uri();
  Serial.print("reqResource: ");
  Serial.println(reqResource);

  // 通过handleFileRead函数处处理用户请求资源
  bool fileReadOK = handleFileRead(reqResource);

  // 如果在SPIFFS无法找到用户访问的资源,则回复404 (Not Found)
  if (!fileReadOK){
    esp8266_server.send(404, "text/plain", "404 Not Found");
  }
}

bool handleFileRead(String resource) {            //处理浏览器HTTP访问

  if (resource.endsWith("/")) {                   // 如果访问地址以"/"为结尾
    resource = "/index.html";                     // 则将访问地址修改为/index.html便于SPIFFS访问
  }

  String contentType = getContentType(resource);  // 获取文件类型

  if (SPIFFS.exists(resource)) {                     // 如果访问的文件可以在SPIFFS中找到
    File file = SPIFFS.open(resource, "r");          // 则尝试打开该文件
    esp8266_server.streamFile(file, contentType);// 并且将该文件返回给浏览器
    file.close();                                // 并且关闭文件
    return true;                                 // 返回true
  }
  return false;                                  // 如果文件未找到,则返回false
}

// 获取文件类型
String getContentType(String filename){
  if(filename.endsWith(".htm")) return "text/html";
  else if(filename.endsWith(".html")) return "text/html";
  else if(filename.endsWith(".css")) return "text/css";
  else if(filename.endsWith(".js")) return "application/javascript";
  else if(filename.endsWith(".png")) return "image/png";
  else if(filename.endsWith(".gif")) return "image/gif";
  else if(filename.endsWith(".jpg")) return "image/jpeg";
  else if(filename.endsWith(".ico")) return "image/x-icon";
  else if(filename.endsWith(".xml")) return "text/xml";
  else if(filename.endsWith(".pdf")) return "application/x-pdf";
  else if(filename.endsWith(".zip")) return "application/x-zip";
  else if(filename.endsWith(".gz")) return "application/x-gzip";
  return "text/plain";
}


void on_myleds() {
  digitalWrite(relay, LOW);

  ledPwmVal = 0;

 }

void off_myleds() {
  digitalWrite(relay, HIGH);
  ledPwmVal = 120;
 }
 void miotPowerState(const String & state)
{
    BLINKER_LOG("need set power state: ", state);

    if (state == BLINKER_CMD_ON) {     //小爱同学控制开命令
         off_myleds();

        BlinkerMIOT.powerState("on");

        BlinkerMIOT.print();

        oState = true;
    }
    else if (state == BLINKER_CMD_OFF) {   //小爱同学控制关命令
        on_myleds();

        BlinkerMIOT.powerState("off");

        BlinkerMIOT.print();

        oState = false;
    }
}

void miotQuery(int32_t queryCode)      //小爱同学控制
{
    BLINKER_LOG("MIOT Query codes: ", queryCode);

    switch (queryCode)
    {
        case BLINKER_CMD_QUERY_ALL_NUMBER :
            BLINKER_LOG("MIOT Query All");
            BlinkerMIOT.powerState(oState ? "on" : "off");
            BlinkerMIOT.print();
            break;
        case BLINKER_CMD_QUERY_POWERSTATE_NUMBER :
            BLINKER_LOG("MIOT Query Power State");
            BlinkerMIOT.powerState(oState ? "on" : "off");
            BlinkerMIOT.print();
            break;
        default :
            BlinkerMIOT.powerState(oState ? "on" : "off");
            BlinkerMIOT.print();
            break;
    }
}

void AliGeniePowerState(const String & state)
{
    BLINKER_LOG("need set power state: ", state);

    if (state == BLINKER_CMD_ON) {     //小爱同学控制开命令
        off_myleds();

        BlinkerAliGenie.powerState("on");

        BlinkerAliGenie.print();

        oState = true;
    }
    else if (state == BLINKER_CMD_OFF) {   //小爱同学控制关命令
        on_myleds();

        BlinkerAliGenie.powerState("off");

        BlinkerAliGenie.print();

        oState = false;
    }
}

void AliGenieQuery(int32_t queryCode)      //天猫精灵控制
{
    BLINKER_LOG("AliGenie Query codes: ", queryCode);

    switch (queryCode)
    {
        case BLINKER_CMD_QUERY_ALL_NUMBER :
            BLINKER_LOG("AliGenie Query All");
            BlinkerAliGenie.powerState(oState ? "on" : "off");
            BlinkerAliGenie.print();
            break;
        case BLINKER_CMD_QUERY_POWERSTATE_NUMBER :
            BLINKER_LOG("AliGenie Query Power State");
            BlinkerAliGenie.powerState(oState ? "on" : "off");
            BlinkerAliGenie.print();
            break;
        default :
            BlinkerAliGenie.powerState(oState ? "on" : "off");
            BlinkerAliGenie.print();
            break;
    }
}

void dataRead(const String & data)      // 如果未绑定的组件被触发,则会执行其中内容
{
    BLINKER_LOG("Blinker readString: ", data);

    Blinker.vibrate();

    uint32_t BlinkerTime = millis();

    Blinker.print("millis", BlinkerTime);
}

void button1_callback(const String & state)     //点灯app内控制按键触发
{

    off_myleds();
    BLINKER_LOG("get button state:on", state);


}
void button2_callback(const String & state)     //点灯app内控制按键触发
{

    on_myleds();
    BLINKER_LOG("get button state:off", state);


}
/**
说明: 控制继电器
NodeMcu -   继电器
VU      -    VCC
D5      -    OUT
GND     -    GND
**/

#include <ESP8266WiFi.h>
#include <ESP8266WiFiMulti.h>
#include <ESP8266WebServer.h>
#include <FS.h>
#include <Ticker.h>
Ticker ticker;
int count;    // Ticker计数用变量

//定义引脚GPIO14,即Nodemcu D5引脚
int relay = 14;
ESP8266WiFiMulti wifiMulti;         // 建立ESP8266WiFiMulti对象

ESP8266WebServer esp8266_server(80);// 建立ESP8266WebServer对象,该对象用于响应HTTP请求。监听端口(80)


void setup(void){
  pinMode(relay, OUTPUT);
  Serial.begin(9600);
  Serial.println("");
  // Ticker定时对象
  ticker.attach(1, tickerCount);

  pinMode(LED_BUILTIN, OUTPUT);      // 初始化NodeMCU控制板载LED引脚为OUTPUT

  wifiMulti.addAP("yang1234", "y123456789"); // 将需要连接的一系列WiFi ID和密码输入这里
  wifiMulti.addAP("ssid_from_AP_2", "your_password_for_AP_2"); // ESP8266-NodeMCU再启动后会扫描当前网络
  wifiMulti.addAP("ssid_from_AP_3", "your_password_for_AP_3"); // 环境查找是否有这里列出的WiFi ID。如果有
  Serial.println("Connecting ...");                            // 则尝试使用此处存储的密码进行连接。

  int i = 0;
  while (wifiMulti.run() != WL_CONNECTED) { // 尝试进行wifi连接。
    delay(1000);
    Serial.print(i++); Serial.print(' ');
  }

  // WiFi连接成功后将通过串口监视器输出连接成功信息
  Serial.println('\n');
  Serial.print("Connected to ");
  Serial.println(WiFi.SSID());              // 通过串口监视器输出连接的WiFi名称
  Serial.print("IP address:\t");
  Serial.println(WiFi.localIP());           // 通过串口监视器输出ESP8266-NodeMCU的IP

  if(SPIFFS.begin()){                       // 启动闪存文件系统
    Serial.println("SPIFFS Started.");
  } else {
    Serial.println("SPIFFS Failed to Start.");
  }

  //初始化网络服务器
  esp8266_server.on("/LED-Control", handleLEDControl);
  esp8266_server.onNotFound(handleUserRequest); // 处理其它网络请求

  // 启动网站服务
  esp8266_server.begin();
  Serial.println("HTTP server started");
}

void loop(void){
  esp8266_server.handleClient();  //处理网络请求
}

void tickerCount(){
//  每次可以加时间直到为0时候关插座
  if (count <= 0){
      digitalWrite(relay, LOW);
      count = 0;
    }else{

    delay(1000);
    count--;
   }
  Serial.print("count=");
  Serial.println(count);

}
void handleLEDControl(){
  // 从浏览器发送的信息中获取PWM控制数值(字符串格式)
  String ledPwm = esp8266_server.arg("ledPwm");

  // 时间
  String t = esp8266_server.arg("time");

  int inttime;
  if(t != ""){
    inttime = t.toInt();
    }
    else{
      t = "∞";
      inttime = 0;
     }
  Serial.print("t=");
  Serial.println(t);
  // 将字符串格式的PWM控制数值转换为整数
  int ledPwmVal = ledPwm.toInt();

  // 实施引脚PWM设置
  if(ledPwmVal == 0){
    digitalWrite(relay, LOW);

   }
   else{
    digitalWrite(relay, HIGH);
    if (inttime != 0)
    {
      count += inttime/1000;
     }
  }
  // 建立基本网页信息显示当前数值以及返回链接

  String httpBody = "Led PWM: " + ledPwm + ",time="+ t +",count="+ count +"<p><a href=\"/LED.html\"><-LED Page</a></p>";
  esp8266_server.send(200, "text/html", httpBody);

}

// 处理用户浏览器的HTTP访问
void handleUserRequest() {

  // 获取用户请求资源(Request Resource)
  String reqResource = esp8266_server.uri();
  Serial.print("reqResource: ");
  Serial.println(reqResource);

  // 通过handleFileRead函数处处理用户请求资源
  bool fileReadOK = handleFileRead(reqResource);

  // 如果在SPIFFS无法找到用户访问的资源,则回复404 (Not Found)
  if (!fileReadOK){
    esp8266_server.send(404, "text/plain", "404 Not Found");
  }
}

bool handleFileRead(String resource) {            //处理浏览器HTTP访问

  if (resource.endsWith("/")) {                   // 如果访问地址以"/"为结尾
    resource = "/index.html";                     // 则将访问地址修改为/index.html便于SPIFFS访问
  }

  String contentType = getContentType(resource);  // 获取文件类型

  if (SPIFFS.exists(resource)) {                     // 如果访问的文件可以在SPIFFS中找到
    File file = SPIFFS.open(resource, "r");          // 则尝试打开该文件
    esp8266_server.streamFile(file, contentType);// 并且将该文件返回给浏览器
    file.close();                                // 并且关闭文件
    return true;                                 // 返回true
  }
  return false;                                  // 如果文件未找到,则返回false
}

// 获取文件类型
String getContentType(String filename){
  if(filename.endsWith(".htm")) return "text/html";
  else if(filename.endsWith(".html")) return "text/html";
  else if(filename.endsWith(".css")) return "text/css";
  else if(filename.endsWith(".js")) return "application/javascript";
  else if(filename.endsWith(".png")) return "image/png";
  else if(filename.endsWith(".gif")) return "image/gif";
  else if(filename.endsWith(".jpg")) return "image/jpeg";
  else if(filename.endsWith(".ico")) return "image/x-icon";
  else if(filename.endsWith(".xml")) return "text/xml";
  else if(filename.endsWith(".pdf")) return "application/x-pdf";
  else if(filename.endsWith(".zip")) return "application/x-zip";
  else if(filename.endsWith(".gz")) return "application/x-gzip";
  return "text/plain";
}
0关, 1-255 对应颜色值, 大于255彩灯
#include <ESP8266WiFi.h>
#include <ESP8266WiFiMulti.h>
#include <ESP8266WebServer.h>
#include <FS.h>
#include <Servo.h>
#include <Ticker.h>

#include "FastLED.h"            // 此示例程序需要使用FastLED库
#define NUM_LEDS 30             // LED灯珠数量
#define LED_DT D6                // Arduino输出控制信号引脚
#define LED_TYPE WS2812         // LED灯带型号
#define COLOR_ORDER GRB         // RGB灯珠中红色、绿色、蓝色LED的排列顺序

uint8_t max_bright = 128;       // LED亮度控制变量,可使用数值为 0 ~ 255, 数值越大则光带亮度越高
ESP8266WiFiMulti wifiMulti;     // 建立ESP8266WiFiMulti对象,对象名称是 'wifiMulti'
CRGB leds[NUM_LEDS];            // 建立光带leds

ESP8266WebServer esp8266_server(80);// 建立ESP8266WebServer对象,该对象用于响应HTTP请求。监听端口(80)

int ledPwmVal;
uint8_t beginHue;

void setup() {
  Serial.begin(9600);
  LEDS.addLeds<LED_TYPE, LED_DT, COLOR_ORDER>(leds, NUM_LEDS);  // 初始化光带

  FastLED.setBrightness(max_bright);                            // 设置光带亮度


  wifiMulti.addAP("yang1234", "y123456789"); // 将需要连接的一系列WiFi ID和密码输入这里
  wifiMulti.addAP("ssid_from_AP_2", "your_password_for_AP_2"); // ESP8266-NodeMCU再启动后会扫描当前网络
  wifiMulti.addAP("ssid_from_AP_3", "your_password_for_AP_3"); // 环境查找是否有这里列出的WiFi ID。如果有
  Serial.println("Connecting ...");                            // 则尝试使用此处存储的密码进行连接。

  int i = 0;
  while (wifiMulti.run() != WL_CONNECTED) { // 尝试进行wifi连接。
    delay(1000);
    Serial.print(i++); Serial.print(' ');
  }

  // WiFi连接成功后将通过串口监视器输出连接成功信息
  Serial.println('\n');
  Serial.print("Connected to ");
  Serial.println(WiFi.SSID());              // 通过串口监视器输出连接的WiFi名称
  Serial.print("IP address:\t");
  Serial.println(WiFi.localIP());           // 通过串口监视器输出ESP8266-NodeMCU的IP

  if(SPIFFS.begin()){                       // 启动闪存文件系统
    Serial.println("SPIFFS Started.");
  } else {
    Serial.println("SPIFFS Failed to Start.");
  }

  //初始化网络服务器
  esp8266_server.on("/LED-Control", handleLEDControl);
  esp8266_server.onNotFound(handleUserRequest); // 处理其它网络请求

  // 启动网站服务
  esp8266_server.begin();
  Serial.println("HTTP server started");

}


//色
typedef void (*SimplePatternList[])();
SimplePatternList gPatterns = { rainbow, rainbowWithGlitter, confetti, sinelon, juggle, bpm };
uint8_t gCurrentPatternNumber = 0; // Index number of which pattern is current
uint8_t gHue = 0; // rotating "base color" used by many of the patterns

#define ARRAY_SIZE(A) (sizeof(A) / sizeof((A)[0]))

void nextPattern()
{
  // add one to the current pattern number, and wrap around at the end
  gCurrentPatternNumber = (gCurrentPatternNumber + 1) % ARRAY_SIZE( gPatterns);
}

void rainbow()
{
  // FastLED's built-in rainbow generator
  fill_rainbow( leds, NUM_LEDS, gHue, 7);
}

void rainbowWithGlitter()
{
  // built-in FastLED rainbow, plus some random sparkly glitter
  rainbow();
  addGlitter(80);
}

void addGlitter( fract8 chanceOfGlitter)
{
  if( random8() < chanceOfGlitter) {
    leds[ random16(NUM_LEDS) ] += CRGB::White;
  }
}

void confetti()
{
  // random colored speckles that blink in and fade smoothly
  fadeToBlackBy( leds, NUM_LEDS, 10);
  int pos = random16(NUM_LEDS);
  leds[pos] += CHSV( gHue + random8(64), 200, 255);
}

void sinelon()
{
  // a colored dot sweeping back and forth, with fading trails
  fadeToBlackBy( leds, NUM_LEDS, 20);
  int pos = beatsin16( 13, 0, NUM_LEDS-1 );
  leds[pos] += CHSV( gHue, 255, 192);
}

void bpm()
{
  // colored stripes pulsing at a defined Beats-Per-Minute (BPM)
  uint8_t BeatsPerMinute = 62;
  CRGBPalette16 palette = PartyColors_p;
  uint8_t beat = beatsin8( BeatsPerMinute, 64, 255);
  for( int i = 0; i < NUM_LEDS; i++) { //9948
    leds[i] = ColorFromPalette(palette, gHue+(i*2), beat-gHue+(i*10));
  }
}

void juggle() {
  // eight colored dots, weaving in and out of sync with each other
  fadeToBlackBy( leds, NUM_LEDS, 20);
  byte dothue = 0;
  for( int i = 0; i < 8; i++) {
    leds[beatsin16( i+7, 0, NUM_LEDS-1 )] |= CHSV(dothue, 200, 255);
    dothue += 32;
  }
}

void loop () {
// 电灯


  esp8266_server.handleClient();  //处理网络请求
  Serial.println(ledPwmVal);
  if (ledPwmVal <= 255 && ledPwmVal > 0 ){

    CHSV myHSVcolor(ledPwmVal,ledPwmVal, ledPwmVal);
    myHSVcolor.h++;
    fill_solid(leds, NUM_LEDS, myHSVcolor);
    FastLED.show();
    delay(25);
  }
  else if (ledPwmVal >= 255){

    gPatterns[gCurrentPatternNumber]();
    // send the 'leds' array out to the actual LED strip
    FastLED.show();
    // insert a delay to keep the framerate modest
    FastLED.delay(1000/max_bright);
    // do some periodic updates
    EVERY_N_MILLISECONDS( 20 ) { gHue++; } // slowly cycle the "base color" through the rainbow
    EVERY_N_SECONDS( 10 ) { nextPattern(); } // change
  }
  else{
      Serial.println("off");
      fill_gradient_RGB(leds, 0, CRGB(0,0,0), 59, CRGB(0, 0, 0));;
      FastLED.show();
      delay(15);
    }

}


void handleLEDControl(){
  /*需要修改的地方*/

  // 从浏览器发送的信息中获取PWM控制数值(字符串格式)
  String ledPwm = esp8266_server.arg("ledPwm");

  // 将字符串格式的PWM控制数值转换为整数
  ledPwmVal = ledPwm.toInt();

  // 实施引脚PWM设置
  //  第四个参数两个灯调值差, beginHue颜色渐变

  // 建立基本网页信息显示当前数值以及返回链接
  String httpBody = "backgraond PWM : " + ledPwm + "<p><a href=\"/LED.html\"><-LED Page</a></p>";
  esp8266_server.send(200, "text/html", httpBody);
}

// 处理用户浏览器的HTTP访问
void handleUserRequest() {

  // 获取用户请求资源(Request Resource)
  String reqResource = esp8266_server.uri();
  Serial.print("reqResource: ");
  Serial.println(reqResource);

  // 通过handleFileRead函数处处理用户请求资源
  bool fileReadOK = handleFileRead(reqResource);

  // 如果在SPIFFS无法找到用户访问的资源,则回复404 (Not Found)
  if (!fileReadOK){
    esp8266_server.send(404, "text/plain", "404 Not Found");
  }
}

bool handleFileRead(String resource) {            //处理浏览器HTTP访问

  if (resource.endsWith("/")) {                   // 如果访问地址以"/"为结尾
    resource = "/index.html";                     // 则将访问地址修改为/index.html便于SPIFFS访问
  }

  String contentType = getContentType(resource);  // 获取文件类型

  if (SPIFFS.exists(resource)) {                     // 如果访问的文件可以在SPIFFS中找到
    File file = SPIFFS.open(resource, "r");          // 则尝试打开该文件
    esp8266_server.streamFile(file, contentType);// 并且将该文件返回给浏览器
    file.close();                                // 并且关闭文件
    return true;                                 // 返回true
  }
  return false;                                  // 如果文件未找到,则返回false
}

// 获取文件类型
String getContentType(String filename){
  if(filename.endsWith(".htm")) return "text/html";
  else if(filename.endsWith(".html")) return "text/html";
  else if(filename.endsWith(".css")) return "text/css";
  else if(filename.endsWith(".js")) return "application/javascript";
  else if(filename.endsWith(".png")) return "image/png";
  else if(filename.endsWith(".gif")) return "image/gif";
  else if(filename.endsWith(".jpg")) return "image/jpeg";
  else if(filename.endsWith(".ico")) return "image/x-icon";
  else if(filename.endsWith(".xml")) return "text/xml";
  else if(filename.endsWith(".pdf")) return "application/x-pdf";
  else if(filename.endsWith(".zip")) return "application/x-zip";
  else if(filename.endsWith(".gz")) return "application/x-gzip";
  return "text/plain";
}


void on_myleds() {

  ledPwmVal = 0;

 }

void off_myleds() {
  ledPwmVal = 120;
 }
8.9
#include <ESP8266WiFi.h>
#include <ESP8266WiFiMulti.h>
#include <ESP8266WebServer.h>
#include <FS.h>

#define BLINKER_WIFI
#define BLINKER_MIOT_OUTLET   //小爱同学
#define BLINKER_DUEROS_OUTLET
#define BLINKER_ALIGENIE_OUTLET //天猫精灵
#include <Blinker.h>
#include <Ticker.h>

int ledPin = 0; //继电器引脚,esp8266为D5引脚
char auth[] = "3a4bda6cc038";  //这里密钥
char ssid[] = "yang1234";   //这里WIFI名称
char pswd[] = "y123456789";    //这里WIFI密码
BlinkerButton Button1("btn-on");     //定义按钮数据
BlinkerButton Button2("btn-off");
bool oState = false;


#include "FastLED.h"            // 此示例程序需要使用FastLED库
#define NUM_LEDS 30             // LED灯珠数量
#define LED_DT D6                // Arduino输出控制信号引脚
#define LED_TYPE WS2812         // LED灯带型号
#define COLOR_ORDER GRB         // RGB灯珠中红色、绿色、蓝色LED的排列顺序

uint8_t max_bright = 128;       // LED亮度控制变量,可使用数值为 0 ~ 255, 数值越大则光带亮度越高
//int relay = 14;
int irSensorPin = D7; //连接红外传感器引脚D7
bool irSensorOutput; //红外传感器输出信号
int relayPinOutput;
int relayPin  = D5;
int count;
CRGB leds[NUM_LEDS];            // 建立光带leds


ESP8266WebServer esp8266_server(80);// 建立ESP8266WebServer对象,该对象用于响应HTTP请求。监听端口(80)

int ledPwmVal;
uint8_t beginHue;

void setup() {
  Serial.begin(9600);
  LEDS.addLeds<LED_TYPE, LED_DT, COLOR_ORDER>(leds, NUM_LEDS);  // 初始化光带
   pinMode(irSensorPin, INPUT);
//  pinMode(relayPin, OUTPUT);

  FastLED.setBrightness(max_bright);                            // 设置光带亮度


  wifiMulti.addAP("yang1234", "y123456789"); // 将需要连接的一系列WiFi ID和密码输入这里
  wifiMulti.addAP("ssid_from_AP_2", "your_password_for_AP_2"); // ESP8266-NodeMCU再启动后会扫描当前网络
  wifiMulti.addAP("ssid_from_AP_3", "your_password_for_AP_3"); // 环境查找是否有这里列出的WiFi ID。如果有
  Serial.println("Connecting ...");                            // 则尝试使用此处存储的密码进行连接。

  int i = 0;
  while (wifiMulti.run() != WL_CONNECTED) { // 尝试进行wifi连接。
    delay(1000);
    Serial.print(i++); Serial.print(' ');
  }

  // WiFi连接成功后将通过串口监视器输出连接成功信息
  Serial.println('\n');
  Serial.print("Connected to ");
  Serial.println(WiFi.SSID());              // 通过串口监视器输出连接的WiFi名称
  Serial.print("IP address:\t");
  Serial.println(WiFi.localIP());           // 通过串口监视器输出ESP8266-NodeMCU的IP

  if(SPIFFS.begin()){                       // 启动闪存文件系统
    Serial.println("SPIFFS Started.");
  } else {
    Serial.println("SPIFFS Failed to Start.");
  }

  //初始化网络服务器
  esp8266_server.on("/LED-Control", handleLEDControl);
  esp8266_server.onNotFound(handleUserRequest); // 处理其它网络请求

  // 启动网站服务
  esp8266_server.begin();
  Serial.println("HTTP server started");

//  小爱和天猫精灵
  BLINKER_DEBUG.stream(Serial);
    BLINKER_DEBUG.debugAll();
    Blinker.begin(auth, ssid, pswd);
    Blinker.attachData(dataRead);
    BlinkerAliGenie.attachPowerState(AliGeniePowerState);
    BlinkerAliGenie.attachQuery(AliGenieQuery);
    BlinkerMIOT.attachPowerState(miotPowerState);
    BlinkerMIOT.attachQuery(miotQuery);
    Button1.attach(button1_callback);
    Button2.attach(button2_callback);

}


//色
typedef void (*SimplePatternList[])();
SimplePatternList gPatterns = { rainbow, rainbowWithGlitter, confetti, sinelon, juggle, bpm };
uint8_t gCurrentPatternNumber = 0; // Index number of which pattern is current
uint8_t gHue = 0; // rotating "base color" used by many of the patterns

#define ARRAY_SIZE(A) (sizeof(A) / sizeof((A)[0]))

void nextPattern()
{
  // add one to the current pattern number, and wrap around at the end
  gCurrentPatternNumber = (gCurrentPatternNumber + 1) % ARRAY_SIZE( gPatterns);
}

void rainbow()
{
  // FastLED's built-in rainbow generator
  fill_rainbow( leds, NUM_LEDS, gHue, 7);
}

void rainbowWithGlitter()
{
  // built-in FastLED rainbow, plus some random sparkly glitter
  rainbow();
  addGlitter(80);
}

void addGlitter( fract8 chanceOfGlitter)
{
  if( random8() < chanceOfGlitter) {
    leds[ random16(NUM_LEDS) ] += CRGB::White;
  }
}

void confetti()
{
  // random colored speckles that blink in and fade smoothly
  fadeToBlackBy( leds, NUM_LEDS, 10);
  int pos = random16(NUM_LEDS);
  leds[pos] += CHSV( gHue + random8(64), 200, 255);
}

void sinelon()
{
  // a colored dot sweeping back and forth, with fading trails
  fadeToBlackBy( leds, NUM_LEDS, 20);
  int pos = beatsin16( 13, 0, NUM_LEDS-1 );
  leds[pos] += CHSV( gHue, 255, 192);
}

void bpm()
{
  // colored stripes pulsing at a defined Beats-Per-Minute (BPM)
  uint8_t BeatsPerMinute = 62;
  CRGBPalette16 palette = PartyColors_p;
  uint8_t beat = beatsin8( BeatsPerMinute, 64, 255);
  for( int i = 0; i < NUM_LEDS; i++) { //9948
    leds[i] = ColorFromPalette(palette, gHue+(i*2), beat-gHue+(i*10));
  }
}

void juggle() {
  // eight colored dots, weaving in and out of sync with each other
  fadeToBlackBy( leds, NUM_LEDS, 20);
  byte dothue = 0;
  for( int i = 0; i < 8; i++) {
    leds[beatsin16( i+7, 0, NUM_LEDS-1 )] |= CHSV(dothue, 200, 255);
    dothue += 32;
  }
}

void handleLEDControl(){
  /*需要修改的地方*/

  // 从浏览器发送的信息中获取PWM控制数值(字符串格式)
  String ledPwm = esp8266_server.arg("ledPwm");

  // 将字符串格式的PWM控制数值转换为整数
  ledPwmVal = ledPwm.toInt();

  // 实施引脚PWM设置
  //  第四个参数两个灯调值差, beginHue颜色渐变
  if (ledPwmVal == 0){
   fill_gradient_RGB(leds, 0, CRGB(0,0,0), 59, CRGB(0, 0, 0));
      FastLED.show();
      delay(15);
  }
  if (ledPwmVal == 1){

    }

  // 建立基本网页信息显示当前数值以及返回链接
  String httpBody = "Led PWM: " + ledPwm + "<p><a href=\"/LED.html\"><-LED Page</a></p>";
  esp8266_server.send(200, "text/html", httpBody);
}


// 处理用户浏览器的HTTP访问
void handleUserRequest() {

  // 获取用户请求资源(Request Resource)
  String reqResource = esp8266_server.uri();
  Serial.print("reqResource: ");
  Serial.println(reqResource);

  // 通过handleFileRead函数处处理用户请求资源
  bool fileReadOK = handleFileRead(reqResource);

  // 如果在SPIFFS无法找到用户访问的资源,则回复404 (Not Found)
  if (!fileReadOK){
    esp8266_server.send(404, "text/plain", "404 Not Found");
  }
}

bool handleFileRead(String resource) {            //处理浏览器HTTP访问

  if (resource.endsWith("/")) {                   // 如果访问地址以"/"为结尾
    resource = "/index.html";                     // 则将访问地址修改为/index.html便于SPIFFS访问
  }

  String contentType = getContentType(resource);  // 获取文件类型

  if (SPIFFS.exists(resource)) {                     // 如果访问的文件可以在SPIFFS中找到
    File file = SPIFFS.open(resource, "r");          // 则尝试打开该文件
    esp8266_server.streamFile(file, contentType);// 并且将该文件返回给浏览器
    file.close();                                // 并且关闭文件
    return true;                                 // 返回true
  }
  return false;                                  // 如果文件未找到,则返回false
}

// 获取文件类型
String getContentType(String filename){
  if(filename.endsWith(".htm")) return "text/html";
  else if(filename.endsWith(".html")) return "text/html";
  else if(filename.endsWith(".css")) return "text/css";
  else if(filename.endsWith(".js")) return "application/javascript";
  else if(filename.endsWith(".png")) return "image/png";
  else if(filename.endsWith(".gif")) return "image/gif";
  else if(filename.endsWith(".jpg")) return "image/jpeg";
  else if(filename.endsWith(".ico")) return "image/x-icon";
  else if(filename.endsWith(".xml")) return "text/xml";
  else if(filename.endsWith(".pdf")) return "application/x-pdf";
  else if(filename.endsWith(".zip")) return "application/x-zip";
  else if(filename.endsWith(".gz")) return "application/x-gzip";
  return "text/plain";
}


void tickerCount(){
//  每次可以加时间直到为0时候关插座
  if (count <= 0){
      Serial.println("IR Motion Sensor OUTPUT:LOW");
        fill_gradient_RGB(leds, 0, CRGB(0,0,0), 59, CRGB(0, 0, 0));
        FastLED.show();
        delay(15);
      count = 0;
    }else{

    delay(1000);
    count--;
   }
  Serial.print("count=");
  Serial.println(count);

}

void on_myleds() {
      count = 200;
      for(int i=0; i<12000; i++){
        gPatterns[gCurrentPatternNumber]();
        // send the 'leds' array out to the actual LED strip
      FastLED.show();
      // insert a delay to keep the framerate modest
      FastLED.delay(1000/max_bright);

      // do some periodic updates
      EVERY_N_MILLISECONDS( 20 ) { gHue++; } // slowly cycle the "base color" through the rainbow
      EVERY_N_SECONDS( 10 ) { nextPattern(); } // change patterns periodically
      delay(10);
        if (count <= 0){
          break;
        }
  }

 }

void off_myleds() {
     fill_gradient_RGB(leds, 0, CRGB(0,0,0), 59, CRGB(0, 0, 0));;
      FastLED.show();
      delay(15);
    Serial.println("IR Motion Sensor OUTPUT:LOW");
 }

 void miotPowerState(const String & state)
{
    BLINKER_LOG("need set power state: ", state);

    if (state == BLINKER_CMD_ON) {     //小爱同学控制开命令

        on_myleds();
        BlinkerMIOT.powerState("on");

        BlinkerMIOT.print();

        oState = true;
    }
    else if (state == BLINKER_CMD_OFF) {   //小爱同学控制关命令

        off_myleds();
        BlinkerMIOT.powerState("off");

        BlinkerMIOT.print();

        oState = false;
    }
}

void miotQuery(int32_t queryCode)      //小爱同学控制
{
    BLINKER_LOG("MIOT Query codes: ", queryCode);

    switch (queryCode)
    {
        case BLINKER_CMD_QUERY_ALL_NUMBER :
            BLINKER_LOG("MIOT Query All");
            BlinkerMIOT.powerState(oState ? "on" : "off");
            BlinkerMIOT.print();
            break;
        case BLINKER_CMD_QUERY_POWERSTATE_NUMBER :
            BLINKER_LOG("MIOT Query Power State");
            BlinkerMIOT.powerState(oState ? "on" : "off");
            BlinkerMIOT.print();
            break;
        default :
            BlinkerMIOT.powerState(oState ? "on" : "off");
            BlinkerMIOT.print();
            break;
    }
}

void AliGeniePowerState(const String & state)
{
    BLINKER_LOG("need set power state: ", state);

    if (state == BLINKER_CMD_ON) {     //小爱同学控制开命令

        on_myleds();
        BlinkerAliGenie.powerState("on");
        BlinkerAliGenie.print();
        oState = true;
    }
    else if (state == BLINKER_CMD_OFF) {   //小爱同学控制关命令
        off_myleds();
        BlinkerAliGenie.powerState("off");
        BlinkerAliGenie.print();
        oState = false;


    }
}

void AliGenieQuery(int32_t queryCode)      //天猫精灵控制
{
    BLINKER_LOG("AliGenie Query codes: ", queryCode);

    switch (queryCode)
    {
        case BLINKER_CMD_QUERY_ALL_NUMBER :
            BLINKER_LOG("AliGenie Query All");
            BlinkerAliGenie.powerState(oState ? "on" : "off");
            BlinkerAliGenie.print();
            break;
        case BLINKER_CMD_QUERY_POWERSTATE_NUMBER :
            BLINKER_LOG("AliGenie Query Power State");
            BlinkerAliGenie.powerState(oState ? "on" : "off");
            BlinkerAliGenie.print();
            break;
        default :
            BlinkerAliGenie.powerState(oState ? "on" : "off");
            BlinkerAliGenie.print();
            break;
    }
}

void dataRead(const String & data)      // 如果未绑定的组件被触发,则会执行其中内容
{
    BLINKER_LOG("Blinker readString: ", data);

    Blinker.vibrate();

    uint32_t BlinkerTime = millis();

    Blinker.print("millis", BlinkerTime);
}

void button1_callback(const String & state)     //点灯app内控制按键触发
{

    off_myleds();
    BLINKER_LOG("get button state:on", state);


}
void button2_callback(const String & state)     //点灯app内控制按键触发
{

    on_myleds();
    BLINKER_LOG("get button state:off", state);


}


void loop () {
// 电灯
  Blinker.run();

  esp8266_server.handleClient();  //处理网络请求

  irSensorOutput = digitalRead(irSensorPin); //读取红外传感器输出
  relayPinOutput = analogRead(relayPin);
  Serial.print(irSensorOutput);
  Serial.println(":");
  Serial.println(relayPinOutput);
  if(irSensorOutput == HIGH && relayPinOutput >= 800){ //如果红外传感器输出高电平
    Serial.println("IR Motion Sensor OUTPUT:HIGH");
    Serial.println(relayPinOutput);
    Serial.println("IR Motion Sensor OUTPUT:HIGH");
    // Call the current pattern function once, updating the 'leds' array

    on_myleds();
  }
  else{
    off_myleds();
  }


}
本文作者: 永生
本文链接: https://yys.zone/detail/?id=191
版权声明: 本博客所有文章除特别声明外,均采用 CC BY-NC-SA 4.0 许可协议。转载请注明出处!
评论列表 (0 条评论)