OpenCV+python计算机视觉图像处理2
报错AttributeError: module 'tensorflow' has no attribute 'Session'。这其实不是安装错误,是因为在新的Tensorflow 2.0版本中已经移除了Session这一模块,改换运行代码
tf.compat.v1.Session()
import cv2
img = cv2.imread("wew.jpg", 1) #读取图片1 图片名2 0灰色 1.彩色
cv2.imshow("image", img)
cv2.waitKey(0)
import cv2
img = cv2.imread("wew.jpg", 1)
cv2.imwrite("image1.jpg", img) # 1.图片名,2,图像数据
有损压缩
import cv2
img = cv2.imread("wew.jpg", 1)
cv2.imwrite("imagetest.jpg", img,[cv2.IMWRITE_JPEG_QUALITY, 50])
无损压缩
import cv2
img = cv2.imread("wew.jpg", 1)
cv2.imwrite("imagetest.png", img,[cv2.IMWRITE_PNG_COMPRESSION, 9]) # 无损压缩(0-9)
1 像素
2 RGB
3 颜色深度8bit0-255
4 wh640*480
5 1.14M=720*547*3*8bit/8(B)=1.14M (分辨率*颜色通道*每一个颜色通道深度,转换成字节除以8)
6 RGB alpha
7 RGB bgr
8 bgr g
import cv2
img = cv2.imread("wew.jpg", 1)
(b, g, r) = img[100, 100]
print(b, g, r)
for i in range(1, 100):
    img[10+i, 100] = (255, 0, 0)
cv2.imshow("image", img)
cv2.waitKey(0)
import tensorflow as tf
tf.compat.v1.disable_eager_execution()  # 保证sess.run()能够正常运行

data1 = tf.constant(2, dtype=tf.int32)
data2 = tf.Variable(10, name="var")
print(data1)
print(data2)
sess = tf.compat.v1.Session()  # 版本2.0的函数
print(sess.run(data1))
init = tf.compat.v1.global_variables_initializer()
sess.run(init)
print(sess.run(data2))
Tensor("Const_2:0", shape=(), dtype=int32)
<tf.Variable 'var_2:0' shape=() dtype=int32>
2
10
import tensorflow as tf
tf.compat.v1.disable_eager_execution()  # 保证sess.run()能够正常运行

data1 = tf.constant(2, dtype=tf.int32)
data2 = tf.Variable(10, name="var")
print(data1)
print(data2)
"""
sess = tf.compat.v1.Session()  # 版本2.0的函数
print(sess.run(data1))
init = tf.compat.v1.global_variables_initializer()
sess.run(init)
print(sess.run(data2))
"""
init = tf.compat.v1.global_variables_initializer()
sess = tf.compat.v1.Session()  # 版本2.0的函数
with sess:
    sess.run(init)
    print(sess.run(data2))
import tensorflow as tf
tf.compat.v1.disable_eager_execution()
data1 = tf.constant(6)
data2 = tf.constant(2)
dataAdd = tf.add(data1, data2)
dataMul= tf.multiply(data1, data2)
dataSub= tf.subtract(data1, data2)
dataDiv = tf.divide(data1, data2)

with tf.compat.v1.Session() as sess:
    print(sess.run(dataAdd))
    print(sess.run(dataMul))
    print(sess.run(dataSub))
    print(sess.run(dataDiv))
import tensorflow as tf
tf.compat.v1.disable_eager_execution()
data1 = tf.constant(6)
data2 = tf.Variable(2)
dataAdd = tf.add(data1, data2)
dataCopy = tf.compat.v1.assign(data2, dataAdd)
dataMul= tf.multiply(data1, data2)
dataSub= tf.subtract(data1, data2)
dataDiv = tf.divide(data1, data2)

init = tf.compat.v1.global_variables_initializer() # Variable变量要初始化
with tf.compat.v1.Session() as sess:
    sess.run(init)
    print(sess.run(dataAdd))
    print(sess.run(dataMul))
    print(sess.run(dataSub))
    print(sess.run(dataDiv))
    print("sess.run(dataCopy)", sess.run(dataCopy)) # 8->data2
    print("dataCopy.eval()", dataCopy.eval()) # 8+6-.14->data=14
    print("tf.get_default_session().", tf.compat.v1.get_default_session().run(dataCopy))
import tensorflow as tf
data1 = tf.compat.v1.placeholder(tf.compat.v1.float32)
data2 = tf.compat.v1.placeholder(tf.compat.v1.float32)
dataAdd = tf.add(data1, data2)
with tf.compat.v1.Session() as sess:
    print(sess.run(dataAdd, feed_dict={data1:6, data2:2}))

print("end!")
8.0
end!
import tensorflow as tf
data1 = tf.constant([[6, 6]])
data2 = tf.constant([
    [2],
    [2]
])
data3 = tf.constant([[3, 3]])
data4 = tf.constant([[1,2],
                    [3, 4],
                     [5,6]
                    ])
print(data4.shape) # 3行2列
print(data4.numpy())  # 3行2列的矩阵
print(data4.numpy()[0])  # 打印第一行
(3, 2)
[[1 2]
[3 4]
[5 6]]
[1 2]
矩阵乘和加
import tensorflow as tf
data1 = tf.constant([[6, 6]])
data2 = tf.constant([[2],
                     [2]])
data3 = tf.constant([[3, 3]])
data4 = tf.constant([[1, 2],
                    [3, 4],
                     [5, 6]
                    ])
matMul = tf.matmul(data1, data2)
matMul2 = tf.multiply(data1, data2)
matAdd = tf.add(data1, data3)

print(matMul.numpy())
print(matMul2.numpy())
print(matAdd.numpy())
[[24]]
[[12 12]
[12 12]]
[[9 9]]
矩阵构成
import tensorflow as tf
mat0 = tf.constant([[0,0,0], [0,0,0]])
mat1 = tf.zeros([2,3])# 2行3列全0矩阵
mat2 = tf.ones([3,2]) # 3行2列全1矩阵
mat3 = tf.fill([2,3], 15) # 填2行3列充矩阵
print(mat0.numpy())
print(mat1.numpy())
print(mat2.numpy())
print(mat3.numpy())
[[0 0 0]
[0 0 0]]
[[0. 0. 0.]
[0. 0. 0.]]
[[1. 1.]
[1. 1.]
[1. 1.]]
[[15 15 15]
[15 15 15]]
import tensorflow as tf
mat1 = tf.constant([[2], [3], [4]])
mat2 = tf.zeros_like(mat1)
mat3 = tf.linspace(0.0, 2.0, 11) #分成10等份
mat4 = tf.compat.v1.random_uniform([2,3], -1,2)
print(mat2.numpy())
print(mat3.numpy())
print(mat4.numpy())
[[0]
[0]
[0]]
[0. 0.2 0.4 0.6 0.8 1. 1.2
1.4 1.6 1.8000001 2. ]
[[ 0.8051617 1.6825929 -0.1693145 ]
[-0.13480985 -0.01555562 1.5267706 ]]
import numpy as np
data1 = np.array([1,2,3,4,5])
print(data1)
data2 = np.array([[1,2],
                  [3,4]])
print(data2)
print(data1.shape, data2.shape)
print(np.zeros([2,3]))
print(np.ones([2,3]))
# 改查
data2[1,0] = 5
print(data2)
print(data2[1,1])
# 矩阵运算
data3 = np.ones([2,3])
print(data3*2)
print(data3/2)
print(data3+2)
# 矩阵+*
data4 = np.array([[1,2,3], [4,5,6]])
print(data3+data4)
print(data3*data4)
[1 2 3 4 5]
[[1 2]
[3 4]]
(5,) (2, 2)
[[0. 0. 0.]
[0. 0. 0.]]
[[1. 1. 1.]
[1. 1. 1.]]
[[1 2]
[5 4]]
4
[[2. 2. 2.]
[2. 2. 2.]]
[[0.5 0.5 0.5]
[0.5 0.5 0.5]]
[[3. 3. 3.]
[3. 3. 3.]]
[[2. 3. 4.]
[5. 6. 7.]]
[[1. 2. 3.]
[4. 5. 6.]]
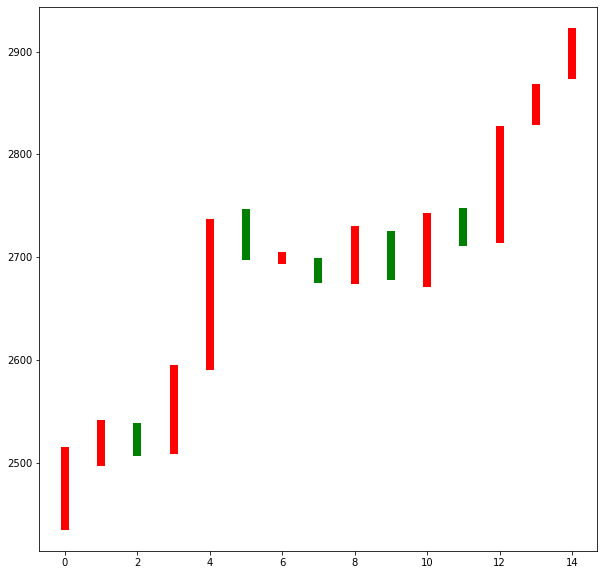
9.神经网络逼近股票收盘均价
import tensorflow as tf
import numpy as np
import matplotlib.pyplot as plt
date = np.linspace(1,15,15)
endPrice = np.array([2511.90,2538.26,2510.68,2591.66,2732.98,2701.69,2701.29,2678.67,2726.50,2681.50,2739.17,2715.07,2823.58,2864.90,2919.08]
)
beginPrice = np.array([2438.71,2500.88,2534.95,2512.52,2594.04,2743.26,2697.47,2695.24,2678.23,2722.13,2674.93,2744.13,2717.46,2832.73,2877.40])
print(date)
plt.figure(figsize=(10,10))
for i in range(0, 15):
    # 1.柱状图
    dataOne = np.zeros([2])
    dataOne[0] = i;
    dataOne[1] = i;
    priceOne = np.zeros([2])
    priceOne[0] = beginPrice[i]
    priceOne[1] = endPrice[i]
    if endPrice[i] > beginPrice[i]:
        plt.plot(dataOne, priceOne, "r", lw=8, label="上涨")
    else:
        plt.plot(dataOne, priceOne, "g", lw=8, label="下跌")

plt.show()
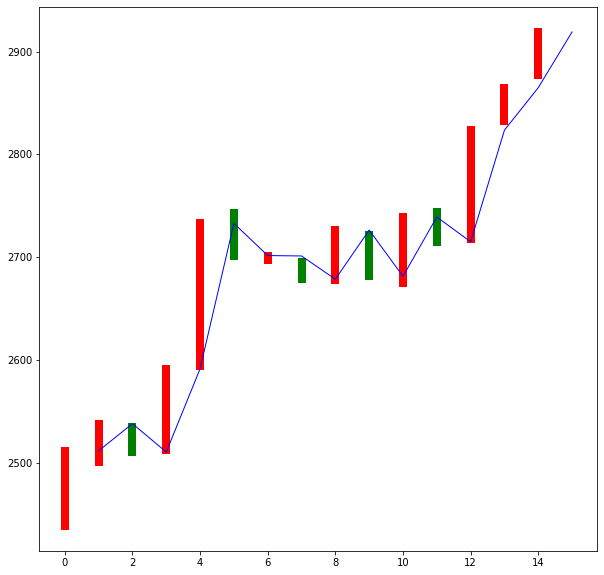
import tensorflow as tf
import numpy as np
import matplotlib.pyplot as plt
date = np.linspace(1,15,15)
endPrice = np.array([2511.90,2538.26,2510.68,2591.66,2732.98,2701.69,2701.29,2678.67,2726.50,2681.50,2739.17,2715.07,2823.58,2864.90,2919.08]
)
beginPrice = np.array([2438.71,2500.88,2534.95,2512.52,2594.04,2743.26,2697.47,2695.24,2678.23,2722.13,2674.93,2744.13,2717.46,2832.73,2877.40])
print(date)
plt.figure(figsize=(10,10))
for i in range(0, 15):
    # 1.柱状图
    dataOne = np.zeros([2])
    dataOne[0] = i;
    dataOne[1] = i;
    priceOne = np.zeros([2])
    priceOne[0] = beginPrice[i]
    priceOne[1] = endPrice[i]
    if endPrice[i] > beginPrice[i]:
        plt.plot(dataOne, priceOne, "r", lw=8, label="上涨")
    else:
        plt.plot(dataOne, priceOne, "g", lw=8, label="下跌")

# plt.show()
dateNormal = np.zeros([15, 1])
priceNormal = np.zeros([15, 1])
for i in range(0, 15):
    dateNormal[i, 0] = i / 14.0
    priceNormal[i, 0] = endPrice[i] / 3000.0  # 所有的最大的没有超过3000

tf.compat.v1.disable_eager_execution()
x = tf.compat.v1.placeholder(tf.float32, [None, 1])
y = tf.compat.v1.placeholder(tf.float32, [None, 1])
w1 = tf.Variable(tf.compat.v1.random_uniform([1, 10], 0, 1))
b1 = tf.Variable(tf.zeros([1, 10]))
wb1 = tf.matmul(x, w1) + b1
layer1 = tf.nn.relu(wb1)

w2 = tf.Variable(tf.compat.v1.random_uniform([10, 1], 0, 1))
b2 = tf.Variable(tf.zeros([15, 1]))
wb2 = tf.matmul(layer1, w2) + b2
layer2 = tf.nn.relu(wb2)

loss = tf.reduce_mean(tf.square(y - layer2)) # y真实值 layer 计算
train_step = tf.compat.v1.train.GradientDescentOptimizer(0.1).minimize(loss)
with tf.compat.v1.Session() as sess:
    sess.run(tf.compat.v1.global_variables_initializer())
    for i in range(0, 10000):
        sess.run(train_step, feed_dict={x:dateNormal, y:priceNormal})
    pred = sess.run(layer2, feed_dict={x:dateNormal})
    predPrice = np.zeros([15, 1])
    for i in range(0, 15):
        predPrice[i, 0] = (pred * 3000)[i, 0]
    plt.plot(date, predPrice, "b", lw=1)
plt.show()
方法一:resize实现
import cv2
img = cv2.imread("1.jpg", 1)
inginfo = img.shape
print(img.shape)
height = inginfo[0]
width = inginfo[1]
mode = inginfo[2]
dst = cv2.resize(img, (int(width * 0.5), int(height * 0.5))) # 宽度,高度
cv2.imwrite("2.jpg", dst)
方法二:源码实现
import cv2
import numpy as np
img = cv2.imread("1.jpg", 1)
imginfo = img.shape
print(imginfo)
height = imginfo[0]
width = imginfo[1]
dstHeight = int(height / 2)
dstWidth = int(width / 2)
dstImge = np.zeros((dstHeight, dstWidth,3), np.uint8) #uint8 0-255
for i in range(0, dstHeight):
    for j in range(0, dstWidth):
        iNew = int(i * (height * 1.0 / dstHeight))
        jNew = int(j * width * 1.0 / dstWidth)
        dstImge[i, j] = img[iNew, jNew]

cv2.imshow("dst", dstImge)
cv2.waitKey(0)
warpAffine :意思是仿射变化。官方给出的参数为
cv2.warpAffine(src, M, dsize[, dst[, flags[, borderMode[, borderValue]]]]) → dst
其中:
src – 输入图像。
M – 变换矩阵。
dsize – 输出图像的大小。
flags – 插值方法的组合(int 类型!)
borderMode – 边界像素模式(int 类型!)
borderValue – (重点!)边界填充值; 默认情况下,它为0。
import cv2
import numpy as np
img = cv2.imread("1.jpg", 1)
cv2.imshow('img', img)
imgInfo = img.shape
height = imgInfo[0]
width = imgInfo[1]
matScale = np.float32([[0.5, 0, 0], [0, 0.5, 0]])
dst = cv2.warpAffine(img, matScale, (int(width / 2), int(height / 2)))
cv2.imshow('dst', dst)
cv2.waitKey(0)
import cv2
img = cv2.imread("1.jpg", 1)
dst = img[100:200, 100:300]
cv2.imshow("image", dst)
cv2.waitKey(0)
import cv2
import numpy as np

img = cv2.imread("1.jpg", 1)
cv2.imshow("src", img)
imgInfo = img.shape
height = imgInfo[0]
width = imgInfo[1]
matShift = np.float32([[1, 0, 100], [0, 1, 200]])
dst = cv2.warpAffine(img, matShift, (height, width))
cv2.imshow("dst", dst)
cv2.waitKey(0)
源码实现
import cv2
import numpy as np
img = cv2.imread("1.jpg", 1)
cv2.imshow("src", img)
imgInfo = img.shape
dst = np.zeros(img.shape, np.uint8)
height = imgInfo[0]
width = imgInfo[1]

for i in range(0, height):
    for j in range(0, width - 100):
        dst[i, j + 100] = img[i, j]

cv2.imshow("image", dst)
cv2.waitKey(0)
import cv2
import numpy as np

img = cv2.imread("1.jpg", 1)
cv2.imshow("src", img)
imgInfo = img.shape
height = imgInfo[0]
width = imgInfo[1]
deep = imgInfo[2]
newImgInfor = (height * 2, width, deep)
dst = np.zeros(newImgInfor, np.uint8)
for i in range(0, height):
    for j in range(0, width):
        # 绘制上面不动
        dst[i, j] = img[i, j]
        # 绘制下面部分 x y = 2 *h - y -1
        dst[height * 2 - i -1, j] = img[i, j]
# 画线
for i in range(0, width):
    dst[height, i] = (0, 0, 255)

cv2.imshow('dst', dst)
cv2.waitKey(0)

import cv2
import numpy as np

img = cv2.imread("1.jpg", 1)
cv2.imshow('src', img)
imgInfo = img.shape
height = imgInfo[0]
width = imgInfo[1]
# src 3->dst 3(左上角 左下角 右上角)
matsrc = np.float32([[0, 0], [0, height - 1], [width - 1, 0]])
matDst = np.float32([[50, 50], [200, height - 100],[width - 200, 100]])
# 组合
matAffine = cv2.getAffineTransform(matsrc, matDst)

dst = cv2.warpAffine(img, matAffine, (width, height))
cv2.imshow("dst", dst)
cv2.waitKey(0)

cv2.getRotationMatrix2D(),这个函数需要三个参数,旋转中心,旋转角度,旋转后图像的缩放比例
import cv2
import numpy as np

img = cv2.imread("1.jpg", 1)
cv2.imshow("src", img)
imgInfo = img.shape
height = imgInfo[0]
width = imgInfo[1]

# 2*3
matRotate = cv2.getRotationMatrix2D((height * 0.5, width * 0.5), 45, 0.5)
dst = cv2.warpAffine(img, matRotate, (height, width))
cv2.imshow("dst", dst)
cv2.waitKey(0)
方法1:
# 方法1
import cv2
img1 = cv2.imread("1.jpg", 0)
img2 = cv2.imread("1.jpg", 1)
print(img1.shape)
print(img2.shape)
cv2.imshow("src", img1)
cv2.waitKey(0)
方法2:
import cv2
img = cv2.imread("1.jpg", 1)
dst = cv2.cvtColor(img, cv2.COLOR_BGR2GRAY)  # 颜色空间转化1. data 2 BGR gray
cv2.imshow("src", dst)
cv2.waitKey(0)
方法3:
import cv2
import numpy as np
img = cv2.imread("1.jpg", 1)
imgInfo = img.shape
height = imgInfo[0]
width = imgInfo[1]
# RGB R=G=B = gray (R+G+B)/3
dst = np.zeros((height, width, 3), np.uint8)
# print(dst)
for i in range(0, height):
    for j in range(0, width):
        (b, g, r) = img[i, j]
        gray = (int(b) + int(g) + int(r)) /3
        dst[i, j] = np.uint8(gray)

cv2.imshow("dst", dst)
cv2.waitKey(0)
方法4,优化
# 1.灰度 最重要 2.基础 3.实时性
# 定点->> 浮点 +=*/ >>
# r*0.299+g*0.587+b*0.144
# 本算法乘以4右移2位,如果精度更大可以乘以100,乘以1000
import cv2
import numpy as np
img = cv2.imread("1.jpg", 1)
imgInfo = img.shape
height = imgInfo[0]
width = imgInfo[1]
# RGB R=G=B = gray (R+G+B)/3
dst = np.zeros((height, width, 3), np.uint8)
# print(dst)
for i in range(0, height):
    for j in range(0, width):
        (b, g, r) = img[i, j]
        b = int(b)
        g = int(g)
        r = int(r)
        gray = (r + (g<<1) + b) >> 2
        dst[i, j] = np.uint8(gray)

cv2.imshow("dst", dst)
cv2.waitKey(0)
(1)灰色反转
import cv2
import numpy as np
img = cv2.imread("1.jpg", 1)
imgInfo = img.shape
height = imgInfo[0]
width = imgInfo[1]

gray = cv2.cvtColor(img, cv2.COLOR_BGR2GRAY)
dst = np.zeros((height, width, 1), np.uint8)
for i in range(0, height):
    for j in range(0, width):
        grayPixel = gray[i, j]
        dst[i, j] = 255 - grayPixel

cv2.imshow("dst", dst)
cv2.waitKey(0)
(2)彩色反转
import cv2
import numpy as np
img = cv2.imread("1.jpg", 1)
imgInfo = img.shape
height = imgInfo[0]
width = imgInfo[1]

dst = np.zeros((height, width, 3), np.uint8)
for i in range(0, height):
    for j in range(0, width):
        (b, g, r) = img[i, j]
        dst[i, j] = (255 - b, 255 - g, 255 - r)

cv2.imshow("dst", dst)
cv2.waitKey(0)
import cv2
import numpy as np

img = cv2.imread("1.jpg", 1)
imgInfo = img.shape
height = imgInfo[0]
width = imgInfo[1]

for m in range(100, 300):
    for n in range(100, 200):
        if m % 10 == 0 and n % 10 == 0:
            for i in range(0, 10):
                for j in range(0, 10):
                    (b, g ,r) = img[m,n ]
                    img[i + m, j + n] = (b, g, r)

cv2.imshow("img", img)
cv2.waitKey(0)
import cv2
import numpy as np
import random
img = cv2.imread("1.jpg", 1)
imgInfo = img.shape
height = imgInfo[0]
width = imgInfo[1]
dst = np.zeros((height, width, 3), np.uint8)

mm = 8
for m in range(0, height - mm):
    for n in range(0, width - mm):
        index = int(random.random() * 8)
        (b, g, r) = img[m + index, n + index]
        dst[m, n] = (b, g, r)
cv2.imshow("dst", dst)
cv2.waitKey(0)
# dst = src1*a + src2 * (1-a)
import cv2
import numpy as np
img0 = cv2.imread("1.jpg", 1)
img1 = cv2.imread("2.jpg", 1)
imgInfo = img0.shape
height = imgInfo[0]
width = imgInfo[1]
roiH = int(height )
roiW = int(width )
img0ROI = img0[0:roiH, 0:roiW]
img1ROI = img1[0:roiH, 0:roiW]

dst = np.zeros((roiH, roiW, 3), np.uint8)
dst = cv2.addWeighted(img0ROI, 0.5, img1ROI, 0.5, 0) # add scr1*a+src2*(1-a)
# 1.scr1 2 a 3 src2 4 1-a

cv2.imshow("dst", dst)
cv2.waitKey(0)
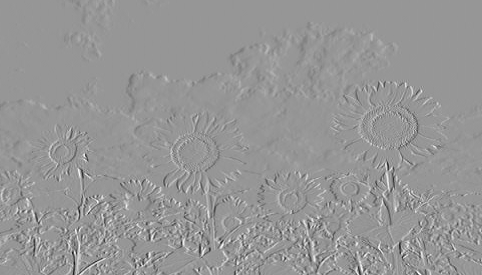
import cv2
import numpy as np
import random
img = cv2.imread('1.jpg', 1)
imgInfo = img.shape
height = imgInfo[0]
width = imgInfo[1]

cv2.imshow("src", img)
# canny 1.gray 2.高斯 3.cammy
gray = cv2.cvtColor(img, cv2.COLOR_BGR2GRAY)
imgG = cv2.GaussianBlur(gray, (3, 3), 0)
dst = cv2.Canny(imgG, 50, 50)
cv2.imshow('dst', dst)
cv2.waitKey(0)

import cv2
import numpy as np
img = cv2.imread("1.jpg", 1)
imgInfo = img.shape
height = imgInfo[0]
width = imgInfo[1]
gray = cv2.cvtColor(img, cv2.COLOR_BGR2GRAY)
# newP = gray0 - gray1 + 150
dst = np.zeros((height, width, 1), np.uint8)
for i in range(0, height):
    for j in range(0, width - 1):
        grayP0 = int(gray[i, j])
        grayP1 = int(gray[i, j + 1])
        newP = grayP0 - grayP1 + 150
        if newP > 255:
            newP = 255
        if newP < 0:
            newP = 0
        dst[i, j] = newP

cv2.imshow("dst", dst)
cv2.waitKey(0)
import cv2
import numpy as np
img = cv2.imread("1.jpg", 1)
imgInfo = img.shape
height = imgInfo[0]
width = imgInfo[1]
gray = cv2.cvtColor(img, cv2.COLOR_BGR2GRAY)
dst = np.zeros((height, width, 3), np.uint8)
for i in range(4, height - 4):
    for j in range(4, width - 4):
        array1 = np.zeros(8, np.uint8)
        for m in range(-4, 4):
            for n in range(-4, 4):
                p1 = int(gray[i + m, j + n] / 32)
                array1[p1] = array1[p1] + 1

        currentMax = array1[0]

        l = 0
        for k in range(0, 8):
            if currentMax < array1[k]:
                l = k
        # 简化均值
        for m in range(-4, 4):
            for n in range(-4, 4):
                if gray[i + m, j + n] >= (l * 32) and gray[i + m, j + n] <= ((l + 1) * 32):
                    (b, g, r) = img[i + m, j + n]
        dst[i, j] = (b, g, r)

cv2.imshow("dst", dst)
cv2.waitKey(0)
参考网址
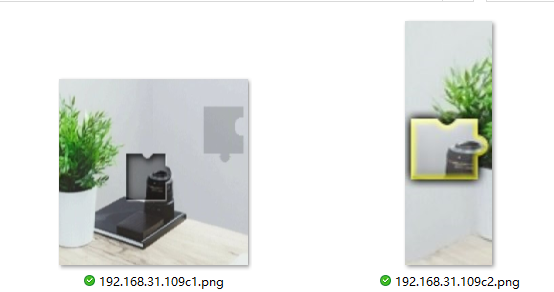
XXXc1.png截图图片右边, XXXc2.png截取图片的左边,为什么c2不截取正方形,因为滑块位置有时候在上面,有时候在下面,
实现方法:
通过opencv 截取两个图片Canny边缘检测进行对比,获取距离,如果距离小于150(150根据设备而定,)则刷新继续尝试截图验证
    def slider_verification(self):

        import cv2

        def match_img(img_path1, img_path2):
            imgs = []
            # 展示
            sou_img1 = cv2.imread(img_path1)
            sou_img2 = cv2.imread(img_path2)
            # 最小阈值100,最大阈值500
            img1 = cv2.imread(img_path1, 0)
            blur1 = cv2.GaussianBlur(img1, (3, 3), 0)
            canny1 = cv2.Canny(blur1, 100, 500)
            cv2.imwrite('temp1.png', canny1)
            img2 = cv2.imread(img_path2, 0)
            blur2 = cv2.GaussianBlur(img2, (3, 3), 0)
            canny2 = cv2.Canny(blur2, 100, 500)
            cv2.imwrite('temp2.png', canny2)
            target = cv2.imread('temp1.png')
            template = cv2.imread('temp2.png')
            # 调整大小
            target_temp = cv2.resize(sou_img1, (350, 200))
            target_temp = cv2.copyMakeBorder(target_temp, 5, 5, 5, 5, cv2.BORDER_CONSTANT, value=[255, 255, 255])
            template_temp = cv2.resize(sou_img2, (200, 200))
            template_temp = cv2.copyMakeBorder(template_temp, 5, 5, 5, 5, cv2.BORDER_CONSTANT, value=[255, 255, 255])
            imgs.append(target_temp)
            imgs.append(template_temp)
            # theight, twidth = template.shape[:2]
            # 匹配跟拼图
            result = cv2.matchTemplate(target, template, cv2.TM_CCOEFF_NORMED)
            cv2.normalize(result, result, 0, 1, cv2.NORM_MINMAX, -1)
            min_val, max_val, min_loc, max_loc = cv2.minMaxLoc(result)
            # # # 画圈
            # cv2.rectangle(target, max_loc, (max_loc[0] + twidth, max_loc[1] + theight), (0, 0, 255), 2)
            # target_temp_n = cv2.resize(target, (350, 200))
            # target_temp_n = cv2.copyMakeBorder(target_temp_n, 5, 5, 5, 5, cv2.BORDER_CONSTANT, value=[255, 255, 255])
            # imgs.append(target_temp_n)
            # imstack = np.hstack(imgs)
            #
            # cv2.imshow('windows' + str(max_loc), imstack)
            # cv2.waitKey(0)
            # cv2.destroyAllWindows()
            # 计算距离
            print(max_loc)
            dis = str(max_loc).split()[0].split('(')[1].split(',')[0]
            x_dis = int(dis) + 150  # 150根据自己设备而定
            # t(x_dis)
            print(x_dis)
            return x_dis

        def pic_shear():
            # 1029:1162 指的从竖直方向截取 1029~1162(y轴)
            # 198:331 指的是从水平方向截取 198~331(x轴)
            pic_path = self.screen_path + self.ip + "screen.png"
            c1 = self.screen_path + self.ip + "c1.png"
            c2 = self.screen_path + self.ip + "c2.png"
            img = cv2.imread(pic_path)
            # (333,853) (891,1277)
            cv2.imwrite(c1, img[853:1277, 333:891])
            # cv2.imwrite(c2, img[1029:1162, 198:331])
            cv2.imwrite(c2, img[855:1276, 189:339])
            dist = match_img(c1, c2)
            return dist

        print("已截图")
        # d(text="拖动滑块完成拼图")

        [x, y], k = self.multiple_find_picture([], 5, "不点击", "不返回", [], delem=['d(text="拖动滑块完成拼图")'])
        if x > 0 and y > 0:
            print(x, y)
            width = self.d.device_info['display']['width']
            x = x - width * 0.247
            print(x, y)

        dis = 0
        for i in range(15):
            self.screen(self.ip + "screen.png")
            dis = pic_shear()
            if dis < 160:
                self.multiple_find_picture([], 5, "点击", "不返回", [], delem=['d(description="javascript:;")'])
                self.multiple_find_picture([], 5, "点击", "不返回", [], delem=['d(text="请点击此处重试")'])
                time.sleep(random.uniform(1, 1.5))
            else:
                break

        print("距离为:%s" % dis)
        self.d.swipe(x, y, x + dis, y)
cv.imdecode(np.fromfile(screen_image, dtype=np.uint8), 1)
本文作者: 永生
本文链接: https://yys.zone/detail/?id=182
版权声明: 本博客所有文章除特别声明外,均采用 CC BY-NC-SA 4.0 许可协议。转载请注明出处!
评论列表 (0 条评论)