arduino 的python控制小车实践探索
python控制小车
python控制小车代码1
vim car.ino
1.控制小车+超声波测距
电源一个gnd,一个A0,
一个EchoPinA1,一个TrigPinA2
int enA = 11;
int in1 = 7;
int in2 = 8;
// motor two
int enB = 6;
int in3 = 9;
int in4 = 10;
char var;

//超声波测距
unsigned int EchoPin = A1;

unsigned int TrigPin = A2;

unsigned long Time_Echo_us = 0;

//Len_mm_X100 = length*100

unsigned long Len_mm_X100  = 0;

unsigned long Len_Integer = 0; //

unsigned int Len_Fraction = 0;

void setup()
{
  Serial.begin(57600);
  // set all the motor control pins to outputs
  pinMode(enA, OUTPUT);
  pinMode(enB, OUTPUT);
  pinMode(in1, OUTPUT);
  pinMode(in2, OUTPUT);
  pinMode(in3, OUTPUT);
  pinMode(in4, OUTPUT);

    pinMode(A0,OUTPUT);
    digitalWrite(A0,HIGH);
    pinMode(EchoPin, INPUT);
    pinMode(TrigPin, OUTPUT);
}

void go()
{
  // this function will run the motors in both directions at a fixed speed
  // turn on motor A

  digitalWrite(in1, HIGH);
  digitalWrite(in2, LOW);
  // set speed to 255 out of possible range 0~255

  // turn on motor B
  digitalWrite(in3, HIGH);
  digitalWrite(in4, LOW);
  // set speed to 255 out of possible range 0~255
    analogWrite(enA, 255);
    analogWrite(enB, 255);


}

void back()
{
  // this function will run the motors in both directions at a fixed speed
  // turn on motor A
  digitalWrite(in1, LOW);
  digitalWrite(in2, HIGH);
  // set speed to 200 out of possible range 0~255

  // turn on motor B
  digitalWrite(in3, LOW);
  digitalWrite(in4, HIGH);
  // set speed to 200 out of possible range 0~255
    analogWrite(enA, 255);
    analogWrite(enB, 255);


}

void left()
{
  // this function will run the motors in both directions at a fixed speed
  // turn on motor A
  digitalWrite(in1, LOW);
  digitalWrite(in2, HIGH);
  // set speed to 200 out of possible range 0~255

  // turn on motor B
  digitalWrite(in3, HIGH);
  digitalWrite(in4, LOW);
  // set speed to 200 out of possible range 0~255
    analogWrite(enA, 255);
    analogWrite(enB, 255);
    delay(20);


}

void right()
{
  // this function will run the motors in both directions at a fixed speed
  // turn on motor A
  digitalWrite(in1, HIGH);
  digitalWrite(in2, LOW);
  // set speed to 200 out of possible range 0~255

  // turn on motor B
  digitalWrite(in3, LOW);
  digitalWrite(in4, HIGH);
  // set speed to 200 out of possible range 0~255

    analogWrite(enA, 255);
    analogWrite(enB, 255);


}
void off()
{
// now turn off motors

  digitalWrite(in1, LOW);
  digitalWrite(in2, LOW);
  digitalWrite(in3, LOW);
  digitalWrite(in4, LOW);

}

void loop()
{

while(Serial.available()>0)
  {
    var=Serial.read();
      if (var == '0')
      {
        off();

        }
        if (var == '1')
      {
        go();

        }
        if (var == '2')
      {
        back();
        }
        if (var == '3')
      {
        left();
        }
         if (var == '4')
      {
        right();
        }
  }
  //超声波测距
  digitalWrite(TrigPin, HIGH);

    delayMicroseconds(50);

    digitalWrite(TrigPin, LOW);

    Time_Echo_us = pulseIn(EchoPin, HIGH);

    if((Time_Echo_us < 60000) && (Time_Echo_us > 1))

    {

      Len_mm_X100 = (Time_Echo_us*34)/2;

      Len_Integer = Len_mm_X100/100;

      Len_Fraction = Len_mm_X100%100;

      Serial.print("Present Length is: ");

      Serial.print(Len_Integer, DEC);

      Serial.print(".");

      if(Len_Fraction < 10)

        Serial.print("0");

      Serial.print(Len_Fraction, DEC);

      Serial.println("mm");

    }
}
2.不带加速的(只控制小车,力量大)
int enA = 11;
int in1 = 7;
int in2 = 8;
// motor two
int enB = 6;
int in3 = 9;
int in4 = 10;
char var;

void setup()
{
  Serial.begin(57600);
  // set all the motor control pins to outputs
  pinMode(enA, OUTPUT);
  pinMode(enB, OUTPUT);
  pinMode(in1, OUTPUT);
  pinMode(in2, OUTPUT);
  pinMode(in3, OUTPUT);
  pinMode(in4, OUTPUT);
}

void go()
{
  // this function will run the motors in both directions at a fixed speed
  // turn on motor A

  digitalWrite(in1, HIGH);
  digitalWrite(in2, LOW);
  // set speed to 255 out of possible range 0~255

  // turn on motor B
  digitalWrite(in3, HIGH);
  digitalWrite(in4, LOW);
  // set speed to 255 out of possible range 0~255
    analogWrite(enA, 255);
    analogWrite(enB, 255);


}

void back()
{
  // this function will run the motors in both directions at a fixed speed
  // turn on motor A
  digitalWrite(in1, LOW);
  digitalWrite(in2, HIGH);
  // set speed to 200 out of possible range 0~255

  // turn on motor B
  digitalWrite(in3, LOW);
  digitalWrite(in4, HIGH);
  // set speed to 200 out of possible range 0~255
    analogWrite(enA, 255);
    analogWrite(enB, 255);


}

void left()
{
  // this function will run the motors in both directions at a fixed speed
  // turn on motor A
  digitalWrite(in1, LOW);
  digitalWrite(in2, HIGH);
  // set speed to 200 out of possible range 0~255

  // turn on motor B
  digitalWrite(in3, HIGH);
  digitalWrite(in4, LOW);
  // set speed to 200 out of possible range 0~255
    analogWrite(enA, 255);
    analogWrite(enB, 255);
    delay(20);


}

void right()
{
  // this function will run the motors in both directions at a fixed speed
  // turn on motor A
  digitalWrite(in1, HIGH);
  digitalWrite(in2, LOW);
  // set speed to 200 out of possible range 0~255

  // turn on motor B
  digitalWrite(in3, LOW);
  digitalWrite(in4, HIGH);
  // set speed to 200 out of possible range 0~255

    analogWrite(enA, 255);
    analogWrite(enB, 255);


}
void off()
{
// now turn off motors

  digitalWrite(in1, LOW);
  digitalWrite(in2, LOW);
  digitalWrite(in3, LOW);
  digitalWrite(in4, LOW);

}

void loop()
{

while(Serial.available()>0)
  {
    var=Serial.read();
      if (var == '0')
      {
        off();

        }
        if (var == '1')
      {
        go();

        }
        if (var == '2')
      {
        back();
        }
        if (var == '3')
      {
        left();
        }
         if (var == '4')
      {
        right();
        }
  }

}
读取是
ser.readline().decode('utf-8')
3.带加速的(力量小)
car.ino
int enA = 11;
int in1 = 7;
int in2 = 8;
// motor two
int enB = 6;
int in3 = 9;
int in4 = 10;
char var;

void setup()
{
  Serial.begin(57600);
  // set all the motor control pins to outputs
  pinMode(enA, OUTPUT);
  pinMode(enB, OUTPUT);
  pinMode(in1, OUTPUT);
  pinMode(in2, OUTPUT);
  pinMode(in3, OUTPUT);
  pinMode(in4, OUTPUT);
}

void go()
{
  // this function will run the motors in both directions at a fixed speed
  // turn on motor A

  digitalWrite(in1, HIGH);
  digitalWrite(in2, LOW);
  // set speed to 200 out of possible range 0~255

  // turn on motor B
  digitalWrite(in3, HIGH);
  digitalWrite(in4, LOW);
  // set speed to 200 out of possible range 0~255
  for (int i = 100; i < 256; i++)
  {
    analogWrite(enA, i);
    analogWrite(enB, i);
    delay(20);
  }

}

void back()
{
  // this function will run the motors in both directions at a fixed speed
  // turn on motor A
  digitalWrite(in1, LOW);
  digitalWrite(in2, HIGH);
  // set speed to 200 out of possible range 0~255

  // turn on motor B
  digitalWrite(in3, LOW);
  digitalWrite(in4, HIGH);
  // set speed to 200 out of possible range 0~255
  for (int i = 100; i < 256; i++)
  {
    analogWrite(enA, i);
    analogWrite(enB, i);
    delay(20);
  }

}

void left()
{
  // this function will run the motors in both directions at a fixed speed
  // turn on motor A
  digitalWrite(in1, LOW);
  digitalWrite(in2, HIGH);
  // set speed to 200 out of possible range 0~255

  // turn on motor B
  digitalWrite(in3, HIGH);
  digitalWrite(in4, LOW);
  // set speed to 200 out of possible range 0~255
  for (int i = 100; i < 256; i++)
  {
    analogWrite(enA, i);
    analogWrite(enB, i);
    delay(20);
  }

}

void right()
{
  // this function will run the motors in both directions at a fixed speed
  // turn on motor A
  digitalWrite(in1, HIGH);
  digitalWrite(in2, LOW);
  // set speed to 200 out of possible range 0~255

  // turn on motor B
  digitalWrite(in3, LOW);
  digitalWrite(in4, HIGH);
  // set speed to 200 out of possible range 0~255
  for (int i = 100; i < 256; i++)
  {
    analogWrite(enA, i);
    analogWrite(enB, i);
    delay(20);
  }

}
void off()
{
// now turn off motors

  digitalWrite(in1, LOW);
  digitalWrite(in2, LOW);
  digitalWrite(in3, LOW);
  digitalWrite(in4, LOW);

}

void loop()
{

while(Serial.available()>0)
  {
    var=Serial.read();
      if (var == '0')
      {
        off();

        }
        if (var == '1')
      {
        go();

        }
        if (var == '2')
      {
        back();
        }
        if (var == '3')
      {
        left();
        }
         if (var == '4')
      {
        right();
        }
  }

}
2.python代码 python控制小车代码2
import time

import serial  # 导入串口通讯库

ser = serial.Serial("com5", 57600, timeout=1)
demo0 = b"0"
demo1 = b"1"
demo2 = b"2"
demo3 = b"3"
i = 0
# 要延长时间才能控制
time.sleep(3)
ser.write(demo0)
python控制小车linux版
import time
import sys
import serial  # 导入串口通讯库
import threading
import os
ser = serial.Serial("/dev/ttyUSB0", 57600, timeout=0.2)
demo0 = b"0"
demo1 = b"1"
demo2 = b"2"
demo3 = b"3"
demo4 = b"4"

# 要延长时间才能控制
time.sleep(1)
ips = sys.argv[1]

def speak(text):
    """说话线程"""
    os.system("espeak -v zh '%s'" % text) # 使用os来文字转语音

print(ips)
if ips == "0":
    threading.Thread(target=speak, args=("停止",)).start()
    ser.write(demo0)

if ips == "1":
    threading.Thread(target=speak, args=("前进",)).start()
    ser.write(demo1)
    time.sleep(3)

if ips == "2":
    threading.Thread(target=speak, args=("后退",)).start()
    ser.write(demo2)
    time.sleep(3)
if ips == "3":
    threading.Thread(target=speak, args=("左拐:",)).start()
    ser.write(demo3)
    time.sleep(1)
if ips == "4":
    threading.Thread(target=speak, args=("右拐:",)).start()
    ser.write(demo4)
    time.sleep(1)
ser.write(demo0)
如果缺少serial安装pyserial不是serial
pip3 install pyserial
第一种:按厘米
int TrgPin = 7;
int EcoPin = 6;
float dist;
void setup()
{
Serial.begin(9600);
//设置TrgPin为输出状态
pinMode(TrgPin, OUTPUT);
// 设置EcoPin为输入状态
pinMode(EcoPin, INPUT);
}
void loop()
{
digitalWrite(TrgPin, LOW);
delayMicroseconds(8);
digitalWrite(TrgPin, HIGH);
// 维持10毫秒高电平用来产生一个脉冲
delayMicroseconds(10);
digitalWrite(TrgPin, LOW);
// 读取脉冲的宽度并换算成距离
dist = pulseIn(EcoPin, HIGH) / 58.00;
Serial.print("Distance:");
Serial.print(dist);
Serial.println("cm");
delay(300);
}
第二种,按毫米
unsigned int EchoPin = 6;

unsigned int TrigPin = 7;

unsigned long Time_Echo_us = 0;

//Len_mm_X100 = length*100

unsigned long Len_mm_X100  = 0;

unsigned long Len_Integer = 0; //

unsigned int Len_Fraction = 0;

void setup()

{

    Serial.begin(9600);

    pinMode(EchoPin, INPUT);

    pinMode(TrigPin, OUTPUT);

}


void loop()

{
    digitalWrite(TrigPin, HIGH);

    delayMicroseconds(50);

    digitalWrite(TrigPin, LOW);


    Time_Echo_us = pulseIn(EchoPin, HIGH);

    if((Time_Echo_us < 60000) && (Time_Echo_us > 1))

    {

      Len_mm_X100 = (Time_Echo_us*34)/2;

      Len_Integer = Len_mm_X100/100;

      Len_Fraction = Len_mm_X100%100;

      Serial.print("Present Length is: ");

      Serial.print(Len_Integer, DEC);

      Serial.print(".");

      if(Len_Fraction < 10)

        Serial.print("0");

      Serial.print(Len_Fraction, DEC);

      Serial.println("mm");

    }

    delay(300);


}
可以一个做gnd一个做5v电压,一个低电平一个高电平,注意电流只有40ma
void setup() {
  // put your setup code here, to run once:
 pinMode(5,OUTPUT);
 pinMode(6,OUTPUT);
 digitalWrite(5,HIGH);
 digitalWrite(6,LOW);
}

void loop() {
  // put your main code here, to run repeatedly:

}
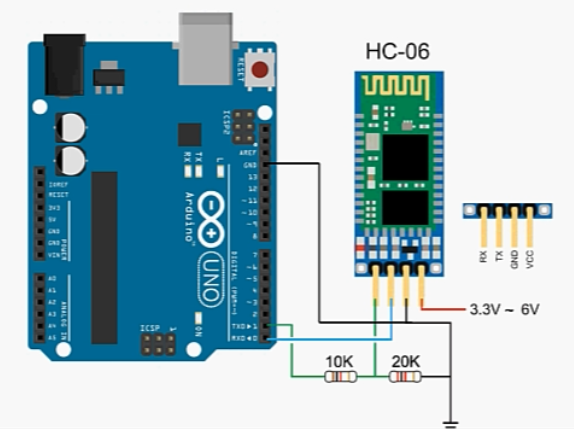
/*
HC-06-Serial-LED-demo
by 太极创客(2017-07-08)
www.taici-maker.com
此程序旨在演示如何利用HC-06蓝牙模块通过手机或平板电脑的
蓝牙功能来打开和关闭arduino开发板引脚11上连接的LED。

如需获得更多关于本程序的使用说明,请参见太极创客制作的《零基础入门学用Arduino》教程。

---- 电路连接 ----
HC-06     Arduino Uno R3 引脚
TX                0 (RX)
RX                1 (TX)
VCC              +5v
GND              GND

注意:
1. 须使用分压电路,确保HC-06 RX信号电压为3.3伏特。
2. 须先将此程序上传至ARDUINO后,再将HC-06连接在ARDUINO开发板的串口引脚上。
   否则程序将无法正常上传。

*/
char serialData;

void setup() {
  Serial.begin(9600);
  pinMode(11, OUTPUT); //11引脚连接演示用LED

}

void loop(){
  serialData =  Serial.read();
  Serial.println(Serial.available());
  if( Serial.available()>0 ){


    if (serialData == '1' ) {  //接收到点亮LED指令
      Serial.print("Got command: ");  Serial.println(serialData);
      Serial.println("LED-ON");

      digitalWrite(11, HIGH);  //点亮LED指令
    } else {    //接收到熄灭LED指令
      Serial.print("Got command: ");
      Serial.println(serialData);
      Serial.println("LED-OFF");

      digitalWrite(11, LOW);      //熄灭LED指令
    }
  }
}
手机蓝牙配对hc-06默认密码1234
已知问题Serial.available()一直是0
下载Arduino bluetooth controller密码:yyss,可以连接switch mode
本文作者: 永生
本文链接: https://yys.zone/detail/?id=171
版权声明: 本博客所有文章除特别声明外,均采用 CC BY-NC-SA 4.0 许可协议。转载请注明出处!
评论列表 (0 条评论)