python ocr 合集
linux与win版有区别,有些库不能用,比如pillow, pyperclip,只能用linux命令保存图片和保存txt读取,linux用pyscreenshot 没有读取剪贴版图片功能,只能保存图片却是全屏图片,所以不用这个库了,
思路:利用区域截图保存文件夹图片,while循环os判断图片存在然后百度ocr识别(需要AK和sk,百度智能云获取),识别之后保存txt文件,再用linux命令复制文件内容,成功后删除图片和txt文件
以后可能发现有更高效方法
linux 实现通知
notify-send '标题' '内容' -i 路径
例如
notify-send '标题' '内容' -i /home/yys/test/screenshot.jpg
安装linux复制软件
sudo apt install xsel
1.1 代码
import base64
import requests
import time
import os
import threading
import sys

if getattr(sys, 'frozen', False):
    cur_path = sys._MEIPASS
else:
    cur_path = os.path.dirname(os.path.abspath("__file__"))
print(cur_path)
paste_PATH = os.path.join(cur_path, 'paste.png')
txt_PATH = os.path.join(cur_path, 'copy.txt')

class CodeDemo:
    def __init__(self, AK, SK, code_url, img_path):
        self.AK = AK
        self.SK = SK
        self.code_url = code_url
        self.img_path = img_path
        self.access_token = self.get_access_token()

    def get_access_token(self):
        token_host = 'https://aip.baidubce.com/oauth/2.0/token?grant_type=client_credentials&client_id={ak}&client_secret={sk}'.format(
            ak=self.AK, sk=self.SK)
        header = {'Content-Type': 'application/json; charset=UTF-8'}
        response = requests.post(url=token_host, headers=header)
        content = response.json()
        access_token = content.get("access_token")
        return access_token

    def getCode(self):
        header = {
            "Content-Type": "application/x-www-form-urlencoded"
        }

        def read_img():
            with open(self.img_path, "rb")as f:
                return base64.b64encode(f.read()).decode()

        image = read_img()
        response = requests.post(url=self.code_url, data={"image": image, "access_token": self.access_token},
                                 headers=header)
        return response.json()


def ocr_dir(route):
    AK = ""  # 官网获取的AK
    SK = ""  # 官网获取的SK
    if not AK.strip() or not SK.strip():
        os.system('notify-send ["调用失败"] "请输入AK和SK"')  # linux发送通知
        exit()
    code_url = "https://aip.baidubce.com/rest/2.0/ocr/v1/accurate_basic"  # 百度图片识别接口地址
    img_path = r"%s" % route  # 识别图片的地址
    code_obj = CodeDemo(AK=AK, SK=SK, code_url=code_url, img_path=img_path)
    res = code_obj.getCode()
    # print(res)
    lis = []
    for k in range(res['words_result_num']):
        # print(res['words_result'][k]['words'])
        lis.append(res['words_result'][k]['words'])
    # print(lis)
    return lis

def screen():
    os.system("gnome-screenshot -a -f "+ paste_PATH) # linux命令区域截图并保存图片

threading.Thread(target=screen).start()

start = time.time()
while True:
    time.sleep(1)
    end = time.time()
    if end-start >= 10:
        if os.path.exists(paste_PATH):
            os.remove(paste_PATH)
        os.system('notify-send ["ocr超时"] "失败,请及时复制"')  # linux发送通知复制文本成功
        exit()
    if os.path.exists(paste_PATH):
        text = ocr_dir(paste_PATH)
        text = "\n".join(text)
        print("text=", text)
        os.remove(paste_PATH)
        f = txt_PATH
        with open(f,"w") as file:   #”w"代表着每次运行都覆盖内
            file.write(text)
        time.sleep(0.1)
        os.system("cat %s | xsel -b -i" % txt_PATH)  # linux命令复制txt文件里面的文字
        time.sleep(0.1)
        os.remove(txt_PATH)
        process = os.popen("xsel -b")  # linux读取剪切版内容
        result = process.read()
        if len(result) >0:
            os.system('notify-send ["识别成功"] "文本已复制到剪贴版"')  # linux发送通知复制文本成功
        else:
            os.system('notify-send ["识别失败"] "剪贴版为空请检查代码或选中文本区域"')  # linux发送通知复制文本
        break
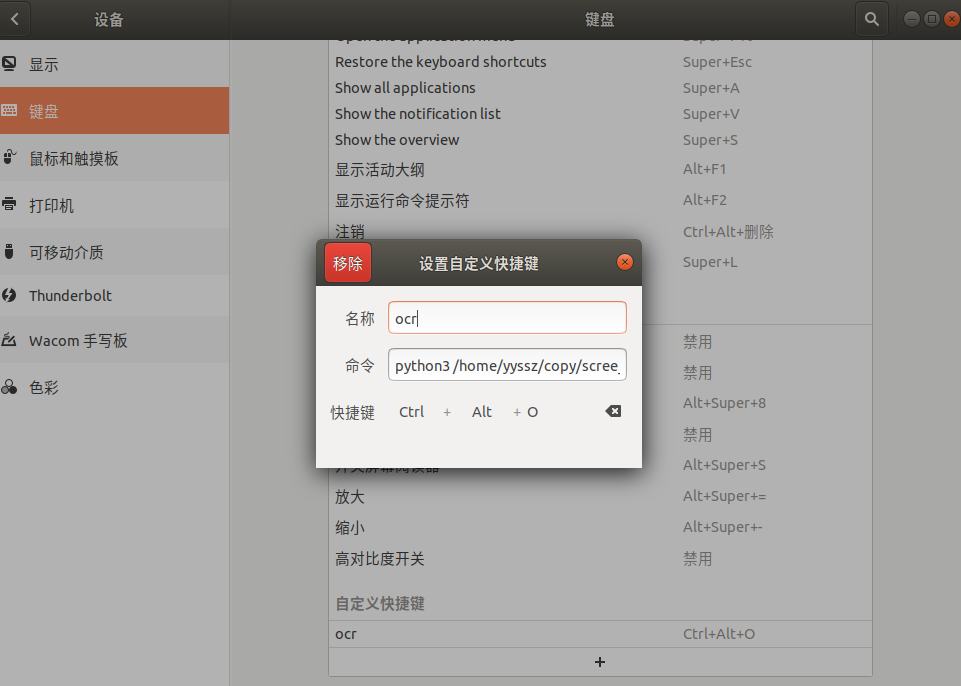
1.2 设置快捷键
例如乌班图18.04
设置->设备->键盘->+
名字:ocr(随便)
命令:python3 /home/yyssz/copy/scree_ocr.py (这是绝对路径,不能用~相对路径)
快捷键:ctrl+alt+o
pip install win10toast
win10版是用win+shif+s来截图的,没有发现cmd命令可以控制,pillow可以读取剪切板图片, pyperclip可以设置剪切板文字,
import base64
import datetime
import os
import time
import win32api
import win32process
import win32gui
import pyperclip
import requests

import win32con
from PIL import ImageGrab
from win10toast import ToastNotifier
import sys
# if获取exe里面文件路径 else 获取py路径
if getattr(sys, 'frozen', False):
    cur_path = sys._MEIPASS
else:
    cur_path = os.path.dirname(__file__)
# 图标和图片路径

SUCC_PATH = os.path.join(cur_path, 'img/succ.ico')
FAIL_PATH = os.path.join(cur_path, 'img/fail.ico')
paste_PATH = os.path.join(cur_path, 'img/paste.png')
print(SUCC_PATH)

i = datetime.datetime.now()
date = ("%s年%02d月%02d日" % (i.year, i.month, i.day))


class CodeDemo:
    def __init__(self, AK, SK, code_url, img_path):
        self.AK = AK
        self.SK = SK
        self.code_url = code_url
        self.img_path = img_path
        self.access_token = self.get_access_token()

    def get_access_token(self):
        token_host = 'https://aip.baidubce.com/oauth/2.0/token?grant_type=client_credentials&client_id={ak}&client_secret={sk}'.format(
            ak=self.AK, sk=self.SK)
        header = {'Content-Type': 'application/json; charset=UTF-8'}
        response = requests.post(url=token_host, headers=header)
        content = response.json()
        access_token = content.get("access_token")
        return access_token

    def getCode(self):
        header = {
            "Content-Type": "application/x-www-form-urlencoded"
        }

        def read_img():
            with open(self.img_path, "rb")as f:
                return base64.b64encode(f.read()).decode()

        image = read_img()
        response = requests.post(url=self.code_url, data={"image": image, "access_token": self.access_token},
                                 headers=header)
        return response.json()


def ocr_dir(route):
    AK = ""  # 官网获取的AK
    SK = ""  # 官网获取的SK
    code_url = "https://aip.baidubce.com/rest/2.0/ocr/v1/accurate_basic"  # 百度图片识别接口地址
    img_path = r"%s" % route  # 识别图片的地址
    code_obj = CodeDemo(AK=AK, SK=SK, code_url=code_url, img_path=img_path)
    res = code_obj.getCode()
    print(res)
    lis = []
    for k in range(res['words_result_num']):
        print(res['words_result'][k]['words'])
        lis.append(res['words_result'][k]['words'])
    print(lis)
    return lis


win32api.keybd_event(91, 0, 0, 0)  # 按键win
win32api.keybd_event(16, 0, 0, 0)  # 按键shift
win32api.keybd_event(83, 0, 0, 0)  # 按键s
win32api.keybd_event(91, 0, win32con.KEYEVENTF_KEYUP, 0)  # 释放按键
win32api.keybd_event(16, 0, win32con.KEYEVENTF_KEYUP, 0)  # 释放按键
win32api.keybd_event(83, 0, win32con.KEYEVENTF_KEYUP, 0)  # 释放按键

start_time = time.time()
# win10通知
toaster = ToastNotifier()

pyperclip.copy("")

while True:

    img = ImageGrab.grabclipboard()
    time.sleep(1)
    # print(img)
    if img:
        img.save(paste_PATH, 'PNG')
    end_time = time.time()

    if end_time - start_time >= 10:
        # 如果等了很久没有进行ocr识别
        if os.path.exists(paste_PATH):
            os.remove(paste_PATH)
        main_hwnd = win32gui.FindWindow(None, "屏幕截图")
        # 根据句柄获取线程和pid
        thread, pid = win32process.GetWindowThreadProcessId(main_hwnd)
        # 根据pid停止程序
        time.sleep(0.5)
        os.system('taskkill/pid ' + str(pid) + ' /f')
        toaster.show_toast("永生提示:等待超时",
                           "没有进行复制!",
                           icon_path=FAIL_PATH,
                           duration=3,
                           # threaded=True
                           )
        exit()

    if os.path.exists(paste_PATH):
        ocr_text = ocr_dir(paste_PATH)
        text = "\n".join(ocr_text)
        print("text=", text)
        os.remove(paste_PATH)
        time.sleep(0.5)

        if text:
            pyperclip.copy(text)

            toaster.show_toast("永生提示:复制成功",
                               "复制文字到剪贴板!",
                               icon_path=SUCC_PATH,
                               duration=3,
                               # threaded=True
                               )
            # 等待提示框关闭

        else:
            pyperclip.copy("")

            toaster.show_toast("永生提示:复制失败",
                               "没有选中内容!",
                               icon_path=FAIL_PATH,
                               duration=3,
                               # threaded=True
                               )
            # 等待提示框关闭

        while toaster.notification_active(): time.sleep(1)
        break
最后再用pyinstaller打包
1. 安装 tesseract-ocr 包
sudo apt-get install tesseract-ocr
2.下载中文包
获取地址:Tesseract官方GitHub提供!
天翼云盘下载chi_sim.traineddata:https://cloud.189.cn/t/ZjiAVjeQveq2
中文语言包的全名是 chi_sim.traineddata
把数据包chi_sim.traineddata移动到tesseract安装目录(最新5版本的)
sudo cp chi_sim.traineddata /usr/share/tesseract-ocr/5/tessdata/
1. 安装 Tesseract
如果你没有安装,可以按照以下步骤安装:
- 下载 Tesseract:
- 访问 Tesseract 官方安装包或者[国内][https://digi.bib.uni-mannheim.de/tesseract/] 下载 Windows 版本。
- 选择
tesseract-ocr-w64-setup-5.x.x.exe(最新版本)。
- 安装 时注意:
- 记住安装路径(默认是
C:\Program Files\Tesseract-OCR\)。 - 选中 "Add Tesseract to the system PATH" 选项(如果有)。
- 记住安装路径(默认是
- 完成安装后,重新打开命令提示符 并运行:
如果能正确输出版本号,说明安装成功。tesseract -v
2. 手动配置 PATH(如果没有自动加入)*
如果仍然报错,你需要手动将 Tesseract-OCR 添加到环境变量:
- 打开环境变量设置:
- 按
Win + R,输入sysdm.cpl,回车。 - 在 "高级" 选项卡中,点击 "环境变量"。
- 按
- 修改
PATH变量:- 在 系统变量 或 用户变量 下找到
Path,双击编辑。 - 点击 "新建",添加 Tesseract 的安装路径:
C:\Program Files\Tesseract-OCR\ - 确保该目录下有
tesseract.exe。
- 在 系统变量 或 用户变量 下找到
- 保存并重启计算机。
4. 确保 Python 能找到 Tesseract
如果你在 Python 中使用 pytesseract,你还需要指定 tesseract.exe 的路径。例如:
import pytesseract
pytesseract.pytesseract.tesseract_cmd = r"C:\Program Files\Tesseract-OCR\tesseract.exe"
5. 再次测试
重新打开 cmd 或 PowerShell,运行:
tesseract -v
如果能看到版本信息,说明问题已解决。
如果仍然报错,尝试 重启电脑,然后再试一次。
安装后下载 chi_sim.traineddata,如上面linux安装所写的地址
下载完 chi_sim.traineddata,直接把chi_sim.traineddata放到安装位置的tessdata文件夹里(C:\Program Files\Tesseract-OCR\tessdata)就好了
pip install pytesseract
天翼云盘下载pip离线库https://cloud.189.cn/t/zaEFrqbQjQj2
from PIL import Image
import pytesseract

image = Image.open('1.png')
content = pytesseract.image_to_string(image, lang='chi_sim')   # 解析图片
print(content)
分块坐标
可以利用 pytesseract 返回的数据中的 “block_num” 或 “line_num” 字段来对文字进行分块,将同一块或同一行的文字合并成一个整体。下面提供一个示例代码,将所有属于同一 block 的文字合并,并计算整个块的边界框:
from PIL import Image
import pytesseract
from collections import defaultdict

# 加载图片
img = Image.open('/mnt/nas/share/192.168.31.41qutoutiao.png')

# 获取 OCR 数据,输出为字典
result = pytesseract.image_to_data(img, lang='chi_sim', output_type=pytesseract.Output.DICT)

# 利用 defaultdict 分组,按 block_num 分组
blocks = defaultdict(lambda: {'text': [], 'left': [], 'top': [], 'right': [], 'bottom': []})

n = len(result['text'])
for i in range(n):
    text = result['text'][i].strip()
    if not text:
        continue
    block_num = result['block_num'][i]
    left = result['left'][i]
    top = result['top'][i]
    width = result['width'][i]
    height = result['height'][i]

    blocks[block_num]['text'].append(text)
    blocks[block_num]['left'].append(left)
    blocks[block_num]['top'].append(top)
    blocks[block_num]['right'].append(left + width)
    blocks[block_num]['bottom'].append(top + height)

# 输出每个 block 的文本、整体边界框和中心点坐标
for block_num, data in blocks.items():
    # 将该 block 内的文字合并
    block_text = " ".join(data['text'])
    # 计算整个 block 的边界框(取最小 left/top 和最大 right/bottom)
    x = min(data['left'])
    y = min(data['top'])
    x2 = max(data['right'])
    y2 = max(data['bottom'])
    w = x2 - x
    h = y2 - y
    # 计算中心点坐标
    center_x = x + w / 2
    center_y = y + h / 2
    print(f"Block {block_num}: {block_text.replace(' ', '')}, Bounding Box: ({x}, {y}, {w}, {h}), Center: ({center_x}, {center_y})")
说明
- 分块依据:这里我们使用
block_num来分块,如果希望更精细(例如按行分组),可以使用line_num,方法类似。 - 边界框计算:对同一块内所有单词的坐标进行合并,取最小的左上角坐标和最大的右下角坐标,便得到该块整体的包围盒。
- 输出:每个 block 的文本及其边界框信息类似于 PaddleOCR 返回的结果结构。
这样就可以模拟 PaddleOCR 的文字分块效果了。根据需要,你也可以进一步细化,比如对文字顺序、排版方向做更多处理。
pytesseract.pytesseract.TesseractNotFoundError: tesseract is not installed or it's not in your path
windows环境下使用pytesseract识别验证码中文字时报错:
报错原因很明确: 没有找到 tesseract
解决方案:
1.找到python的安装路径下的pytesseract: 例如我的是 C:\Users\yys53\OneDrive\python\install\Lib\site-packages\pytesseract\pytesseract.py
2.用文本编辑器打开pytesseract.py,查找tesseract_cmd
将原来的 tesseract_cmd = 'tesseract' 改为: tesseract_cmd = 'OCR的安装路径下的tessract.exe'
例如我的是
tesseract_cmd = r"C:\Program Files (x86)\Tesseract-OCR\tesseract.exe"
注:python 3.11 版本的python-3.11.5-amd64.exe 有bug:20230910,用的:python-3.10.11-amd64.exe(win11测试的)
| paddlepaddle | 2.5.0 | ✅ |
| paddleocr | 2.6.1.3 | ✅ |
4.1. 安装
4.1.1 安装PaddlePaddle
如果您没有基础的Python运行环境,请参考运行环境准备。
-
您的机器安装的是CUDA9或CUDA10,请运行以下命令安装
python3 -m pip install paddlepaddle-gpu -i https://mirror.baidu.com/pypi/simple -
您的机器是CPU,请运行以下命令安装
python3 -m pip install paddlepaddle -i https://mirror.baidu.com/pypi/simple
更多的版本需求,请参照飞桨官网安装文档中的说明进行操作。
4.1.2 安装PaddleOCR whl包
pip3 install "paddleocr>=2.0.1" # 推荐使用2.0.1+版本
- 对于Windows环境用户:直接通过pip安装的shapely库可能出现
[winRrror 126] 找不到指定模块的问题。建议从这里下载shapely安装包完成安装。
4.2. 便捷使用
4.2.1 命令行使用
PaddleOCR提供了一系列测试图片,点击这里下载并解压,然后在终端中切换到相应目录
cd /path/to/ppocr_img
如果不使用提供的测试图片,可以将下方--image_dir参数替换为相应的测试图片路径。
4.2.1.1 中英文模型
-
检测+方向分类器+识别全流程:
--use_angle_cls true设置使用方向分类器识别180度旋转文字,--use_gpu false设置不使用GPUpaddleocr --image_dir ./imgs/11.jpg --use_angle_cls true --use_gpu false结果是一个list,每个item包含了文本框,文字和识别置信度
[[[28.0, 37.0], [302.0, 39.0], [302.0, 72.0], [27.0, 70.0]], ('纯臻营养护发素', 0.9658738374710083)]
......
-
单独使用检测:设置
--rec为falsepaddleocr --image_dir ./imgs/11.jpg --rec false
结果是一个list,每个item只包含文本框
[[27.0, 459.0], [136.0, 459.0], [136.0, 479.0], [27.0, 479.0]]
[[28.0, 429.0], [372.0, 429.0], [372.0, 445.0], [28.0, 445.0]]
......
-
单独使用识别:设置
--det为falsepaddleocr --image_dir ./imgs_words/ch/word_1.jpg --det false
结果是一个list,每个item只包含识别结果和识别置信度
['韩国小馆', 0.994467]
版本说明 paddleocr默认使用PP-OCRv3模型(--ocr_version PP-OCRv3),如需使用其他版本可通过设置参数--ocr_version,具体版本说明如下:
| 版本名称 | 版本说明 |
|---|---|
| PP-OCRv3 | 支持中、英文检测和识别,方向分类器,支持多语种识别 |
| PP-OCRv2 | 支持中英文的检测和识别,方向分类器,多语言暂未更新 |
| PP-OCR | 支持中、英文检测和识别,方向分类器,支持多语种识别 |
如需新增自己训练的模型,可以在paddleocr中增加模型链接和字段,重新编译即可。
更多whl包使用可参考whl包文档
2.1.2 多语言模型
PaddleOCR目前支持80个语种,可以通过修改--lang参数进行切换,对于英文模型,指定--lang=en。
paddleocr --image_dir ./imgs_en/254.jpg --lang=en
4.2.2 Python脚本使用
4.2.2.1 中英文与多语言使用
通过Python脚本使用PaddleOCR whl包,whl包会自动下载ppocr轻量级模型作为默认模型。
- 检测+方向分类器+识别全流程
from paddleocr import PaddleOCR, draw_ocr

# Paddleocr目前支持的多语言语种可以通过修改lang参数进行切换
# 例如`ch`, `en`, `fr`, `german`, `korean`, `japan`
ocr = PaddleOCR(use_angle_cls=True, lang="ch")  # need to run only once to download and load model into memory
img_path = './imgs/text.jpg'
result = ocr.ocr(img_path, cls=True)
for line in result:
    print(line)

# 显示结果
from PIL import Image

image = Image.open(img_path).convert('RGB')
boxes = [line[0] for line in result]
txts = [line[1][0] for line in result]
scores = [line[1][1] for line in result]
im_show = draw_ocr(image, boxes, txts, scores, font_path='./fonts/simfang.ttf')
im_show = Image.fromarray(im_show)
im_show.save('result.jpg')
结果是一个list,每个item包含了文本框,文字和识别置信度,第一次运行会安装
/home/yys/.local/lib/python3.8/site-packages/scipy/__init__.py:155: UserWarning: A NumPy version >=1.18.5 and <1.25.0 is required for this version of SciPy (detected version 1.17.4
warnings.warn(f"A NumPy version >={np_minversion} and <{np_maxversion}"
download https://paddleocr.bj.bcebos.com/PP-OCRv3/chinese/ch_PP-OCRv3_det_infer.tar to /home/yys/.paddleocr/whl/det/ch/ch_PP-OCRv3_det_infer/ch_PP-OCRv3_det_infer.tar
100%|███████████████████████████████████████████████████████████████████████████████████████████████████████████████████████████████████████████████████████████████████████████████████████████████████████████████████████████████████████| 3.83M/3.83M [00:01<00:00, 1.99MiB/s]
download https://paddleocr.bj.bcebos.com/PP-OCRv3/chinese/ch_PP-OCRv3_rec_infer.tar to /home/yys/.paddleocr/whl/rec/ch/ch_PP-OCRv3_rec_infer/ch_PP-OCRv3_rec_infer.tar
100%|███████████████████████████████████████████████████████████████████████████████████████████████████████████████████████████████████████████████████████████████████████████████████████████████████████████████████████████████████████| 11.9M/11.9M [00:00<00:00, 22.3MiB/s]
download https://paddleocr.bj.bcebos.com/dygraph_v2.0/ch/ch_ppocr_mobile_v2.0_cls_infer.tar to /home/yys/.paddleocr/whl/cls/ch_ppocr_mobile_v2.0_cls_infer/ch_ppocr_mobile_v2.0_cls_infer.tar
100%|███████████████████████████████████████████████████████████████████████████████████████████████████████████████████████████████████████████████████████████████████████████████████████████████████████████████████████████████████████| 2.19M/2.19M [00:01<00:00, 1.85MiB/s]
[2022/10/06 19:27:33] ppocr DEBUG: Namespace(alpha=1.0, benchmark=False, beta=1.0, cls_batch_num=6, cls_image_shape='3, 48, 192', cls_model_dir='/home/yys/.paddleocr/whl/cls/ch_ppocr_mobile_v2.0_cls_infer', cls_thresh=0.9, cpu_threads=10, crop_res_save_dir='./output', det=True, det_algorithm='DB', det_db_box_thresh=0.6, det_db_score_mode='fast', det_db_thresh=0.3, det_db_unclip_ratio=1.5, det_east_cover_thresh=0.1, det_east_nms_thresh=0.2, det_east_score_thresh=0.8, det_fce_box_type='poly', det_limit_side_len=960, det_limit_type='max', det_model_dir='/home/yys/.paddleocr/whl/det/ch/ch_PP-OCRv3_det_infer', det_pse_box_thresh=0.85, det_pse_box_type='quad', det_pse_min_area=16, det_pse_scale=1, det_pse_thresh=0, det_sast_nms_thresh=0.2, det_sast_polygon=False, det_sast_score_thresh=0.5, draw_img_save_dir='./inference_results', drop_score=0.5, e2e_algorithm='PGNet', e2e_char_dict_path='./ppocr/utils/ic15_dict.txt', e2e_limit_side_len=768, e2e_limit_type='max', e2e_model_dir=None, e2e_pgnet_mode='fast', e2e_pgnet_score_thresh=0.5, e2e_pgnet_valid_set='totaltext', enable_mkldnn=False, fourier_degree=5, gpu_mem=500, help='==SUPPRESS==', image_dir=None, image_orientation=False, ir_optim=True, kie_algorithm='LayoutXLM', label_list=['0', '180'], lang='ch', layout=True, layout_dict_path=None, layout_model_dir=None, layout_nms_threshold=0.5, layout_score_threshold=0.5, max_batch_size=10, max_text_length=25, merge_no_span_structure=True, min_subgraph_size=15, mode='structure', ocr=True, ocr_order_method=None, ocr_version='PP-OCRv3', output='./output', precision='fp32', process_id=0, rec=True, rec_algorithm='SVTR_LCNet', rec_batch_num=6, rec_char_dict_path='/home/yys/.local/lib/python3.8/site-packages/paddleocr/ppocr/utils/ppocr_keys_v1.txt', rec_image_shape='3, 48, 320', rec_model_dir='/home/yys/.paddleocr/whl/rec/ch/ch_PP-OCRv3_rec_infer', recovery=False, save_crop_res=False, save_log_path='./log_output/', save_pdf=False, scales=[8, 16, 32], ser_dict_path='../train_data/XFUND/class_list_xfun.txt', ser_model_dir=None, shape_info_filename=None, show_log=True, sr_batch_num=1, sr_image_shape='3, 32, 128', sr_model_dir=None, structure_version='PP-Structurev2', table=True, table_algorithm='TableAttn', table_char_dict_path=None, table_max_len=488, table_model_dir=None, total_process_num=1, type='ocr', use_angle_cls=True, use_dilation=False, use_gpu=False, use_mp=False, use_onnx=False, use_pdserving=False, use_space_char=True, use_tensorrt=False, use_xpu=False, vis_font_path='./doc/fonts/simfang.ttf', warmup=False)
[2022/10/06 19:27:34] ppocr DEBUG: dt_boxes num : 1, elapse : 0.06911945343017578
[2022/10/06 19:27:34] ppocr DEBUG: cls num : 1, elapse : 0.011980772018432617
[2022/10/06 19:27:34] ppocr DEBUG: rec_res num : 1, elapse : 0.16700196266174316
[[[12.0, 28.0], [426.0, 27.0], [426.0, 52.0], [12.0, 53.0]], ('再浇水2.049%,鸭蛋包邮送到家', 0.9118813872337341)]
4.2.2.2 获取中心坐标
获取中心坐标,例如手机首页系统工具四个坐标
a = [[[838.0, 1472.0], [985.0, 1472.0], [985.0, 1514.0], [838.0, 1514.0]], ('系统工具', 0.9243237376213074)]
if a[-1][0] == '系统工具':
    x = (a[0][0][0] + a[0][2][0]) / 2
    y = (a[0][0][1] + a[0][2][1]) / 2
    print(x, y)
感谢提供错误信息,以下是问题的详细解释和解决方法:
问题 1:protobuf版本过高的问题
错误信息:
TypeError: Descriptors cannot not be created directly.
If this call came from a _pb2.py file, your generated code is out of date and must be regenerated with protoc >= 3.19.0.
If you cannot immediately regenerate your protos, some other possible workarounds are:
1. Downgrade the protobuf package to 3.20.x or lower.
2. Set PROTOCOL_BUFFERS_PYTHON_IMPLEMENTATION=python (but this will use pure-Python parsing and will be much slower).
解决方法:
这个问题是由于protobuf版本过高引起的。为了解决这个问题,你可以按照下面的步骤降级protobuf到3.19.0版本:
pip install protobuf==3.19.0
问题 2:libpaddle模块加载问题
错误信息:
ImportError: DLL load failed while importing libpaddle: 找不到指定的模块。
Error: Can not import paddle core while this file exists: D:\python\lib\site-packages\paddle\fluid\libpaddle.pyd
解决方法:
这个问题通常与Microsoft Visual C++ Redistributable相关。你需要安装VC_redist.x64来解决这个问题。你可以从Microsoft的官方下载中心下载并安装VC_redist.x64。请确保选择适合你操作系统位数(64位)的版本。安装完成后,重启计算机以确保库的正确加载。
如果你在安装VC_redist.x64后仍然遇到问题,请确保你的系统是最新的,并且没有其他与库加载相关的问题。如果问题仍然存在,你可能需要联系PaddleOCR或相关模块的支持团队以获取更多帮助。
可以从Microsoft的官方网站下载VC_redist.x64(Microsoft Visual C++ Redistributable)的安装程序。以下是下载链接:
Microsoft Visual C++ Redistributable for Visual Studio 2015, 2017, and 2019 (64位)
请确保选择适合你操作系统位数(64位)的版本,并下载安装程序。安装完成后,重启计算机以确保库的正确加载。这应该能够解决“ImportError: DLL load failed while importing libpaddle”的问题。
也可以直接下载:https://aka.ms/vs/17/release/vc_redist.x64.exe
问题 3:ImportError: libssl.so.1.1: cannot open shared object file: No such file or directory
错误信息:
root@48a9920840eb:/home/yys/mobile# paddleocr
Error: Can not import paddle core while this file exists: /usr/local/lib/python3.10/dist-packages/paddle/fluid/libpaddle.so
Traceback (most recent call last):
  File "/usr/local/bin/paddleocr", line 5, in <module>
    from paddleocr.paddleocr import main
  File "/usr/local/lib/python3.10/dist-packages/paddleocr/__init__.py", line 14, in <module>
    from .paddleocr import *
  File "/usr/local/lib/python3.10/dist-packages/paddleocr/paddleocr.py", line 21, in <module>
    import paddle
  File "/usr/local/lib/python3.10/dist-packages/paddle/__init__.py", line 31, in <module>
    from .framework import monkey_patch_variable
  File "/usr/local/lib/python3.10/dist-packages/paddle/framework/__init__.py", line 17, in <module>
    from . import random  # noqa: F401
  File "/usr/local/lib/python3.10/dist-packages/paddle/framework/random.py", line 17, in <module>
    from paddle import fluid
  File "/usr/local/lib/python3.10/dist-packages/paddle/fluid/__init__.py", line 36, in <module>
    from . import framework
  File "/usr/local/lib/python3.10/dist-packages/paddle/fluid/framework.py", line 35, in <module>
    from . import core
  File "/usr/local/lib/python3.10/dist-packages/paddle/fluid/core.py", line 356, in <module>
    raise e
  File "/usr/local/lib/python3.10/dist-packages/paddle/fluid/core.py", line 269, in <module>
    from . import libpaddle
ImportError: libssl.so.1.1: cannot open shared object file: No such file or directory
解决方法:
看起来你在导入Python环境中的paddle模块时遇到了问题。这个错误可能由多种原因引起。以下是一些可能的解决方案:
- 重新安装PaddlePaddle:错误信息表明你当前的PaddlePaddle安装可能存在问题。你可以尝试强制重新安装特定版本的PaddlePaddle。例如,你可以使用以下命令重新安装PaddlePaddle 2.5版本(这个随着python版本可能不同):
python -m pip install --force-reinstall paddlepaddle==2.5.2
如果这个方法不起作用,你也可以尝试降级到2.4.2版本:
python -m pip install --force-reinstall paddlepaddle==2.4.2
-
检查冲突文件:错误信息显示无法导入文件
/usr/local/lib/python3.10/dist-packages/paddle/fluid/libpaddle.so。你可能需要检查这个文件是否存在,以及它是否正在引起冲突。 -
缺少依赖项:错误信息
ImportError: libssl.so.1.1: cannot open shared object file: No such file or directory表明你的系统中缺少libssl.so.1.1库。你可能需要安装这个库。
请记住,根据你的需求,将命令中的版本号替换为适合你的版本。
请注意,这些都是根据你提供的错误信息给出的一般建议,实际的解决方案可能会根据你的具体设置和环境有所不同。
问题 4:FatalError: Illegal instruction is detected by the operating system.
apt-get install swig
如果不装swig下面命令可能编译PyMuPDF报错
pip install --no-cache-dir paddlepaddle==2.5.2 paddleocr==2.7.0.3 -i https://pypi.tuna.tsinghua.edu.cn/simple
sys.argv为1时候批量本地图片识别,如果其他屏幕截图
import cv2
import pyperclip
import numpy as np
from tips import Taskbar
import os
import uiautomator2 as u2
import win32api
import win32gui
from win32con import WM_INPUTLANGCHANGEREQUEST
import sys
t1 = Taskbar()
def change_language(lang="EN"):
"""
切换语言
:param lang: EN––English; ZH––Chinese
:return: bool
"""
LANG = {
"ZH": 0x0804,
"EN": 0x0409
}
hwnd = win32gui.GetForegroundWindow()
language = LANG[lang]
result = win32api.SendMessage(
hwnd,
WM_INPUTLANGCHANGEREQUEST,
0,
language
)
if not result:
return True
class AutoCV2():
def __init__(self, base_path, ip='192.168.31.41', port=':5555'):
super(AutoCV2, self).__init__()
# self.ip = ip
# self.port = port
# os.system("adb connect %s%s" % (ip, port))
# self.d = u2.connect(ip)
self.base_path = base_path
self.name = ''
self.origin_point = [0, 0]
self.color_tpl = {
'R': (0, 255, 0),
'T': (0, 0, 255),
'F': (0, 0, 255),
'X': (0, 255, 255),
'Y': (255, 255, 0),
}
self.color = (0, 0, 0)
self.wbox = [0, 0, -1, -1]
self.mode = 'N'
self.drawing = False
self.ix = -1
self.iy = -1
# self.img_o = cv2.cvtColor(np.asanyarray(grab()), cv2.COLOR_RGB2BGR)
# "F:\显示.png"
# path = self.d.screenshot(self.ip + ".png")
# 截取全屏图像
from PIL import ImageGrab
screenshot = ImageGrab.grab()
if len(sys.argv) == 2:
if sys.argv[1] == '1':
print("批量识别")
# path = r'D:\Nextcloud\Photos'
files = os.listdir(self.base_path)
for file in files:
if file.endswith('.png'):
abs_file = os.path.join(self.base_path, file)
self.paddleocr_pic_to_text(abs_file)
change_language(lang="ZH")
exit()
else:
print("截图识别")
# 保存图像
path = r"D:\screenshot.png" # 指定保存路径和文件名
screenshot.save(path)
self.img_o = cv2.imdecode(np.fromfile(path, dtype=np.uint8), 1)
self.img_x = self.img_o.copy()[self.wbox[1]:self.wbox[3], self.wbox[0]:self.wbox[2], :]
self.img = None
self.roi = []
self.offset = []
self.tpl_pth = ''
self.tpl_pth_2 = ''
self.tpl = np.array([])
self.tpl_2 = np.array([])
self.offset_x = -1
self.offset_y = -1
self.flag = 0
self.horizontal = 0
self.vertical = 0
self.flag_hor = 0
self.flag_ver = 0
self.dx = 0
self.dy = 0
self.sx = 0
self.sy = 0
self.dst = 0
self.x1 = 0
self.y1 = 0
self.x2 = 0
self.y2 = 0
self.x3 = 0
self.y3 = 0
self.f1 = 0
self.f2 = 0
self.scroll_har = 0
self.scroll_var = 0
self.img_w = 0
self.img_h = 0
self.img = 0
self.dst1 = 0
self.win_w = 0
self.win_h = 0
self.show_w = 0
self.show_h = 0
self.scroll_w = 0
def copy_text(self, result):
import pyperclip
# 按照 y 坐标进行排序
# result.sort(key=lambda x: x[0][1]) # 按照 y 坐标升序排序
# 创建一个空字符串,用于存储所有识别结果的文本
all_text = ""
# 记录上一个文本的 y 坐标
prev_y = None
# 遍历 result 列表
for item in result:
# 提取坐标和识别的文字
coordinates = item[0]
text = item[1][0] # 提取元组中的第一个元素,即识别的文字
# 判断是否需要换行
if prev_y is not None and coordinates[0][1] != prev_y:
all_text += "\n"
# 将识别的文字拼接到总文本中,使用制表符和空格分隔
all_text += f"{text}\t"
# 更新上一个文本的 y 坐标
prev_y = coordinates[0][1]
# 设置总文本到剪贴板位置
pyperclip.copy(all_text)
# 输出总文本
print("已设置以下内容到剪贴板位置:")
print(all_text)
open(os.path.join(self.base_path, 'result.txt'), 'a', encoding='utf-8').write(all_text + '\n\n\n')
def paddleocr_pic_to_text(self, pic_path=None):
from paddleocr import PaddleOCR
ocr = PaddleOCR(use_angle_cls=True, lang="ch") # need to run only once to download and load model into memory
result = ocr.ocr(pic_path, cls=True)
dic = {}
dic_center_text = {}
all_text = ''
if len(result) == 1:
# 新版的paddleocr结构不同
result = result[0]
print(result)
self.copy_text(result)
import shutil
mydir = os.path.join(self.base_path, '移动')
if not os.path.exists(mydir):
os.makedirs(mydir)
move_path = os.path.join(mydir, os.path.basename(pic_path))
shutil.move(pic_path, move_path)
# os.remove(pic_path)
# print("删除%s文件" % pic_path)
print("移动%s文件" % move_path)
def draw_op(self, event, x, y, flags, param):
self.img = self.img_o.copy()
if event == cv2.EVENT_LBUTTONDOWN:
self.drawing = True
self.ix, self.iy = x, y + self.dy
print('self.ix, self.iy', self.ix, self.iy)
if self.flag == 0:
if self.horizontal and 0 < x < self.win_w and self.win_h - self.scroll_w < y < self.win_h:
self.flag_hor = 1 # 鼠标在水平滚动条上
elif self.vertical and self.win_w - self.scroll_w < x < self.win_w and 0 < y < self.win_h:
self.flag_ver = 1 # 鼠标在垂直滚动条上
if self.flag_hor or self.flag_ver:
self.flag = 1 # 进行滚动条垂直
self.x1, self.y1, self.x2, self.y2, self.x3, self.y3 = x, y, self.dx, self.dy, self.sx, self.sy #
elif event == cv2.EVENT_MOUSEMOVE:
if self.drawing:
if self.mode == 'R':
cv2.rectangle(self.img, (self.ix, self.iy), (x, y), self.color, 2)
if self.mode == 'T':
# 从起点开始
cv2.rectangle(self.img, (self.ix, self.iy), (x, y + self.dy), self.color, 2)
if self.mode == 'X':
cv2.rectangle(self.img, (self.ix, self.iy), (x, y), self.color, 2)
if self.mode == 'Y':
cv2.rectangle(self.img, (self.ix, self.iy), (x, y), self.color, 2)
if self.mode == 'F':
cv2.circle(self.img, (x, y), 5, self.color, -1)
elif event == cv2.EVENT_LBUTTONUP:
self.drawing = False
if self.mode == 'R':
self.roi = [self.ix, self.iy, x, y]
cv2.rectangle(self.img_o, (self.ix, self.iy), (x, y), self.color, 2)
if self.mode == 'T':
# 绘制范围
self.tpl = self.img_x[self.iy:(y + self.dy), self.ix:x, :]
cv2.rectangle(self.img_o, (self.ix, self.iy), (x, y + self.dy), self.color, 2)
self.m_x = self.ix + self.tpl.shape[1] // 2
self.m_y = self.iy + self.tpl.shape[0] // 2
# print('myx, myy',self.m_x, self.m_y)
if self.mode == 'X':
self.tpl = self.img_x[self.iy:y, self.ix:x, :]
cv2.rectangle(self.img_o, (self.ix, self.iy), (x, y), self.color, 2)
self.m_x = self.ix + self.tpl.shape[1] // 2
# self.m_y = self.iy + self.tpl.shape[0] // 2
if self.mode == 'Y':
self.tpl_2 = self.img_x[self.iy:y, self.ix:x, :]
cv2.rectangle(self.img_o, (self.ix, self.iy), (x, y), self.color, 2)
# self.m_x = self.ix + self.tpl.shape[1] // 2
self.m_y = self.iy + self.tpl.shape[0] // 2
if self.mode == 'F':
cv2.circle(self.img_o, (x, y), 5, (0, 0, 255), -1)
self.offset_x = x - self.m_x
self.offset_y = y - self.m_y
self.offset = [self.offset_x, self.offset_y]
if self.img_h <= self.show_h and self.img_w <= self.show_w:
pass
else:
if event == cv2.EVENT_MOUSEMOVE and (flags & cv2.EVENT_FLAG_LBUTTON): # 按住左键拖曳
if self.flag == 1:
if self.flag_hor:
w = (x - self.x1) / 2 # 移动宽度
self.dx = self.x2 + w * self.f1 # 原图x
if self.dx < 0: # 位置矫正
self.dx = 0
elif self.dx > self.img_w - self.show_w:
self.dx = self.img_w - self.show_w
self.sx = self.x3 + w # 滚动条x
if self.sx < 0: # 位置矫正
self.sx = 0
elif self.sx > self.win_w - self.scroll_har:
self.sx = self.win_w - self.scroll_har
if self.flag_ver:
h = y - self.y1 # 移动高度
self.dy = self.y2 + h * self.f2 # 原图y
if self.dy < 0: # 位置矫正
self.dy = 0
elif self.dy > self.img_h - self.show_h:
self.dy = self.img_h - self.show_h
self.sy = self.y3 + h # 滚动条y
if self.sy < 0: # 位置矫正
self.sy = 0
elif self.sy > self.win_h - self.scroll_var:
self.sy = self.win_h - self.scroll_var
self.dx, self.dy = int(self.dx), int(self.dy)
img1 = self.img[self.dy:self.dy + self.show_h, self.dx:self.dx + self.show_w] # 截取显示图片
print(self.dy, self.dy + self.show_h, self.dx, self.dx + self.show_w)
self.dst = img1.copy()
elif event == cv2.EVENT_LBUTTONUP: # 左键释放
self.flag, self.flag_hor, self.flag_ver = 0, 0, 0
self.x1, self.y1, self.x2, self.y2, self.x3, self.y3 = 0, 0, 0, 0, 0, 0
if self.horizontal and self.vertical:
self.sx, self.sy = int(self.sx), int(self.sy)
# 对dst1画图而非dst,避免鼠标事件不断刷新使显示图片不断进行填充
self.dst1 = cv2.copyMakeBorder(self.dst, 0, self.scroll_w, 0, self.scroll_w, cv2.BORDER_CONSTANT,
value=[255, 255, 255])
cv2.rectangle(self.dst1, (self.sx, self.show_h), (int(self.sx + self.scroll_har), self.win_h),
(181, 181, 181), -1) # 画水平滚动条
cv2.rectangle(self.dst1, (self.show_w, self.sy), (self.win_w, int(self.sy + self.scroll_var)),
(181, 181, 181), -1) # 画垂直滚动条
elif self.horizontal == 0 and self.vertical:
self.sx, self.sy = int(self.sx), int(self.sy)
self.dst1 = cv2.copyMakeBorder(self.dst, 0, 0, 0, self.scroll_w, cv2.BORDER_CONSTANT,
value=[255, 255, 255])
cv2.rectangle(self.dst1, (self.show_w, self.sy), (self.win_w, int(self.sy + self.scroll_var)),
(181, 181, 181), -1) # 画垂直滚动条
elif self.horizontal and self.vertical == 0:
self.sx, self.sy = int(self.sx), int(self.sy)
self.dst1 = cv2.copyMakeBorder(self.dst, 0, self.scroll_w, 0, 0, cv2.BORDER_CONSTANT,
value=[255, 255, 255])
cv2.rectangle(self.dst1, (self.sx, self.show_h), (int(self.sx + self.scroll_har), self.win_h),
(181, 181, 181), -1) # 画水平滚动条
cv2.imshow("img", self.dst1)
cv2.waitKey(1)
def main_fun(self):
cv2.namedWindow('img')
content = """
auto_cv 说明:
1.按r绘制roi,绿色框线选者区域
2.按esc退住出绘制,
3.按c清除绘制
"""
t1.showBaloon(title='截图提示', content=content)
self.img = self.img_o.copy()
img_original = self.img # 此处需换成大于self.img_w * self.img_h的图片
# img_original_h, img_original_w = img_original.shape[0:2] # 原图宽高
cv2.namedWindow('img', cv2.WINDOW_NORMAL)
# cv2.moveWindow("img", 300, 100)
self.img = img_original.copy()
self.img_h, self.img_w = self.img.shape[0:2] # 原图高宽
import win32api
import win32con
screen_w = win32api.GetSystemMetrics(win32con.SM_CXSCREEN)
screen_h = win32api.GetSystemMetrics(win32con.SM_CYSCREEN)
print('图片高=%s ,图片宽度=%s, 显示器高度=%s, 显示器宽度=%s' % (self.img_h, self.img_w, screen_h, screen_w))
if self.img_h >= screen_h:
self.show_h = int(screen_h * 0.8)
else:
self.show_h = self.img_h
if self.img_w >= screen_w:
self.show_w = screen_w
else:
self.show_w = self.img_w
print("显示高度=%s, 显示宽度=%s" % (self.show_h, self.show_w))
# show_h, show_w = y, 800 # 显示图片高宽
self.horizontal, self.vertical = 0, 0 # 原图是否超出显示图片
self.dx, self.dy = 0, 0 # 显示图片相对于原图的坐标
self.scroll_w = 16 # 滚动条宽度
self.sx, self.sy = 0, 0 # 滚动块相对于滚动条的坐标
self.flag, self.flag_hor, self.flag_ver = 0, 0, 0 # 鼠标操作类型,鼠标是否在水平滚动条上,鼠标是否在垂直滚动条上
self.x1, self.y1, self.x2, self.y2, self.x3, self.y3 = 0, 0, 0, 0, 0, 0 # 中间变量
self.win_w, self.win_h = self.show_w + self.scroll_w, self.show_h + self.scroll_w # 窗口宽高
self.scroll_har, self.scroll_var = self.win_w * self.show_w / self.img_w, self.win_h * self.show_h / self.img_h # 滚动条水平垂直长度
if self.img_w - self.show_w <= 0:
result_w = 0
else:
result_w = (self.img_w - self.show_w) / (self.win_w - self.scroll_har)
if self.img_h - self.show_h <= 0:
result_h = 0
else:
result_h = (self.img_h - self.show_h) / (self.win_h - self.scroll_var)
self.f1, self.f2 = result_w, result_h # 原图可移动部分占滚动条可移动部分的比例
cv2.resizeWindow("img", self.win_w, self.win_h)
cv2.setMouseCallback('img', self.draw_op)
flag = 0
while (1):
# cv2.imshow('img', self.img)
if self.img_h <= self.show_h and self.img_w <= self.show_w:
# 满足,不需要滚动条
cv2.imshow("img", self.img)
else:
if self.img_w > self.show_w:
self.horizontal = 1
if self.img_h > self.show_h:
self.vertical = 1
# print(self.horizontal, self.vertical)
i = self.img[self.dy:self.dy + self.show_h, self.dx:self.dx + self.show_w]
self.dst = i.copy()
k = cv2.waitKey(1) & 0xFF
if k == ord('m'):
self.mode = "M"
elif k == ord('n'):
self.mode = "N"
elif k == ord('r'):
self.mode = "R"
self.color = self.color_tpl.get(self.mode)
elif k == ord('f'):
self.mode = "F"
t1.showBaloon(title='截图提示', content='偏移点')
self.color = self.color_tpl.get(self.mode)
elif k == ord('t'):
self.mode = "T"
self.color = self.color_tpl.get(self.mode)
t1.showBaloon(title='截图提示', content='开始截模板图片,完成后按ESC退出\n')
elif k == ord('x'):
self.mode = "X"
self.color = self.color_tpl.get(self.mode)
elif k == ord('y'):
self.mode = "Y"
self.color = self.color_tpl.get(self.mode)
elif k == ord('c'):
self.img = self.img_x.copy()
self.img_o = self.img_x.copy()
elif k == 27:
break
cv2.destroyAllWindows()
# print('self.tpl=' , len(self.tpl))
if self.tpl.any():
cv2.imshow(self.name, self.tpl)
while True:
k = cv2.waitKey(1) & 0xFF
if k == ord('s'):
import re
import time
# 获取当前时间
current_time = time.localtime()
# 组合年月日时分秒字符串
time_string = time.strftime("%Y年%m月%d日%H时%M分%S秒", current_time)
pic_name = 'screen' + time_string
self.tpl_pth = os.path.join(self.base_path, f'{pic_name}.png')
print(self.tpl_pth)
t1.showBaloon(title='截图提示', content='保存成功' + ",按ESC退出\n" + self.tpl_pth)
cv2.imencode('.png', self.tpl)[1].tofile(self.tpl_pth)
cv2.destroyAllWindows()
print("结束")
change_language(lang="ZH")
self.paddleocr_pic_to_text(self.tpl_pth)
exit()
# change_language(lang="EN")
# print("循环")
if k == 27:
break
cv2.destroyAllWindows()
return self.tpl_pth, self.tpl_pth_2, self.roi, self.offset
if __name__ == '__main__':
change_language(lang="EN")
argv = sys.argv
# print(argv)
port = ''
if len(argv) == 2:
ip = argv[1]
elif len(argv) == 3:
ip = argv[1]
port = argv[2]
else:
ip = '192.168.31.41'
if not port:
port = ':5555'
AutoCV2(r'D:\Nextcloud\Photos', ip, port=port).main_fun()
print("结束")
4.5 基于 Tkinter 和 PaddleOCR 的屏幕截图文字识别应用
import tkinter as tk
from tkinter import Toplevel, Label
from PIL import ImageGrab
import numpy as np
import cv2
from paddleocr import PaddleOCR
import pyautogui

class ScreenShotOCR:
    def __init__(self, root):
        self.root = root
        self.sx = self.sy = self.ex = self.ey = 0
        self.win = None
        self.canvas = None
        self.ocr = PaddleOCR(use_angle_cls=True, lang='ch')
        self.root.withdraw()  # 隐藏主窗口

        self.start_screenshot()

    def start_screenshot(self):
        self.win = Toplevel(self.root)
        print(1)
        # try:
        #     self.win.attributes("-fullscreen", True)
        # except Exception as e:
        #     print(f"Setting fullscreen mode failed: {e}")
        self.win.overrideredirect(True)
        self.win.geometry("{0}x{1}+0+0".format(self.win.winfo_screenwidth(), self.win.winfo_screenheight()))

        print(3)
        self.win.attributes('-alpha', 0.3)  # 透明度

        self.win.bind("<Button-1>", self.on_button_press)
        self.win.bind("<B1-Motion>", self.on_move)
        self.win.bind("<ButtonRelease-1>", self.on_button_release)

    def on_button_press(self, event):
        # 使用pyautogui获取全局鼠标位置
        self.sx, self.sy = pyautogui.position()

    def on_move(self, event):
        if self.canvas:
            self.canvas.destroy()
        # 更新鼠标位置
        self.ex, self.ey = pyautogui.position()
        self.canvas = tk.Canvas(self.win, cursor="cross")
        self.canvas.pack(fill=tk.BOTH, expand=True)
        self.canvas.create_rectangle(self.sx, self.sy, self.ex, self.ey, outline='red')

    def on_button_release(self, event):
        self.win.destroy()
        self.capture_screen()

    def capture_screen(self):
        x1 = min(self.sx, self.ex)
        y1 = min(self.sy, self.ey)
        x2 = max(self.sx, self.ex)
        y2 = max(self.sy, self.ey)
        # print(self.sx, self.ex, self.sy, self.ey)
        # print(x1, y1, x2, y2)
        img = ImageGrab.grab(bbox=(x1, y1, x2, y2))
        img_np = np.array(img)
        img_cv = cv2.cvtColor(img_np, cv2.COLOR_RGB2BGR)
        # try:
        #     img = './img/screenshot.png'
        #     cv2.imwrite(img, img_cv)
        #     print(img)
        # except:
        #     print("截图失败")

        self.do_ocr(img_cv)

    def copy_text(self, result):
        import pyperclip
        # 按照 y 坐标进行排序
        # result.sort(key=lambda x: x[0][1])  # 按照 y 坐标升序排序

        # 创建一个空字符串,用于存储所有识别结果的文本
        all_text = ""

        # 记录上一个文本的 y 坐标
        prev_y = None

        # 遍历 result 列表
        print(result)
        for item in result[0]:
            # 提取坐标和识别的文字
            # print(item)
            coordinates = item[0][0][0]
            text = item[-1][0]  # 提取元组中的第一个元素,即识别的文字
            print(text)
            # 判断是否需要换行
            if prev_y is not None and coordinates != prev_y:
                all_text += "\n"

            # 将识别的文字拼接到总文本中,使用制表符和空格分隔
            all_text += f"{text}\t"

            # 更新上一个文本的 y 坐标
            prev_y = coordinates
        # 设置总文本到剪贴板位置
        pyperclip.copy(all_text)

    def do_ocr(self, img_cv):
        # 假设这里img_cv是你的图像变量,并且你已经正确调用了OCR进行识别
        result = self.ocr.ocr(img_cv, cls=True)  # 假设这是你调用OCR的方式
        # print('result=', result)
        # 改正之前的代码,正确地提取文本内容
        self.copy_text(result)
        self.root.destroy()  # 关闭窗口


    def show_result(self, text):
        result_win = Toplevel(self.root)
        result_win.title("OCR结果")
        Label(result_win, text=text, justify=tk.LEFT).pack(fill=tk.BOTH, expand=True)
        # 重新显示主窗口
        self.root.deiconify()

if __name__ == "__main__":
    root = tk.Tk()
    app = ScreenShotOCR(root)
    root.mainloop()
下面用tk获取坐标,不用pyautogui,但是在rdp远程获取坐标不准确 ,
tkinter的winfo_pointerx和winfo_pointery方法可能无法准确获取鼠标的位置,因为这些方法获取的是本地系统的鼠标位置,而不是远程系统的鼠标位置。尝试使用
pyautogui库,它可以在多种操作系统和环境下准确地获取鼠标的位置。如果你在使用 RDP 时遇到问题,可能需要检查你的 RDP 客户端的设置,或者尝试使用其他的远程桌面工具。def on_button_press(self, event): # 使用tkinter获取全局鼠标位置 self.sx, self.sy = self.root.winfo_pointerx(), self.root.winfo_pointery() def on_move(self, event): if self.canvas: self.canvas.destroy() # 更新鼠标位置 self.ex, self.ey = self.root.winfo_pointerx(), self.root.winfo_pointery() self.canvas = tk.Canvas(self.win, cursor="cross") self.canvas.pack(fill=tk.BOTH, expand=True) self.canvas.create_rectangle(self.sx, self.sy, self.ex, self.ey, outline='red')
这段代码定义了一个名为 ScreenShotOCR 的类,用于创建一个基于 tkinter 和 PaddleOCR 的屏幕截图文字识别应用。用户可以通过这个应用选择屏幕上的一个区域,应用会对这个区域内的图像进行文字识别,并将识别结果复制到剪贴板中。下面是代码的主要功能描述和组成部分:
-
初始化 (
__init__方法): 初始化主窗口root,设置初始截图坐标,初始化 PaddleOCR 用于中文识别(包含角度分类器),并隐藏主窗口。 -
开始截图 (
start_screenshot方法): 创建一个全屏的顶级窗口win用于选择截图区域。设置窗口为全屏无边框,并设置透明度。绑定鼠标事件以响应用户操作。 -
鼠标按下 (
on_button_press方法): pyautogui记录鼠标按下的位置。 -
鼠标移动 (
on_move方法): 随着鼠标移动,动态创建并更新一个红色矩形框以显示当前选择的区域。 -
鼠标释放 (
on_button_release方法): 鼠标释放时销毁选择框窗口并调用capture_screen方法来截取并处理选定区域的图像。 -
截取屏幕 (
capture_screen方法): 使用ImageGrab.grab方法根据用户选定的坐标截取屏幕区域,然后将截取的图像转换为 OpenCV 格式并传递给 OCR 方法进行识别。 -
执行 OCR (
do_ocr方法): 对传入的图像执行 OCR 操作,获取识别结果,并调用copy_text方法处理结果。 -
复制文本 (
copy_text方法): 处理 OCR 结果,将识别出的文本复制到剪贴板。 -
显示结果 (
show_result方法): 虽然在这个版本的代码中未被直接调用,但这个方法的目的是创建一个新的顶级窗口以显示 OCR 的结果文本。
整个应用流程是用户通过图形界面选择屏幕上的一部分进行截图,然后应用自动进行文字识别,并将识别结果复制到剪贴板。
本文作者: 永生
本文链接: https://yys.zone/detail/?id=145
版权声明: 本博客所有文章除特别声明外,均采用 CC BY-NC-SA 4.0 许可协议。转载请注明出处!
评论列表 (0 条评论)