linux 使用 Arduino 客户端和编译运行两种方式
1.1安装 arduino ide
sudo apt install arduino
如果虚拟机首先连接虚拟机(注意虚拟机连过一次电脑不能连了,重启电脑才可以)

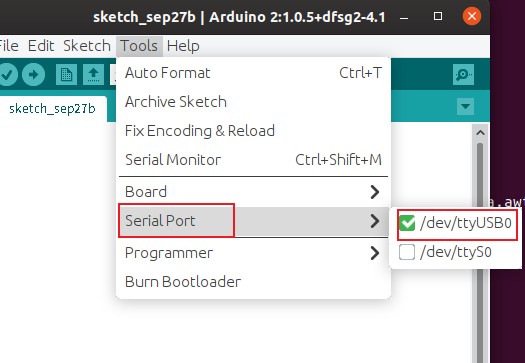
1.2 然后查看端口
dmesg | grep ttyS*
yys@yys:~/desk/blink$ dmesg | grep ttyS*
[ 0.200384] printk: console [tty0] enabled
[ 1.460665] 00:05: ttyS0 at I/O 0x3f8 (irq = 4, base_baud = 115200) is a 16550A
[ 518.617003] usb 3-3.1: ch341-uart converter now attached to ttyUSB0
可以看出端口为ttyUSB0
然后修改串口路径
vim ~/.arduino/preferences.txt
修改为(大概第68行)
serial.port=/dev/ttyUSB0
board=mega2560
browser=mozilla
browser.linux=mozilla
console=true
console.auto_clear=true
console.error.file=stderr.txt
console.length=500
console.lines=4
console.output.file=stdout.txt
editor.antialias=false
editor.caret.blink=true
editor.divider.size=0
editor.divider.size.windows=2
editor.external=false
editor.font=Monospaced,plain,12
editor.font.macosx=Monaco,plain,10
editor.indent=true
editor.invalid=false
editor.keys.alternative_cut_copy_paste=true
editor.keys.alternative_cut_copy_paste.macosx=false
editor.keys.home_and_end_travel_far=false
editor.keys.home_and_end_travel_far.macosx=true
editor.keys.shift_backspace_is_delete=true
editor.languages.current=
editor.tabs.expand=true
editor.tabs.size=2
editor.window.height.default=600
editor.window.height.min=290
editor.window.width.default=500
editor.window.width.min=400
export.applet.separate_jar_files=false
export.application.fullscreen=false
export.application.platform=true
export.application.platform.linux=true
export.application.platform.macosx=true
export.application.platform.windows=true
export.application.stop=true
export.delete_target_folder=true
last.screen.height=926
last.screen.width=1918
last.sketch.count=0
last.sketch0.location=709,163,500,600,416
last.sketch0.path=/home/yys/sketchbook/sketch_sep27a/sketch_sep27a.ino
launcher=xdg-open
platform.auto_file_type_associations=true
preproc.color_datatype=true
preproc.enhanced_casting=true
preproc.imports.list=java.applet.*,java.awt.Dimension,java.awt.Frame,java.awt.event.MouseEvent,java.awt.event.KeyEvent,java.awt.event.FocusEvent,java.awt.Image,java.io.*,java.net.*,java.text.*,java.util.*,java.util.zip.*,java.util.regex.*
preproc.output_parse_tree=false
preproc.save_build_files=false
preproc.substitute_floats=true
preproc.substitute_unicode=true
preproc.web_colors=true
programmer=arduino:avrispmkii
run.display=1
run.options=
run.options.memory=false
run.options.memory.initial=64
run.options.memory.maximum=256
run.present.bgcolor=#666666
run.present.exclusive=false
run.present.exclusive.macosx=true
run.present.stop.color=#cccccc
run.window.bgcolor=#DFDFDF
serial.databits=8
serial.debug_rate=9600
serial.parity=N
serial.port=/dev/ttyUSB0
serial.stopbits=1
sketchbook.path=/home/yys/sketchbook
target=arduino
update.check=true
update.id=-2207942161808906792
update.last=1601168844976
upload.using=bootloader
upload.verify=true
1.3.选择板子类型

1.4 port 刚才填写的,不然灰色(如果还不行就重新linux或者拔板子)
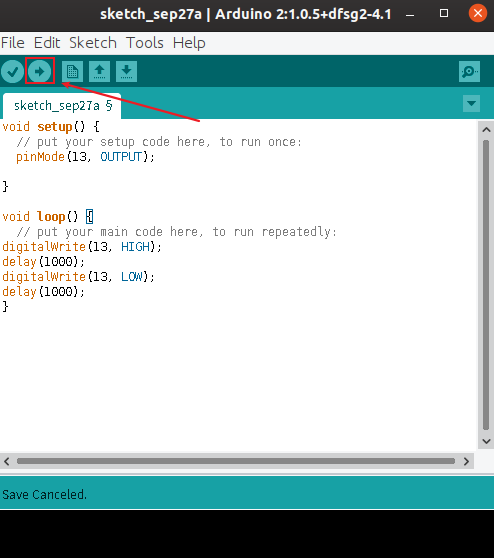
1.5 编写代码
void setup() {
  // put your setup code here, to run once:
  pinMode(13, OUTPUT);

}

void loop() {
  // put your main code here, to run repeatedly:
digitalWrite(13, HIGH);
delay(1000);
digitalWrite(13, LOW);
delay(1000);
}
1, setup():这个函数是开始的时候运行一次
2,loop():这个函数是执行函数,会不断循环工作
3,pinMode(pin,mode):将数字lO口指定为输入或输出
4,digitalWrite(pin,value):将数字IO口输出高电平或低电平
5,delay(ms):暂停执行多少毫秒
6,在英文输入状态时,;分号是作为结束符用
7,在英文输入状态时,//是用作单行注释
点这个运行就可以了
2.linux 命令 Arduino MEGA2560(方法二,推荐)
(发现不能编译多个文件)
2.1使用命令下载
sudo apt-get install arduino arduino-mk
然后
建一个文件夹
mkdir blink
cd blink
拷贝示例代码(闪灯)到当前目录(也可以自己写如上面1.5):
cp /usr/share/doc/arduino-core/examples/01.Basics/Blink/Blink.ino .
创建Makefile文件:
vim Makefile
添加如下代码,串口/dev/ttyUSB0端口(可以根据上面查看板子端口如上面1.2), 板子名字mega2560(在方法一preferences.txt第一行看到这名字)
ARDUINO_LIBS = Ethernet SPI
BOARD_TAG = mega2560
MONITOR_PORT = /dev/ttyUSB0
include /usr/share/arduino/Arduino.mk
保存,退出编辑
可以先编译:
make
如果编译通过没有出错,就可以烧入程序了:
make upload
如果报错拒绝
PermissionError: [Errno 13] Permission denied: '/dev/ttyUSB0'
一般使用USB口,无论USB转什么口,串口之类的,启动时容易出现:/dev/ttyUSB0 permission denied.
因为一般情况下不是root用户,对端口没有权限.
遇到这种情况,我一般这样做:
sudo chmod 777 /dev/ttyUSB0
修改权限为可读可写可执行,但是这种设置电脑重启后,又会出现这种问题,还要重新设置.因此查询资料,可以用下面这条指令:
sudo usermod -aG dialout yys
其中yys是我的用户名,换成你想用USB的用户名即可.把此用户名加入dialout用户组,然后注销下电脑,即可.这样下次重启也不用修改权限了
树形图,(其中build-mega2560是编译后生成文件)
yys@yys:~/desk/blink$ tree
.
├── Blink.ino
├── build-mega2560
│   ├── blink.eep
│   ├── blink.elf
│   ├── blink.hex
│   ├── blink.hex.sizeok
│   ├── Blink.ino.d
│   ├── Blink.ino.o
│   ├── core
│   │   ├── avr-libc
│   │   │   ├── malloc.c.d
│   │   │   ├── malloc.c.o
│   │   │   ├── realloc.c.d
│   │   │   └── realloc.c.o
│   │   ├── CDC.cpp.d
│   │   ├── CDC.cpp.o
│   │   ├── HardwareSerial.cpp.d
│   │   ├── HardwareSerial.cpp.o
│   │   ├── HID.cpp.d
│   │   ├── HID.cpp.o
│   │   ├── IPAddress.cpp.d
│   │   ├── IPAddress.cpp.o
│   │   ├── main.cpp.d
│   │   ├── main.cpp.o
│   │   ├── new.cpp.d
│   │   ├── new.cpp.o
│   │   ├── Print.cpp.d
│   │   ├── Print.cpp.o
│   │   ├── Stream.cpp.d
│   │   ├── Stream.cpp.o
│   │   ├── Tone.cpp.d
│   │   ├── Tone.cpp.o
│   │   ├── USBCore.cpp.d
│   │   ├── USBCore.cpp.o
│   │   ├── WInterrupts.c.d
│   │   ├── WInterrupts.c.o
│   │   ├── wiring_analog.c.d
│   │   ├── wiring_analog.c.o
│   │   ├── wiring.c.d
│   │   ├── wiring.c.o
│   │   ├── wiring_digital.c.d
│   │   ├── wiring_digital.c.o
│   │   ├── wiring_pulse.c.d
│   │   ├── wiring_pulse.c.o
│   │   ├── wiring_shift.c.d
│   │   ├── wiring_shift.c.o
│   │   ├── WMath.cpp.d
│   │   ├── WMath.cpp.o
│   │   ├── WString.cpp.d
│   │   └── WString.cpp.o
│   ├── libcore.a
│   └── libs
│       ├── Ethernet
│       │   ├── Dhcp.cpp.d
│       │   ├── Dhcp.cpp.o
│       │   ├── Dns.cpp.d
│       │   ├── Dns.cpp.o
│       │   ├── EthernetClient.cpp.d
│       │   ├── EthernetClient.cpp.o
│       │   ├── Ethernet.cpp.d
│       │   ├── Ethernet.cpp.o
│       │   ├── EthernetServer.cpp.d
│       │   ├── EthernetServer.cpp.o
│       │   ├── EthernetUdp.cpp.d
│       │   ├── EthernetUdp.cpp.o
│       │   └── utility
│       │       ├── socket.cpp.d
│       │       ├── socket.cpp.o
│       │       ├── w5100.cpp.d
│       │       └── w5100.cpp.o
│       └── SPI
│           ├── SPI.cpp.d
│           └── SPI.cpp.o
└── Makefile

7 directories, 67 files
win10子系统:用的uno
ARDUINO_LIBS = Ethernet SPI
BOARD_TAG = uno
MONITOR_PORT = /dev/ttyS5
include /usr/share/arduino/Arduino.mk
1.Win10的串口,在Linux子系统可以直接使用,其对应关系就是
Win10的COMx对应Linux子系中的/dev/ttySx,
例如: COM30 对应Linux子系统的/dev/ttyS5
有了这个对应关系,在Linux子系统中使用picocom命令:
# picocom -b 115200 /dev/ttyS5
本文作者: 永生
本文链接: https://yys.zone/detail/?id=126
版权声明: 本博客所有文章除特别声明外,均采用 CC BY-NC-SA 4.0 许可协议。转载请注明出处!
评论列表 (0 条评论)